|
|
 |
.gif) |
.gif) |
.gif) |
.gif) |
HP ThinkJet, QuietJet, and QuietJet Plus Printers - Print
Cartridge, Installation, Maintenance and Troubleshooting
Guide |
|

In this document:

Introduction 
This
document provides information on how to install, maintain and
troubleshoot the print cartridges for the HP ThinkJet and HP
QuietJet and QuietJet Plus printers. Refer to the appropriate
sections below. The HP ThinkJet and HP QuietJet printers
support two types of black, disposable print cartridges. Print
cartridge P/N 92261A is used when printing on HP JetPaper and
print cartridge P/N 51604A is used for plain paper.
Installation 
Follow the
steps below:
- Open the
print cartridge container, and take out the print cartridge;
set it aside. If you have the HP QuietJet printer discard
the white/yellow rectangular object and the clear plastic
disc. If you have the HP ThinkJet printer keep the
rectangular (absorber) object.
- Open the
printer's front cover: Reference Figure 1 (below) for the HP
QuietJet, or Figure 2 for the HP ThinkJet.
- Open the HP QuietJet printer's front cover by
placing both hands on the front cover and gently pressing
down on the tear window while pulling the cover toward
you. See Figure 1 above.
- Open the HP ThinkJet printer's cover by lifting the
cover up and toward you. See Figure 2 above.
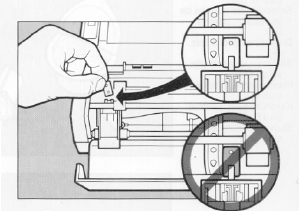
- For the
HP ThinkJet printer, (the HP QuietJet does not have one)
replace the Absorber with the clean one removed from the
Cartridge package. Reference step 1 above and Figure 3
below. A pencil or pen tip may be useful in removing the old
one by placing the tip in the top hole of the pad.
Figure 3:
HP ThinkJet Absorber pad, top insert clean pad, bottom
insert dirty pad.

- Prime the
print cartridge by gently pushing the end of a straightened
paper clip, or similar object, about .25 of an inch into the
hole in the rear of the print cartridge. Gently push the ink
bladder until a drop of ink appears on the face of the print
cartridge. See Figure 4 below. Wipe the print cartridge face
with a soft tissue. Be careful, excessive force will
puncture the bladder! See Figure 4 below.
- Insert upper left: Inserting the paper clip on
bottom of cartridge.
- Insert upper right: recommended distance.
- Center view, cartridge inverted, showing the ink
drop.
- Pull the
carriage cradle latch down toward you. Step 1 in Figure 5
below.
- Set the
print cartridge in the cradle (Step 2 Figure 5 below) and
push the cradle latch back to lock the print cartridge in
place. Step 3 in Figure 5 below.
Maintenance 
To maintain
the print cartridge for optimum use, follow the steps
below.
- Avoid
touching the face of the print head cartridge with
fingers.
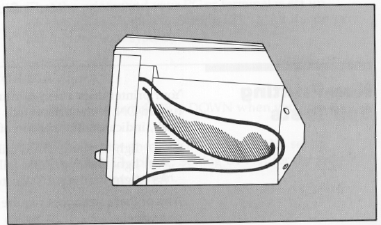
- Periodically check the ink level of the print
cartridge. If the bladder inside the cartridge is collapsed
(See Figure 6 below) then the ink supply is nearly depleted
and the cartridge needs to be replaced.
Figure 6:
Ink cartridge, collapsed bladder

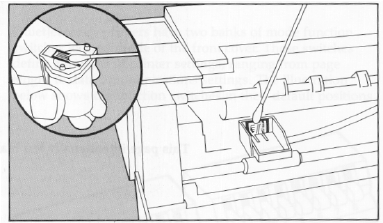
- If the
printer has not been used for a prolonged period, or if dust
has accumulated on the print cartridge face, you may need to
gently wipe the face of the print cartridge with a damp
lint-free cloth to maintain best print quality. See Figure 7
upper left insert below.
Figure 7:
Cartridge cleaning, contacts cleaning.

- Avoid
allowing the print cartridge face to come into prolonged
contact with other materials.
- Use the
print cartridge before the expiration date printed on the
package.
Troubleshooting 
If dots are
missing from a printout, remove the print cartridge from the
printer. Generally, one of five print cartridge problems has
occurred:
- The
Carriage latch is not closed tightly, resulting in a poor
electrical connection between the print cartridge and the
contacts on the printer. (Reference step 6 in the Installing
section.
- Contacts
on the print cartridge or the printer carriage are dirty.
Reference step 3 in the Maintenance Section above.
- For the contacts use a foam or lint-free Q-tip
dampened with water as shown in Figure 7 of the
Maintenance section above.
- Dust is
clogging the print cartridge faceplate (chrome square area).
See step 3 in the Maintenance section above.
- The print
cartridge requires priming. Perform Step 4 of the
installation section above. Reference Figure 4 above.
- The print
cartridge is out (or is running out) of ink. See step 2 in
the Maintenance section above. Reference Figure 6.
If the
cartridge is replaced and the problem persists, the print head
voltage may be out of specification, causing damage to the
print cartridges. Contact an authorized repair technician for
assistance.
Copyright (C) Hewlett-Packard Co.
1999
This information is subject to change without notice
and
is provided "as is" with no
warranty.
Hewlett-Packard shall not be liable for any
direct,
indirect, special, incidental or consequential
damages
in connection with the use of this
material.
| |
.gif) |
| still not
finding what you're looking for? |
|
|

|
 | |
