 |
|
|
|
Quick Start Guide for
WorldDesk Server for Windows NT
(Cubix Document 829B)
This procedure describes how to install the WorldDesk Server and create a basic configuration for dial-in and dial-out operation. Detailed discussion of the WorldDesk family of products, their installation and configuration is provided in The WorldDesk System Administrator’s Guide, DOC827.
WorldDesk Server software must be installed on a Windows NT Workstation or Windows NT Advanced Server, version 3.51 or later. If Windows NT is not installed, do so now using the instructions provided by Microsoft.
Before You Begin
Multiport Serial Adapter Cards
WorldDesk Server can use existing COM ports or multiport serial boards from Cubix or third-party vendors. If you use multiport serial boards make sure they are installed and operating correctly before installing WorldDesk Server.
Cubix Multiport Serial Adapters
When installing a Cubix MP-series serial adapter, be sure to assign a unique ID to each adapter using switches 3-8. Switches 1 and 2 control the I/O port assigned for use by the MP adapter, and must be set the same for all MP adapters in the server. Connect the supplied cable to the MP adapter and each modem to be used. Record the I/O port selected below; this information will be required during the software portion of the installation.
IO PORT Selected: o 0X200 o 0X210 o 0X300 o 0X310
Detailed configuration and specifications are provided in DOC 776, MP 2008 Board Installation Guide.
Third-Party Mulitport Serial Adapters
Install the board(s) and their associated drivers according to the manufacturer’s instructions. Verify their operation prior to installation of WorldDesk Server software.
Installation Procedure
This guide assumes you are either installing WorldDesk Server for the first time. If you have previously installed WorldDesk Server, a "Partial Installation" option is provided to allow you to selectively install components.
| Window Header | User Response/Selection |
| Welcome | <nothing required> |
| License Information | Install 14 Day Demo (see Note 1) |
| Choose Installation Directory | C:\WD |
| Install MP2x08 | Yes |
| I/O Base Address | 0x200 |
| Choose Destination Location(MP) | <nothing required> |
| Select Serial Ports | MP00-MP07 |
| Modem Type | Hayes Compataible |
| Server Number | 1234 |
| Select Protocol | IPX/SPX (see note 2) |
| Continue Installation | <nothing required> |
| Notepad-readme.txt | Fi/e/Exit |
| Setup | Yes, Restart Finish |
Note 1: The WorldDesk Server installation requires registration codes which must be obtained from Cubix Customer Service. You may elect to temporarily forgo the registration process and install the 14-day demo version.
Should you choose to register your WorldDesk Server during installation, record the MAC address and serial number displayed in the License Information window then contact Cubix Customer Service to obtain a valid Product Code and License Number.
Cubix Customer Service
(800)829-0551 (US only) or (702)888-1000
Monday - Friday, 8:00 a.m. to 5:00 p.m. PST
Note 2: WorldDesk Comlink Server can be installed on an NT system using IPX/SPX, TCP/IP or a combination of the two protocols. If the server is installed on a system running TCP/IP only, the cluster will not appear automatically when WorldDesk Manager is started. Select the "Add TCP/IP Cluster" from the System menu list to add a TCP/IP cluster to the WorldDesk Manager network window.
CONFIGURATION
Display Server Cluster
The new WorldDesk Server appears in "WORKGROU" as server "NTWKS" (See Figure 1).
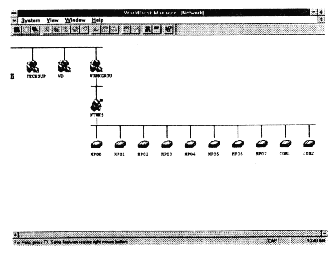
Figure 1 Default Server Configuration
Assign Cluster and Server Names
When the Server reboots, the cluster and server names will appear with the new names.
Configure Commuter Ports
Designate the Master Server
A red square will appear next to the server icon designated as cluster master. The cluster master is responsible for coordinating cluster configuration changes among all servers in the cluster.
Select a User/Password Authentication Method
The default security configuration requires password authentication for all dial-in sessions but no authentication is required for management access or dial-out modem sharing.
You may specify the Comlink Server, Novell NetWare® file servers, or Windows NT systems (Workstation or Server v3.51 or later) for user/password authentication. If you select the Comlink Server you must create user accounts for each dial-in user. User accounts are created via the cluster icon’s "Security/User Management" settings.
If you select a Novell NetWare file server or Windows NT Workstation or Server, user/password validation is performed by the Novell or Windows NT system when a user logs in.
WorldDesk Server is now configured for dial-in and dial-out operation. Install the appropriate WorldDesk dial-in and dial-out clients. Consult the WorldDesk System Administrator’s Guide, DOC 827, for detailed information about advanced server configuration.
This document, and all Web contents, Copyright © 1997 by Cubix Corp., Carson City, NV, USA.