 |
|
|
|
Quick Start Guide for
WorldDesk Client for Windows 3.1x
(Cubix Document 831C)
This procedure describes the installation and basic configuration of WorldDesk Client for Windows 3.1x. Detailed discussion of the WorldDesk family of products, their installation and configuration is provided in The WorldDesk System Administrator’s Guide, DOC827.
The WorldDesk Client for Windows 3.1x software is to be installed only on workstations running Windows 3.1x or Windows for Workgroups 3.11 or later.
Before You Begin
Before installing your WorldDesk Client, check to make sure your have the following:
NOTE: If your WorldDesk System will use DES Challenge/Response password security you should also receive a DES Key Card and instructions for its use.
Installation Procedure
Windows 3.1x
Client diskettes may be provided preconfigured with the following information. Refer to your system administrator to determine the information you may have to enter during the installation.
| Company Name | __________________ |
| User Name | __________________ |
| Client Elements | [ ] Remote Node Client [ ] Applink Client [ ] Dial-out Client |
| Modem COM Port | [ ] COM 1 [ ] COM 2 [ ] COM 3 [ ] COM 4 |
| Maximum Serial Port Speed | [ ] 9600 [ ] 19200 [ ] 38400 [ ] 57600 [ ] 115200 |
| Modem Type | __________________ |
| WorldDesk Server Properties | __________________ Cluster Name __________________ |
| Install IPX/SPX? | [ ] YES [ ] NO If YES, Select Frame Type: [ ] Ethernet 802.2 [ ] Ethernet 802.3 [ ] Ethernet II [ ] Ethernet SNAP |
| Install TCP/IP? | [ ] YES [ ] NO If YES, Select Frame Type: [ ] Ethernet II [ ] Ethernet SNAP |
| Connect to WorldDesk Cluster on boot-up? | [ ] YES [ ] NO [ ] Prompt on boot |
| Load Applink driver on boot-up? | [ ] Yes [ ] No [ ] Prompt on boot |
| Applink Cluster | __________________ |
| User Name | __________________ |
| NT Domain | __________________ |
| Location of Remote Control Application (Applink Client only) | __________________ |
| WorldDesk Installation Location? | Drive: __________ Directory: __________ |
| Change System Files? | [ ] Yes [ ] No, create example files. |
| Location of NetWare drivers? | Drive: __________ Directory: __________ |
During the install process, you may receive the following message; click on OK.
You may use C:\WD\WDLOAD.BAT to load the appropriate network drivers and begin a remote node session. C:\WD\WDUNLOAD.BAT will terminate a remote node session and unload the network drivers.
This message means your workstation is NOT configured to automatically connect to a WorldDesk Server. After installation, follow the instructions for "Manual" or "Prompt When Booting" when you run WorldDesk Client (see "Running WorldDesk Client").
Reboot Now: Remove the client setup diskette from the floppy drive. The workstation will reboot automatically.
Reboot Later: The message "The WorldDesk client installation for Windows 3.1x is complete." will appear.
Windows for Workgroups
The following instructions apply only if you are using Remote Node Client and Windows for Workgroups v3.11. Otherwise, skip to "Running WorldDesk Client."
If prompted for the NET.CFG file path, enter the directory in which the client software was installed during set up.
Using WorldDesk Client
WorldDesk Remote Node
Automatic: The "Cubix WorldDesk Remote Client Service" screen appears; proceed with step 2.
Prompt When Booting: If the "Load the WorldDesk network drivers and connect to a WorldDesk Server [Y, N]?" prompt appears, type Y. When the "Cubix WorldDesk Remote Client Service" screen appears, proceed with step 2.
Manual: If neither of the previous options occurs, you must run WorldDesk manually at the DOS prompt ; Type WDLOAD and press Enter
Several messages display during the connection process. When the following messages appear, you are connected to the WorldDesk cluster:
"The remote connection has been established"
"The MAC address assigned to this session is <MAC address displays>."
WorldDesk Applink
Automatic: When "Cubix WorldDesk Applink Service" appears, Applink has loaded automatically.
Prompt when Booting: When "Load the WorldDesk Applink drivers and connect to a WorldDesk cluster [Y, N]?" appears, type Y to load Applink, or type N to continue booting without installing Applink.
Manual: At the DOS prompt type APPLINK and press Enter.
WorldDesk Dial-out
The WorldDesk Redirector is installed to automatically start on boot-up. If you do not want this, remove the Redirector icon from the Startup group of Program manager.
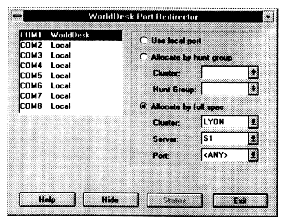
Figure 1
NOTE: WorldDesk dial-out uses logical port COM3 as the default modem port. If you need to redirect to a different port or to specify a particular WorldDesk modem or group of modems follow the instructions provided by your system administrator. You may also need to configure other communication parameters as instructed by your system administrator.
Changing Your Password
Occasionally you may be required to change the password used to access the WorldDesk cluster. To do this, make sure you are logged on to your network and complete the following steps:
Enter User Name: (the name you use to log in to a WorldDesk cluster)
Enter Home Cluster Name: (the WorldDesk cluster you use)
Enter Old Password: (the password you currently use to log in to a WorldDesk cluster)
Enter New Password: (the new password you would like to use to log in to a WorldDesk cluster)
Confirm New Password: (same as the "New Password" field)
This document, and all Web contents, Copyright © 1997 by Cubix Corp., Carson City, NV, USA.