 |
|
|
|
Chapter 2
Hardware
Overview
Cover Removal
Power Supply Bay
Processor Bay
Disk Drive Bay
Auxiliary Junction Panel
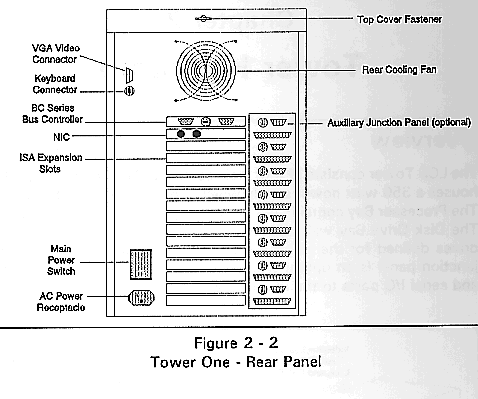
The LCS Tower consists of four main sections. The Power Supply Bay houses a 350 watt power supply which provides power to the Tower. The Processor Bay contains the 16-slot segmented passive backplane. The Disk Drive Bay will support up to the maximum number of disk drives defined for the particular Tower configuration. The auxiliary junction panel is an option which provides a means to bring parallel and serial I/O ports to the rear of the Tower.
Figure 2-1
.LCS Tower - Front Panel
Tower One - Rear Panel
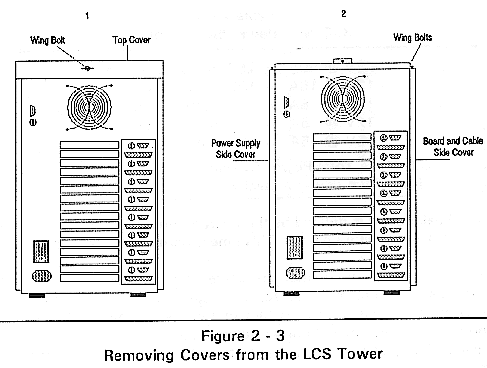
Gaining access to any of the four sections of the Tower requires removing one or more of the enclosure covers.
Warning! High Voltage! Before removing covers, turn off power to the Tower and unplug the power cord.
Top Cover
Turn the rear wing bolt counter-clockwise, then lift off the cover.
Side Covers
Turn the two wing bolts counter-clockwise, then lift off the cover.
Removing Covers from the LCS Tower
The LCS Tower contains one internal 350 watt switching power supply.
This supply is fan cooled. When the power supply load is properly limited to 350 watts average, and the ambient operating temperature of the Tower is maintained between 00C and 400C, the power supply will provide a long life of trouble-free service.
Load Considerations
The LCS Tower has four available voltage sources: +5V, +12V, -12V, and -5V. The Tower provides the following power levels for each of these four voltage sources.
Table 2 - 1
350 Watt Power Supply Ratings
  +5V    @  50A = 250 watts maximum
  +12V  @  16A = 192 watts maximum (Peak)
  +12V  @    8A = 96 watts maximum (Steady State)
  -12V   @    5A = 60 watts maximum
  -5V     @    5A = 25 watts maximum

Steady State Total Power Available = 350 watts maximum

Peak Total Power Available = 400 watts maximum

* Peak power is defined as the power required during the IDE
hard
disk drive ramp-up time. This time is normally 10 seconds or
less.
The user must ensure that no single voltage source power rating exceeds the maximum listed in Table 2-1. In addition, these maximums are limited by the fact that no more than 350 watts total power may be drawn from all voltage sources combined. It is the responsibility of the user to verify that the sum of the power drawn from the four sources does not exceed 350 watts.
To determine if the 350 watt power supply is capable of furnishing sufficient power, add the power required for each voltage and calculate the total power using the power requirements in Table 2-2.
2 Table 2 - 2
Power Requirements (Watts)
Device           +5V      +12V      -12V      -5V

QL 1044          12.0      1.0       0.6      -----

QL 2220          13.0      0.5       0.3      -----

QL 3001SX***     11.0      0.5       0.4      -----

QL 3001CX***     12.5      0.5       0.4      -----

QL 3002SX***     15.5      1.0       0.8      -----

QL 3002CX***     18.5      1.0       0.8      -----

BC               13.0      0.6       0.6      -----
3030SX/25***

BC 4000DX/33     21.0      0.6       0.6      -----

BC 4030DX/33     16.0      0.6       0.6      -----

BC 4030SX/25     14.5      0.6       0.6      -----

Floppy Disk     4.0        -----     -----    -----

Hard Disk       3.0       13.0*      -----    -----
(IDE, 100 MB)             6.5**

Hard Disk       3.0       36.0*      -----    -----
(IDE, 500 MB)             18.0**

Hard Disk       4.0       52.0*      -----    -----
(SCSI, 500 MB)            24.0**

Fan                -----  10.0       -----    -----

Ethernet NIC    5.0        0.5       0.4      0.5

Token Ring NIC  4.0        0.2       -----    -----

* Peak
** Steady State
*** These power figures are with the coprocessor installed.
Subtract 1.0  watt on the +5V if not installed.
For example, Table 2-3 illustrates the typical power requirement for a 80486 EISA LCS Tower Server System.
Since each voltage and the total power consumption is less than the allowed maximum power consumption, the configuration in Table 2-3 can be properly powered with the 350 watt power supply.
3 Table 2 - 3
80486 EISA LCS Tower Server Subsystem
Example Tower Server with 14 QL 3001CX Processors
Device Type     Qty    +5V   +12V     -12V    -5V     Total

BC 4000DX/33   1     21     0.6     0.6           22.2
                                            -----

Token Ring     1     4      0.2     -----         4.2
                                            -----

Floppy         1     4      -----   -----         4.0
                                            -----

Hard Disk      1     3      13.0*   -----         16.0
 (IDE, 100                  6.5**           -----
MB)

QL 3001CX      14     175   7.0     5.6
                                            ----- 187.6

Total                 207   20.8*   6.2
                            14.3**          ----- 234.0

Maximum               250   192*     60.0
Allowed                     96**            25.0  350.0


* Peak
** Steady  State
This section of the LCS Tower contains a passive 16-slot ISA or combination EISA/ISA compatible backplane.
Power for the backplane is input through a nine position barrier strip, located on the top end of the backplane. Three positions provide +5V, and three positions provide +5V ground. +12V, -12V, and -5V are each powered with a single line and a single ground referenced to +5V ground.
Installing Bus Controllers
All LCS Tower configurations include a segmented passive backplane. The Tower Server configuration provides both EISA and ISA slots; all other Tower configurations support ISA only.
The LCS Tower Server backplane consists of a single segment with 16-slots labeled on the backplane as "P1", "P2", . . ., "P16". Slot P1 is located at the bottom of the Tower, and the slots are consecutively labeled toward the top of the Tower. Slots P1 through P7 are ISA compatible; slots P8 through P15 are EISA compatible; and slot P16 is ISA compatible.
When installing the BC Series processor board into the LCS Tower Server, the board must be installed in the EISA slot closest to the top of the Tower and labeled P15. If additional EISA boards are to be installed, they must be placed in the remaining EISA slots, which are labeled as "Slot 1" through "Slot 7" as well as "P8" through "P14".
In LCS Towers with sixteen ISA compatible slots, the segments are labeled on the backplane of the Tower as "Group 1", "Group 2", etc. When installing a BC Series processor into a segment, Cubix recommends that the BC Series board be installed in the uppermost slot of the Group.
Installation Instructions
1. Turn off power to the Tower.
2. Unplug the power cord.
3. Remove the top cover from the unit.
4. Remove the left side panel from the unit.
5. If replacing an existing BC Series processor, remove the retaining screw from the BC "L" bracket and remove the BC board. Take care to grasp the board itself and not the components, as they may break off of the board.
6. If adding a new BC Series processor, remove the screws securing the blank "L" bracket from the rear I/O panel in line with the vacant slot desired. Remove the "L" bracket.
7. Install one Cubix BC Series processor into each segment, or group, as desired. Secure each board with the screw located in the blank filler panel. Verify that only one BC Series board is installed per group.
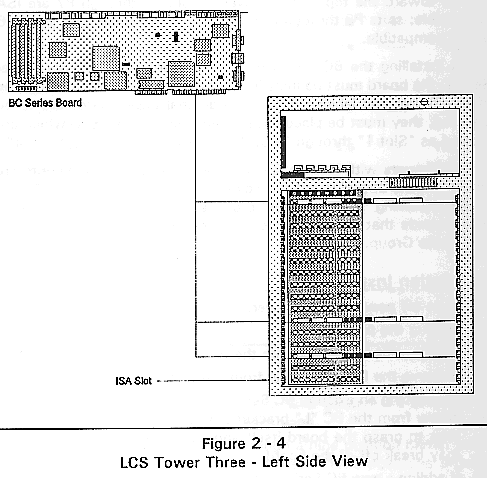
The following drawing shows three BC Series boards installed in a LCS Tower Three.
LCS Tower Three - Left Side View
8. Connect the cables to the board, using the documentation provided with the BC Series processor.
9. Connect a keyboard and monitor to each BC board and apply power to the Tower. Use the video/keyboard multiplexor, if one is present.
10. Run the setup program on each BC Series processor. Refer to the setup documentation provided with the BC board.
11. Turn off the power to the Tower.
12. Install any other peripheral boards.
The Disk Drive Bay contains the power distribution panel, the Tower disk drives, and optionally a Cubix video/keyboard multiplexor.
Power Distribution Panel
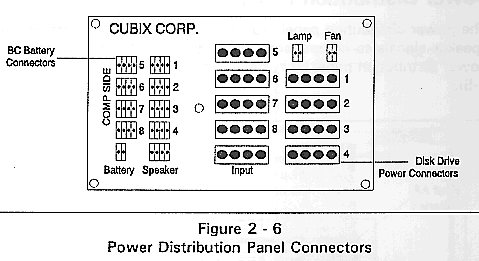
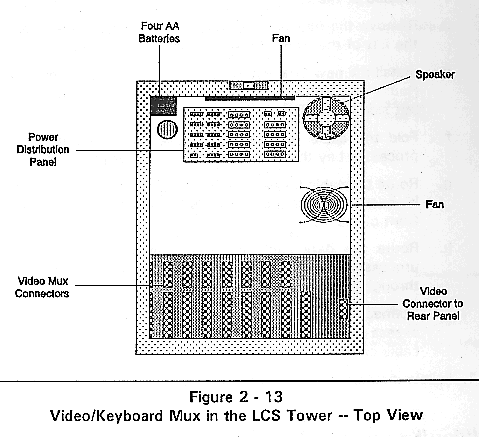
The power distribution panel provides disk drive power, battery, and speaker signals to components within the LCS Tower. Access the power distribution panel by removing the top cover (refer to Figure 25.).
Power Distribution Panel in the LCS Tower -- Top View
Connectors
+5 volt and +12 volt power is supplied to the panel through the four position connector labeled "INPUT" and is distributed to the other four position connectors labeled 1 through 8, which then provide power to the disk drives.
Power Distribution Panel Connectors
The power is also distributed to a 12 volt fan via the two-pin "FAN" connector, and to the Power On light on the front panel of the LCS Tower via the two-pin "LAMP" connector.
The two-pin connector labeled "BATTERY" is connected to a 6 volt battery pack. The power from the battery is distributed to the four-pin connectors labeled 1 through 8, which can then provide battery backup for the CMOS clock and configuration information on each BC Series processor. In addition, the BC Series processors attached to these four-pin connectors can share the speaker output, which is provided by an eight ohm permanent magnet type speaker attached to the four-pin connector labeled "SPEAKER".
In summary, the power distribution panel performs several functions:
! It provides power connectors for up to eight disk drives
! It provides power to the Tower fan
! It provides illumination of the Power On indicator
! Speaker outputs from up to eight processor boards are consolidated into one output
! 6 volt battery power is provided for up to eight processor boards
Disk Drives
For each LCS Tower, front panel access is provided for the maximum number of 3.5" floppy drives available for the specific Tower configuration. On the front panel, these access ports are numbered to match the group numbers on the backplane segments. The ports are numbered from left to right. The backplane is numbered from bottom to top.
When adding a disk drive, install the drive in the same numbered position as the segment or group the drive will service.
Floppy Disk Drive Installation/Replacement
1. Shut power off to the LCS Tower with the rear panel switch.
2. Disconnect the A.C. power cord from the rear I/O panel.
3. Remove the top and side covers.
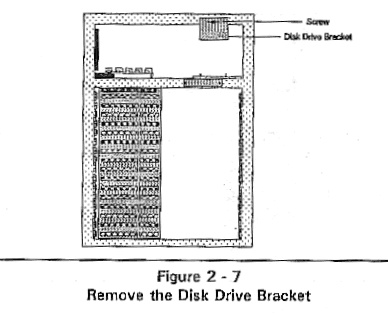
4. Remove the two screws securing the U-shaped disk drive bracket and remove the bracket towards the rear.
Remove the Disk Drive Bracket
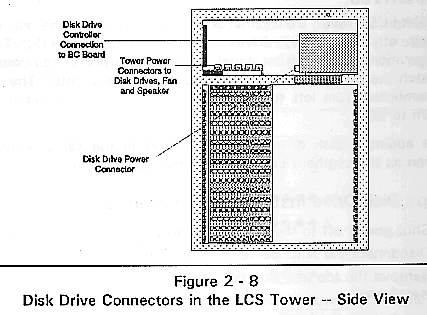
5. If replacing a drive, disconnect the four position power connector and the data cable from the drive.
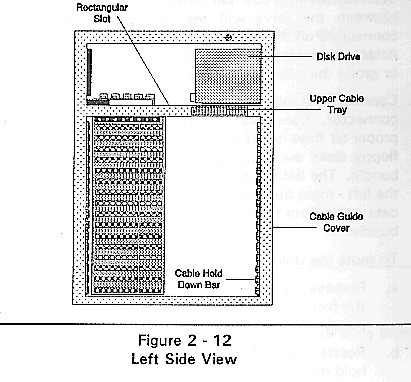
Disk Drive Connectors in the LCS Tower -- Side View
6. Remove the drive or filler panel by pulling forward.
7. Install the drive into the correct drive slot.
Install the Disk Drive
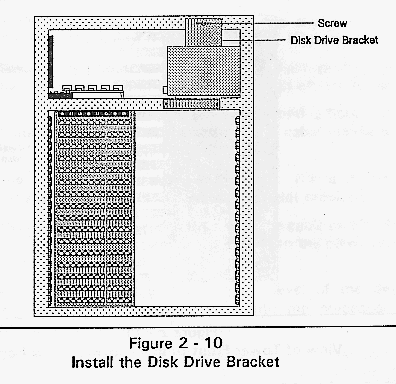
8. Secure the drive by re-installing the U-shaped disk drive bracket with two screws.
Install the Disk Drive Bracket
9. Connect the four position power cable provided with the Tower between the drive and the power distribution panel. The connectors on the power distribution panel are numbered 1 to 8. Attach the cable to the same numbered connector as the segment or group the drive will service.
10. Connect a standard AT floppy data cable to the floppy drive connector. Care must be taken to route this data cable so that proper air flow is not restricted. The drive data cables from the floppy disks are routed to the left side of the Tower in a neat bundle. The data cables are arranged so that the data cable from the left - most floppy drive (#1) is in the front of the bundle. The data cable from the right - most floppy drive is at the rear of the bundle.
To route the drive data cable:
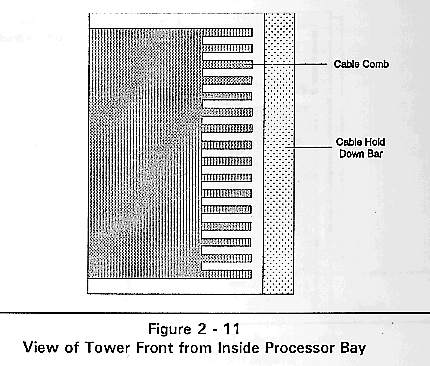
a. Remove the two screws near the top of the Tower securing the front panel. Remove the front panel by lifting up on the panel.
b. Rotate the two quarter-turn fasteners securing the cable hold-down bar (in the processor bay). Remove the bar.
View of Tower Front from Inside Processor Bay
Left Side View
c. Remove the two screws securing the upper cable tray located at the top of the processor bay. Remove the tray.
d. Remove the four screws securing the cable guide cover to the left of the front of the enclosure. Lift off the cover.
e. Install the new disk to the right of the existing floppy drives. Route its data cable at the back of the cable bundle to the left side of the Tower.
f. Fold the cable to make a 900 bend. Route it into the processor bay through the rectangular slot provided.
g. Route the cable forward to the top of the cable comb. Route it under the existing data cables (between the comb and the front of the Tower).
h. Route the data cable down to the level of the desired processor board. Route it back into the processor bay through a slot in the cable comb.
i. Connect the cable to the processor board. Remove any excess cable by folding the cable against itself in front of the cable comb.
11. Follow instructions in reverse order to reassemble.
Video/Keyboard Multiplexor
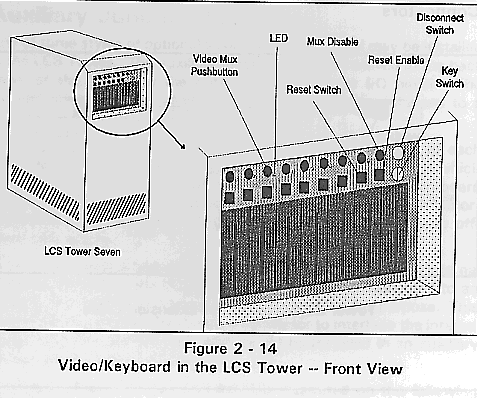
The Cubix Video/Keyboard Multiplexor (Mux) redirects VGA video monitor and PS/2 keyboard signals from one of eight Cubix processor boards to a single set of connectors on the upper rear panel of the LCS Tower. This lets an administrator manage up to eight Cubix processor boards with a single VGA monitor and PS/2-type keyboard.
Video/Keyboard Mux in the LCS Tower -- Top View
Video/Keyboard in the LCS Tower -- Front View
A keylock security switch prevents unauthorized operation of the Video Mux and the reset switches.
To activate the Video Mux and the board reset switches, turn the key clockwise to the horizontal position; the key points toward the UNLOCK label.
To view and control a specific processor, press its corresponding pushbutton. If a Cubix processor board is connected to the selected channel, its corresponding LED indicator will be illuminated. The board's video signals will be sent through the monitor output connector to the monitor, and the keyboard will control the selected processor. To select another processor, press its corresponding pushbutton.
To disconnect all processor inputs from the Video Mux, press the ninth pushbutton (on the far right side of the top row) and turn the key to the vertical position; the key points toward the LOCK label. In this position, the key also disables the processor reset switches.
Connectors
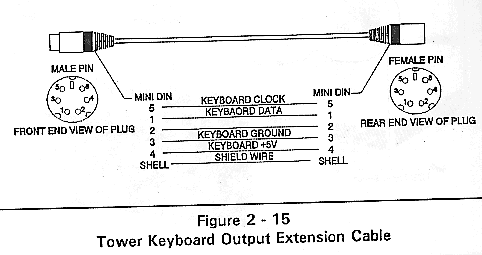
Tower Keyboard Output Extension Cable
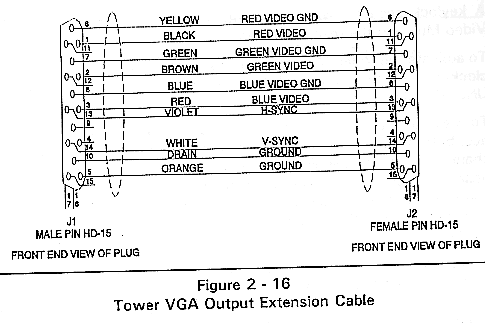
Tower VGA Output Extension Cable
Any of three styles of optional auxiliary junction panel may be installed in the LCS Tower. The auxiliary junction panel is installed in the back panel of the Tower to the right of the processor I/O panel. The auxiliary junction panel allows the user to customize solutions to a wide range of I/O requirements.
Since the amount of space for I/O connectors on the edge of each processor board is limited, board manufacturers must determine which I/O functions supported by the board will be accessible via an on-board connector and which functions will require an off-board connector. The auxiliary junction panel provides a location to install these off-board connectors.
The Cubix processor boards provide several I/O functions with internal headers. To access the I/O, these headers must be connected to an I/O adapter printed circuit board (PCB) designed for this purpose. This adapter board contains the standard connector to interface the internal header with the auxiliary I/O, and should be installed in an auxiliary junction panel on the LCS Tower.
Each style of auxiliary junction panel is illustrated on the following pages.
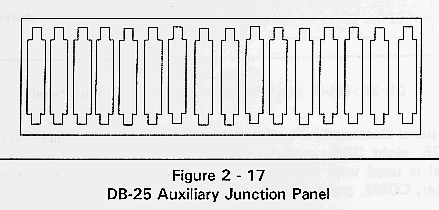
DB-25 Auxiliary Junction Panel
The panel illustrated in Figure 2-17 provides space to install up to sixteen DB-25 connectors. Typically this panel is used with Cubix QL Series processors to provide parallel printer support.
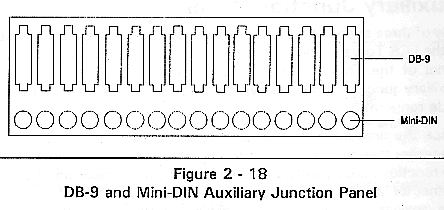
DB-9 and Mini-DIN Auxiliary Junction Panel
The panel illustrated in Figure 2-18 provides space to install up to sixteen DB-9 and sixteen Mini-DIN connectors. Typically this panel is used with Cubix QL Series processors to provide video and keyboard support.
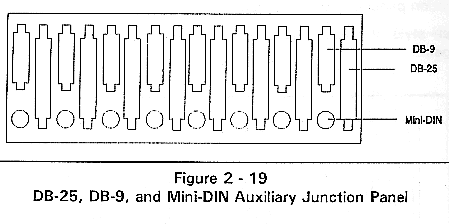
DB-25, DB-9, and Mini-DIN Auxiliary Junction Panel
The panel illustrated in Figure 2-19 provides space to install up to eight DB-25, eight DB-9, and eight Mini-DIN connectors. Typically this panel is used with Cubix BC Series processors to provide parallel printer, COM2, and mouse support.
To install an auxiliary junction panel:
1. Remove power from the LCS Tower.
2. Remove the nine screws securing the blank panel to the right of the rear I/O panel.
3. Using the same screws, attach the auxiliary I/O panel to the rear I/O panel.
4. Using the screws on the connector housing on the Cubix I/O adapter board, attach the adapter board to the auxiliary junction panel directly to the right of the processor card it will service.
5. Attach the I/O adapter board to the internal header on the Cubix processor board. Refer to the documentation provided with the processor board for installation instructions.
This document, and all Web contents, Copyright © 1997
by Cubix Corp., Carson City, NV, USA.