Chapter 4
Component Installation
Overview
This chapter includes the following installation and
replacement instructions:
- Drive Module Installation
- PCM Installation
- IES Installation
- SCSI Connector & Cable Installation
- Power Supply Installation
- Fan Installation
- Backplane Installation
Drive Module Installation
Note: AC Power to the SafeStor-FT II may remain on
during this procedure.
- Remove the front panel. The front panel is secured by four
magnets, two on each side of the panel. Using the finger holes on the bottom of the front
panel, pull the front panel off of the unit.
- If a drive is being replaced, removed the currently
installed drive:
- Halt SCSI bus traffic. This may be done via the SCSI
Controller Software or by dismounting appropriate volume(s) at the network level.
- Remove group power. This may be done by using the
appropriate group power toggle switch or the IES Supervisory System software. Allow a few
seconds for spin down before actually removing the drive.
- Unlock and remove the drive.
- Insert the module containing the new drive. Verify
that it is directly aligned with the connector on the backplane.
- Using the key supplied with the SafeStor-FT II, lock the
drive carrier into place.
- Apply group power.
- If a PCM is installed, press the Drive Start button on the
front of the PCM to spin up the disk drive. Either a PCM or an IES must be installed in
the right most carrier position when viewing from the front of the chassis. If an IES is
installed, the drive spins up automatically.
- Verify that the new drive is receiving power (the top LED on
the front of the drive carrier is illuminated when power is on).
- Replace the front panel.
- Restart software as required.
PCM (Power Control Module) Installation
Note: Power to the SafeStor-FT II may remain on during
this procedure.
Notice!
Group power in the SafeStor-FT II will remain on. When a
PCM or IES is removed from a powered system, the Drive Start button on the PCM should be
pushed to restart the system if a drive is replaced or power is restored.
- Remove the front panel. The front panel is secured
by two magnets, one on each side of the panel. Using the finger holes on the bottom of the
front panel, pull the front panel off of the unit.
- If the PCM is replacing an existing PCM or IES, remove the
carrier containing the module from the SafeStor-FT II. This carrier is located in the
right most carrier position when viewing the front of the SafeStor-FT II.
Using the key supplied with the SafeStor-FT II, unlock the
carrier. This turns power to the PCM or IES off and releases the carrier so that it may be
removed. Remove the carrier by sliding it forward.
- Insert the carrier containing the new PCM,
verifying that it is in each of the three sets of guides aligning it with the connector on
the backplane. The PCM must be installed into the right most carrier location when viewing
the front of the SafeStor-FT II.
- Using the key supplied with the SafeStor-FT II, lock the PCM
carrier into place.
- Replace the front panel.
IES Installation
Notice!
Group power in the SafeStor-FT II will remain on if a PCM
or IES is removed from a powered system, until the system or group power is removed. In
the case of a PCM, the Drive Start button should be pushed to restart system upon
installation
Note: Power to the SafeStor-FT II may remain on
during this procedure.
- Remove the front panel. The front panel is secured
by four magnets, two on each side of the panel. Using the finger holes on the bottom of
the front panel, pull the front panel off of the unit.
- If the IES is replacing an existing PCM or IES, remove the
carrier containing the module from the SafeStor-FT II. This carrier is located in the
right most carrier position when viewing the front of the SafeStor-FT II.
- Using the key supplied with the SafeStor-FT II, unlock the
carrier. This turns power to the PCM or IES off and releases the carrier so that it may be
removed.
- Remove the carrier by sliding it forward.
- Configure the data highway address of the new IES
using the S1 DIP switch (labeled "Cubix Data Highway") on the IES printed
circuit board. If an IES is being replaced, set S1 on the new board to match the switch
settings on the board being replaced. Otherwise, refer to the IES Configuration
section in Chapter 2.
- Insert the carrier containing the new IES, verifying that it
is in each of the three sets of guides aligning it with the connector on the backplane.
The IES must be installed into the right most carrier location when viewing the front of
the SafeStor-FT II.
- Using the key supplied with the SafeStor-FT II, lock the IES
carrier into place.
- Verify that the IES is receiving power (the LEDs on the
front of the IES carrier are illuminated when power is applied).
- Replace the front panel.
Power Supply Installation
The status of each power supply is indicated by LEDs on the
front of each power supply. If a power supply is turned on, and its LED is amber, the
power supply is exhibiting a fault and should be replaced. If an IES is installed, the
power supply LEDs are duplicated on the front panel.
Note: Power to the SafeStor-FT II may remain on during
this procedure.
- Remove the front panel. The front panel is secured
by four magnets, two on each side of the panel. Using the finger holes on the bottom of
the front panel, pull the front panel off of the unit.
- If a power supply is being replaced, remove the existing
supply from the SafeStor-FT II. If a supply fault has occurred, refer to the LEDs on the
front of each power supply. Remove the power supply with the amber LED indicating a power
supply fault.
- Using the key supplied with the SafeStor-FT II, unlock the
power supply carrier. This turns power to the supply off and also releases the carrier so
that it may be removed.
- Remove the power supply carrier by gripping the lower lip on
the front of the supply and sliding it forward.
Note: The LED on the front of an unlocked power supply
will glow amber, even though power to that supply is off, provided that the second supply
is operational.
- Insert the carrier containing the new power
supply, verifying that it plugs into the connectors on the backplane.
- Using the key supplied with the SafeStor-FT II, lock the
power supply carrier into place. This applies power to the power supply.
- Verify that the green LED on the front of the new supply is
illuminated and the amber LED is not.
- Replace the front panel.
Fan Installation
Note: Power to the SafeStor-FT II may remain on during
this procedure.
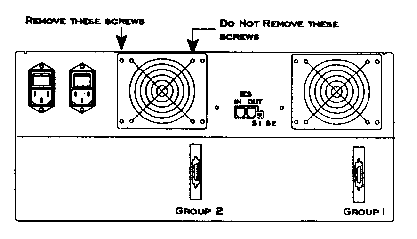
- Remove the four screws securing the fan plate to
the rear panel as illustrated in Figure 4 - 1 and remove the plate.
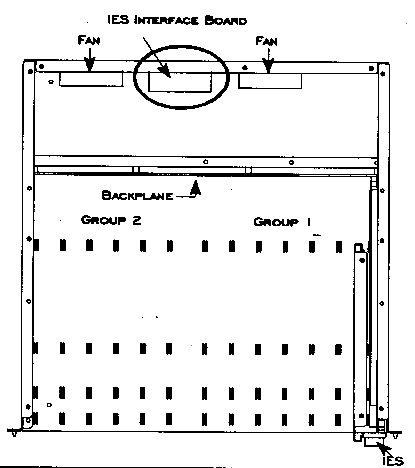
- Reach inside the opening created when the plate was removed
and disconnect the fan cable from the IES interface board (this board houses the RJ-11 IES
connectors in the middle of the rear panel as illustrated in Figure 4 - 2). On the top end
of the cable where it attaches to the interface board is a small plastic tab. Squeeze the
tab to release the cable from the connector.
- Remove the fan.
- Install the new fan and reassemble the unit in reverse
order.

Figure 4-1, Fan Screws on Rear Panel

Figure 4-2, IES Interface Board (Top View)
Backplane Installation
Verify all group SCSI traffic in the SafeStor-FT II is
halted. Power down both power supplies by turning both power switches to the off position.
These switches are located on the rear of the SafeStor-FT II. Verify that no LEDs on the
front of the unit are illuminated.
- Disconnect both power cables from the rear of the
SafeStor-FT II. Warning! Do not continue with this procedure until both power cords
are removed.
- Remove the front panel. The front panel is secured by four
magnets, two on each side of the panel. Using the finger holes on the bottom of the front
panel, pull the front panel off of the unit.
- If the SafeStor-FT II is mounted in a cabinet, remove the
unit.
- Unscrew the four screws securing the side panel ears through
the RETMA rails and into the G-nuts. The SafeStor-FT II can temporarily rest on the
support rails and brackets mounted in the cabinet during installation.
- Remove the SafeStor-FT II from the cabinet. The SafeStor-FT
II is very heavy and care should be taken to avoid injury when lifting the unit. Remove
the top panel. The top panel is secured by five screws.
- All disk drives must be removed from the
SafeStor-FT II. Before removing the drives, be sure to note the location of each drive
(affix a label to each drive identifying its position in the drive bay).
- Using the key supplied with the SafeStor-FT II, unlock each
disk drive carrier.
- Remove each disk drive carrier by sliding it forward. Label
the drive to identify its location on the drive bay.
Note: If drives must be removed anyway, do so before
removing SafeStor-FT II from cabinet. This will make it lighter.
- Remove the carrier containing the PCM or IES from
the SafeStor-FT II. This carrier is located in the right most carrier position when
viewing the front of the SafeStor-FT II.
- Using the key supplied with the SafeStor-FT II, unlock the
carrier.
- Remove the carrier by sliding it forward.
- Disconnect the SCSI I/O connector(s) from the rear
of the SafeStor-FT II.
- Remove the two upper support brackets located to the outside
of the chassis. Each bracket is secured with two screws and washers to the middle
horizontal panel and with one flat head screw to the side panel.
(Note: The support bracket on the right-hand side contains
a limit switch. It is not necessary to remove this switch, but the cables must be
disconnected from the backplane to remove the bracket.)
- From the rear of the SafeStor-FT II, disconnect
the two cables (located on the upper left corner of the backplane) from the IES interface
board illustrated in Figure 4 - 2. On the top end of each cable where it attaches to the
interface board is a small plastic tab. Squeeze the tab to release the cable from the
connector.
- Warning! Power must be disconnected from the
SafeStor-FT II before this step is performed!
- Use a pair of needle nose pliers to disconnect the two
cables attached to each power receptacle.

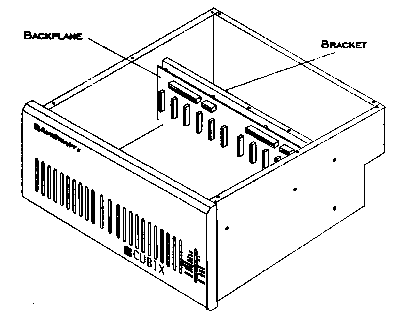
Figure 4-3, Backplane Bracket Screws
- Remove the eight screws and washers securing the
old backplane to the support bracket. Use the eight screws and washers removed in the
previous step to secure the new backplane to the support bracket. The use of a long
shafted #2 phillips screw driver is recommended. Some of the eight screws may be difficult
to reach.
- Reassemble in reverse order, observing the following
instructions.
- When connecting the internal cables to the power
receptacles, the pink cable must be attached to the left connector and the blue
cable must be attached to the right connector when viewing the rear of the
receptacle from the front of the SafeStor-FT II.
- Use the labels on the disk drives to install each drive into
the correct drive location, after installing SafeStor-FT II back into the cabinet.
- Replace the SafeStor-FT II if it was removed from
a cabinet.
- Place the SafeStor-FT II on the support rails. The
SafeStor-FT II is very heavy and care should be taken to avoid injury when lifting the
unit into place.
- From the front of the unit, push four 10-32 screws through
the side panel ears and through the RETMA rail.
- Tighten the screws into the G-Nuts.
- Reattach SCSI I/O cable(s) to rear of unit.
- Restore power to the SafeStor-FT II.
This document, and all Web contents,
Copyright © 1997 by Cubix Corp., Carson City, NV, USA.


