 |
|
|
|
Chapter 3
Components
Overview
This chapter describes each of the following SafeStor-FT II components:
Power Supply Bay
The power supply bay is located on the top of the SafeStor-FT II behind the front panel. This bay houses dual 170 watt power supplies. The purpose of the dual supplies is to provide fault tolerance in the event of a single power supply failure. Fault tolerance is further supported by separate power input receptacles which allow each supply to be powered by a separate power source.
A hot swap feature allows a SafeStor-FT II power supply to be replaced without interrupting power to the unit. The Cubix power supply is contained in a canister-type enclosure to make replacement as easy as possible. A key provides security by locking each supply in place. A supply receives power only when it is locked into position.
Each supply is fan cooled. LEDs located on each power supply reflect the status of the supply. These LEDs are located on the front of each supply to the bottom and left of the fan (refer to Figure 3 - 1). A green LED indicates that the supply is functioning and providing power to the SafeStor-FT II. An amber LED indicates a power supply fault. If one power supply is on and the other supply is off, the LED on the disengaged supply will glow amber. If both supplies are off, no LEDs will illuminate. Because the LEDs on the power supplies are only visible when the front panel is removed, they are duplicated on the optional IES LEDs that are visible through the front panel.
The power supply load should be limited to 170 watts average, although a peak load of 383 watts will be supported for up to ten seconds. The air inlet temperature of the SafeStor-FT II must be maintained between 0 and 40 degrees Celsius. Appendix B - Power Supply contains load considerations and BTU calculations.
Disk Drive Bay
The disk drive bay is located in the front of the SafeStor-FT II behind the front panel. The purpose of the disk drive bay is to provide a location for mounting up to twelve 80 pin SCSI hard disk drives. Depending on the SafeStor-FT II backplane type, the disk drive bay is organized as one group of twelve drive slots (1 x 12), two groups of six drive slots (2 x 6), or three groups of four (3 x 4). For 1/3 height drives, the maximum of 12 drives may be installed; for 1/2 height drive, a maximum of 6 drives may be installed (every other slot). Third height and 1/2 height drives may be mixed in the same SafeStor-FT II system.
Replacement of a drive module in a SCSI array group can be done without affecting other SCSI groups. This is done by the following procedure:
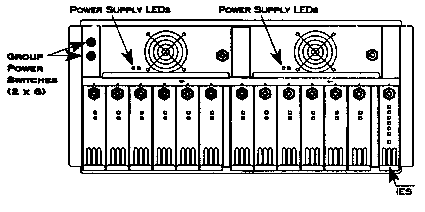
Figure 3-1, SafeStor-FT II with 12 Third-Height Disk Drives
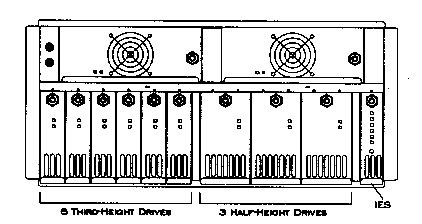
Figure 3-2, SafeStor-FT II with 6 Third-Height & 3 Half-Height Drives
Backplane
The backplane is mounted vertically in the rear of the disk drive bay and contains 12 80-pin SCA SCSI drive slots. The backplane allows each SCSI drive in a group to be connected to the terminated SCSI I/O signals, pick up +5V and +12V supply voltages, and collect SCSI ID information from local dip switches. It also provides for control/status information to be passed between SCSI groups and the optional attached IES module.
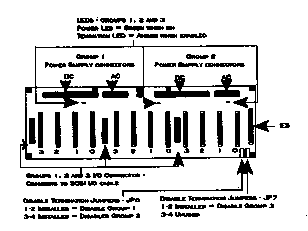
Figure 3-3, Backplane when viewed from chassis front
(3 x 4 backplane shown)
SCSI Termination
Electrical bus requirements dictate that each SCSI bus must be terminated. By default, the on-board termination for each group is enabled. An amber LED indicates the enabled state. The SCSI bus should never be operated without proper termination at each end. (See Figure 3-3 for location of Termination Jumpers -- normally termination is enabled, and no jumpers are installed.)
Group Power Switches
There is a rocker arm switch for each SCSI group located at the upper left of the SafeStor-FT II (UP = ON; DWN = OFF) (see Figure 3-1).
PCM
The PCM (Power Control Module) is installed in units not equipped with an IES. The purpose of the PCM is to spin-up the disk drives in the SafeStor-FT II.
When power is applied to the PCM, it automatically brings up all of the disk drives in the SafeStor-FT II to which power is also applied. Therefore, when power is turned on to a SafeStor-FT II equipped with a PCM, all disk drives installed in the unit will automatically be brought up with the system.
In the event a single group must be turned off (i.e., to replace a drive), operator intervention is required to spin-up the drives when power is restored. A pushbutton on the front of the PCM is provided for this purpose. Refer to the description of the PCM Drive Start Button in the Front Panel section later in this chapter.
IES
The IES (Intelligent Environmental Sensor) is an optional component that provides diagnostics and a management interface for the SafeStor-FT II. The IES is a printed circuit board that may be installed in place of the PCM. Because the IES is an intelligent module, the Drive Start button required by the PCM is not needed if an IES is installed.
The IES continuously monitors the environmental conditions of the SafeStor-FT II, including the fan rotation and power supply voltages. In the event of a fault, the IES will illuminate the appropriate diagnostic LEDs. The IES will also send an alarm to BCVision, which will notify the user and generate a SNMP trap to notify CMS of the failure.
Front Panel
The front panel of the SafeStor-FT II contains ventilation slots that allow the user to view the disk drive LEDs. If an IES is installed, its diagnostic LEDs are visible through the front panel. Otherwise, the Drive Start button on the PCM may be accessed through the front panel.
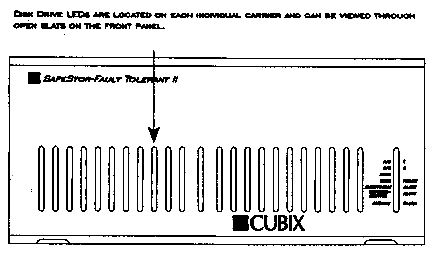
Figure 3-4, Front Panel with IES
Disk Drive LEDs
On the front of each disk drive is a faceplate with two LEDs:
IES LEDs
The optional IES contains a column of diagnostic LEDs and an Audible Clear pushbutton as illustrated in Figure 3 - x:
Audible Clear
If an alarm occurs in the SafeStor-FT II, the alarm will cause the speaker to sound in addition to illuminating the appropriate LED on the diagnostic panel. The speaker will continue to sound until the alarm clears or the Audible Clear pushbutton is pressed.
PCM Drive Start Button
If a PCM is installed instead of an IES, the Drive Start pushbutton is accessible via the front panel. When power is applied to the PCM, it automatically starts all disk drives in the SafeStor-FT II. If power to a disk drive is cycled after the PCM is operational, press the Drive Start pushbutton to spin-up the disk drive. Pressing the Drive Start pushbutton will have no affect on disk drives already in operation.
Rear Panel
All external cabling to the SafeStor-FT II is installed via the rear panel.
The connectors on the rear panel are explained below. Instructions for using these connectors to install the subsystem are in Chapter 2 - Installation.
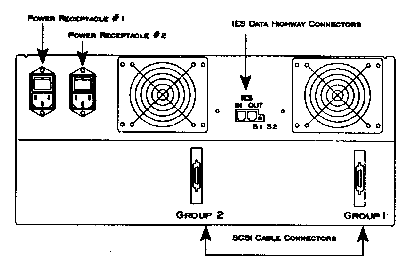
Figure 3-5, Rear Panel Connectors for External
Cabling
(2 x 6 SafeStor-FT II)
This document, and all Web contents, Copyright © 1997 by Cubix Corp., Carson City, NV, USA.