 |
|
|
|
Chapter 2
Installation and Operation
Overview
This chapter provides instructions for installing a new SafeStor-FT II into a Cubix System 1010 Cabinet or user-supplied RETMA cabinet. The following provides an overview of each step required to install the SafeStor-FT II:
Remove Front Panel - First remove the front panel and packing foam from the SafeStore/FT II. Do not apply power to the SafeStor-FT II without first removing the packing foam from behind the front panel!
Remove Front Panel
The front panel is secured by two screws, one on each side of the unit through the side panel ears.
Cabinet Installation - Install the SafeStor-FT II into a cabinet which accommodates 19" RETMA devices. Once installed, apply power to the SafeStor-FT II.
SCSI Bus Configuration - Note the SCSI ID DIP switches are located on the backplane, and start typically with ID at the right of a group, and ID’s are usually indexed by one for each slot occupied by a drive. The ID switch setting on unused SCSI slots does not matter. Drives should always be installed in a group such that empty slots are to the left. This assures the drives are always at the end of the SCSI bus, and close to the SCSI termination.
Turn on the front panel power switch for each available SCSI group.
IES Configuration - If an IES is installed, set the IES address per the instructions on page 2-14.
External Cable Installation - Attach the SCSI I/O connectors on the rear of the SafeStor-FT II to the appropriate SCSI bus adapters. If the SafeStor-FT II is to be connected to an IES Supervisory System, attach the Cubix data highway cable per the diagram on page 2-16.
Power Sequencing - Cycle power to the SafeStor-FT II and the SCSI bus adapters.
System Verification - Verify the system functions by examining the LEDs on the SafeStor-FT II and replace the front panel.
LEDs include the following:
Warning!
The SafeStor-FT II system must be serviced and configured by qualified service personnel only.
This equipment is designed and designated as Class 1 Electronic Equipment to meet all required safety standards. Two properly grounded power cords in good physical condition must be used to power the SafeStor-FT II from properly grounded wall receptacles. The use of frayed, cracked, or abraded power cords, or power cords with a damaged third wire safety ground connection, or power cords without a third wire safety ground, are not the responsibility of Cubix Corporation and will void the warranty. Use only 3/18 AWG SVT or SJT cords with an approved IEC 320/C13 connector to operate the system.
Cabinet Installation
The SafeStor-FT II rack mount enclosures are designed for installation into Cubix System 1010 cabinets. The enclosures are standard 19" RETMA units and may be mounted into any cabinet that accommodates 19" RETMA devices (dimension requirements are illustrated in Figure 2 - 1).
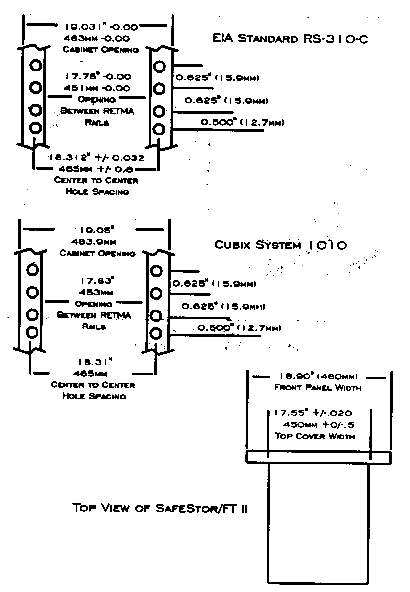
Figure 2-1, Mounting Dimensions
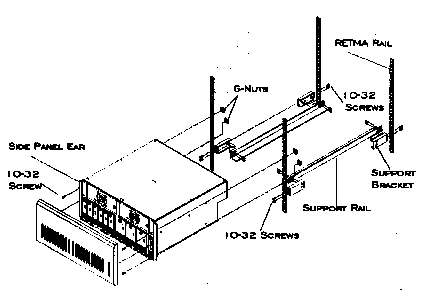
Figure 2-2, SafeStor/FT II Cabinet Installation
SCSI Bus Configuration
Cubix manufacturing configures each available SCSI group in the SafeStor-FT II according to the configuration specified at the time the unit is ordered. The maximum number of SCSI drives supported by a single SafeStor-FT II is twelve, and the maximum number of servers that may be serviced by these drives is equal to the number of groups supported by the backplane.
For example, the SCSI backplane depicted below is divided into two groups of six drive connectors each. Each group represents a separate SCSI bus and has built-in active SCSI termination. Termination for each group is normally enabled, and the "termination enabled" state is represented by an amber LED.
Figure 2 - 3 illustrates the 2 x 6 SafeStor-FT II backplane divided into two groups of six drive slots.

Figure 2-3, 2 x 6 Backplane with two SCSI Bus Groups
Figure 2-4 below illustrates the 1 x 12 SafeStor-FT II divided into one group of 12 drive slots.
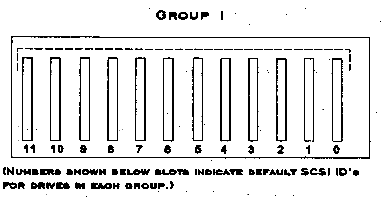
Figure 2-4, 1 x 12 Backplane with one SCSI Bus Group
Figure 2-5, below, illustrates the 3x4 SafeStor-FT II divided into 3 groups of 4 drive slots.
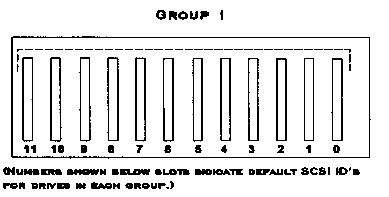
Figure 2-5, 3 x 4 Backplane with three SCSI Bus Groups
Verify the SCSI Bus Configuration:
The following diagram indicates the viewing port for group power and SCSI termination LED’s in the 2 x 6 SafeStor-FT II. For the 1 x 12 model, only the right hand set of LED’s are used.
Figure 2-6
Location of 2 x 6 Backplane Power/Terminations SCSI Bus LED's
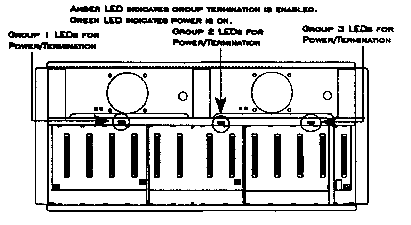
Figure 2-7
Location of 3 x 4 Backplane Power/Terminations SCSI Bus LED's
SCSI ID Configuration
Each device on a SCSI bus must have a unique SCSI ID. In the SafeStor-FT II, the SCSI ID is accomplished with dip switches built into the backplane. For each available SCSI group, the slot position to the far right is usually ID . The ID numbers increment by one for each occupied slot to the left of ID .
As drives are installed they should be installed such that slots are filled in ascending order from the right. For example, if installing three third-height drives to a group with no other devices installed, use slots 0 - 2. Empty slots are always to the left.
Note
In narrow SCSI configurations, SCSI IDs above 6 are invalid and are interpreted as 0 for SCSI ID 8, 1 for SCSI ID 9, and 5 for SCSI ID 13.
IES Configuration
Every SafeStor-FT II is equipped with either a power control module (PCM) or an Intelligent Environmental Sensor (IES) installed in the right most carrier location (when viewing the front of the unit). The IES is a SafeStor-FT II option and is only included with the SafeStor-FT II if specified when the system is ordered. The PCM is a standard SafeStor-FT II component.
If an IES is installed, a PCM is still included in the shipment. The PCM will be shipped in a carrier similar to the disk drive carriers, but it will not be installed in the SafeStor-FT II. Store the PCM in a safe location. It will only be needed in the unlikely event of an IES failure.
The PCM provides disk spin-up functions in systems not equipped with an IES. On the front of the PCM is a keyswitch and a Drive Start button (refer to Figure 2 - 8). If the SafeStor-FT II is equipped with a PCM rather than an IES, proceed to the External Cable Installation instructions.
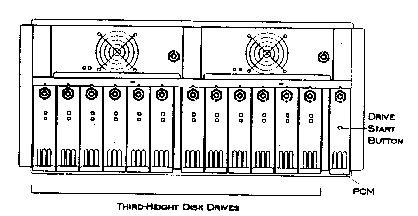
Figure 2-8, PCM in SafeStor/FT II
As explained in Chapter 1, the IES provides management functions for the SafeStor-FT II. On the front of the IES is a keyswitch, a column of diagnostic LEDs, and an audible clear button (refer to Figure 2 - 9).
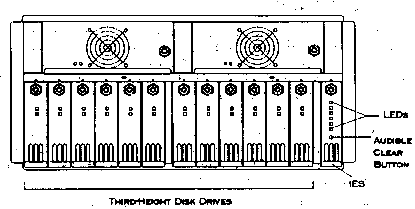
Figure 2-9, IES in SafeStor/FT II
If the SafeStor-FT II is equipped with an IES, and if the IES is to be connected to an IES Supervisory System, configure the address of the IES as described below. Otherwise, proceed to the External Cable Installation instructions.
The Cubix Data Highway is the out-of-band highway connecting devices on an IES Supervisory System (refer to the Management section in Chapter 1 for more information). Each IES connected to the same data highway must be assigned a unique data highway address. The BCVision software application uses this address to identify and communicate with each IES.
Valid IES addresses range from 1 to 31 (address 0 is reserved). The default address of the IES is configured to 1 by Cubix manufacturing. The address of the IES is determined by an eight position DIP switch located on the IES board. Instructions for configuring the IES address are specified on the next page.
Note: Power to the SafeStor-FT II may remain on during this procedure.
Table 2 - 1
IES Address Configuration
IES Address |
DIP
Switch Position |
|||||||
1 |
OFF |
ON |
ON |
ON |
ON |
ON |
ON |
ON |
2 |
ON |
OFF |
ON |
ON |
ON |
ON |
ON |
ON |
3 |
OFF |
OFF |
ON |
ON |
ON |
ON |
ON |
ON |
4 |
ON |
ON |
OFF |
ON |
ON |
ON |
ON |
ON |
5 |
OFF |
ON |
OFF |
ON |
ON |
ON |
ON |
ON |
6 |
ON |
OFF |
OFF |
ON |
ON |
ON |
ON |
ON |
7 |
OFF |
OFF |
OFF |
ON |
ON |
ON |
ON |
ON |
8 |
ON |
ON |
ON |
OFF |
ON |
ON |
ON |
ON |
9 |
OFF |
ON |
ON |
OFF |
ON |
ON |
ON |
ON |
10 |
ON |
OFF |
ON |
OFF |
ON |
ON |
ON |
ON |
11 |
OFF |
OFF |
ON |
OFF |
ON |
ON |
ON |
ON |
12 |
ON |
ON |
OFF |
OFF |
ON |
ON |
ON |
ON |
13 |
OFF |
ON |
OFF |
OFF |
ON |
ON |
ON |
ON |
14 |
ON |
OFF |
OFF |
OFF |
ON |
ON |
ON |
ON |
15 |
OFF |
OFF |
OFF |
OFF |
ON |
ON |
ON |
ON |
16 |
ON |
ON |
ON |
ON |
OFF |
ON |
ON |
ON |
17 |
OFF |
ON |
ON |
ON |
OFF |
ON |
ON |
ON |
18 |
ON |
OFF |
ON |
ON |
OFF |
ON |
ON |
ON |
19 |
OFF |
OFF |
ON |
ON |
OFF |
ON |
ON |
ON |
20 |
ON |
ON |
OFF |
ON |
OFF |
ON |
ON |
ON |
21 |
OFF |
ON |
OFF |
ON |
OFF |
ON |
ON |
ON |
22 |
ON |
OFF |
OFF |
ON |
OFF |
ON |
ON |
ON |
23 |
OFF |
OFF |
OFF |
ON |
OFF |
ON |
ON |
ON |
24 |
ON |
ON |
ON |
OFF |
OFF |
ON |
ON |
ON |
25 |
OFF |
ON |
ON |
OFF |
OFF |
ON |
ON |
ON |
26 |
ON |
OFF |
ON |
OFF |
OFF |
ON |
ON |
ON |
27 |
OFF |
OFF |
ON |
OFF |
OFF |
ON |
ON |
ON |
28 |
ON |
ON |
OFF |
OFF |
OFF |
ON |
ON |
ON |
29 |
OFF |
ON |
OFF |
OFF |
OFF |
ON |
ON |
ON |
30 |
ON |
OFF |
OFF |
OFF |
OFF |
ON |
ON |
ON |
31 |
OFF |
OFF |
OFF |
OFF |
OFF |
ON |
ON |
ON |
External Cable Installation
There are two types of external cables that may be installed:
Figure 2-10 illustrates the external connectors on the rear of the SafeStor-FT II 2 x 6 System.
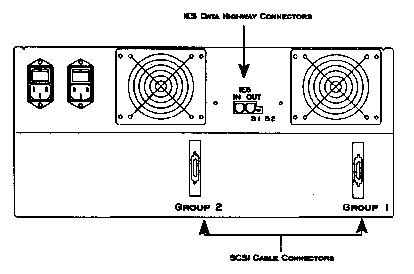
Figure 2-10, 2 x 6 External Connectors
Note: For a SafeStor-FT II 1 x 12 System, only the SCSI cable connector marked "Group 1" is used.
Figure 2-11 illustrates the external connectors on the rear of the SafeStor-FT II 3 x 4 system.
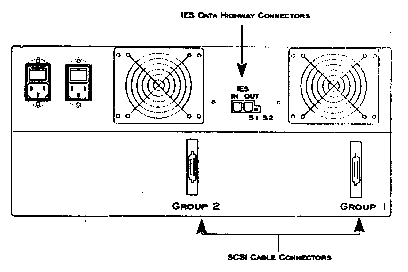
Figure 2-11, 3 x 4 External Connectors
IES Data Highway Cable Installation
If the SafeStor-FT II is to be connected to an IES Supervisory System, connect the IES to the Cubix data highway using the two RJ-11 connectors on the rear I/O panel of the subsystem. See Figure 2 -10. Otherwise, proceed to the SCSI Cable Installation instructions.
Switch 1 |
Description |
ON |
The SafeStor-FT II is the last device in the chain of subsystems connected to the data highway (i.e., the IES OUT connector is not attached to the highway). |
OFF |
The SafeStor-FT II is not the last device in the chain of subsystems connected to the data highway (i.e., the IES OUT connector is attached to the next device in the chain). |
SCSI Cable Installation
Each SCSI group in the SafeStor-FT II to be used by a server must be connected to an external SCSI bus adapter residing in the server system. A list of the SCSI bus adapters currently supported by the SafeStor-FT II is included in Appendix C.
The SafeStor-FT II supports either fast or fast/wide SCSI. Fast SCSI requires a 50-pin cable and fast/wide SCSI requires a 68-pin cable. The SafeStor-FT II backplane is equipped with a 68-pin connector for each wide (16 bit) SCSI group, and a 50 pin connector for each narrow (8 bit) SCSI group. The backplane SCSI I/O connector for each available group is labelled on the rear of the SafeStor-FT II chassis (Group 1, Group 2, Group 3, etc.).
Power Sequencing
After the SafeStor-FT II is configured and installed, power must be cycled so that the servers connected to the SafeStor-FT II will recognize the SCSI hard drives. Power must be applied in one of the sequence options described below. If neither of the options for power sequencing is observed, the servers may not recognize the SCSI disk drives.
Option 1
Option 2
System Verification
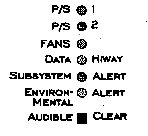
Figure 2-12, IES LED Diagnostics
This document, and all Web contents, Copyright © 1997 by Cubix Corp., Carson City, NV, USA.