 |
|
|
|
Chapter 3
Components
Overview
Power Supply Bay
Disk Drive Bay
Backplane
PCM
IES
Front Panel
Rear Panel
This chapter contains a sections describing each of the following SafeStor\FT components:
. Power Supply Bay
. Disk Drive Bay
. Backplane
. Power Supply Module (PCM)
. Intelligent Environmental Sensor (IES)
. Front Panel
. Rear Panel
The power supply bay is located on the top of the SafeStor\FT behind the front panel. This bay houses the dual 170 watt power supplies. The purpose of the dual supplies is to provide fault tolerance in the event of a single power supply failure. Fault tolerance is further supported by separate power input receptacles which allow each supply to be powered by a separate power source.
A hot swap feature allows a power supply in the SafeStor\FT to be replaced without interrupting power to the unit. The Cubix power supply is contained in a canister type of enclosure to make replacement as straightforward as possible. A key provides security by locking each supply in place. A supply receives power only when the supply is locked into position.
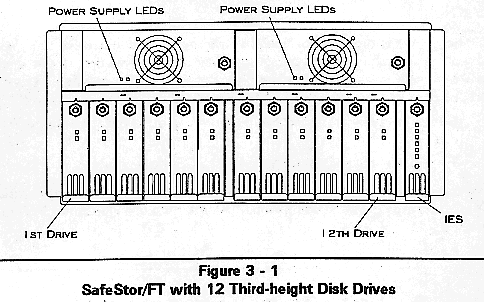
Each supply is fan cooled. LEDs located on each power supply reflect the status of the supply. These LEDs are located on the front of each supply to the bottom and left of the fan (refer to Figure 3-1). A green LED indicates that the supply is functioning and providing power to the SafeStor\FT. An amber LED indicates a power supply fault. If one power supply is on and the other supply is off, the LED on the disengaged supply will glow amber. If both supplies are off, no LEDs will illuminate. Because the LEDs on the power supplies are only visible when the front panel is removed, they are duplicated on the optional IES LEDs that are visible through the front panel.
The power supply load should be limited to 170 watts average, although a peak load of 383 watts will be supported for up to ten seconds. The air inlet temperature of the SafeStor\FT must be maintained between 0 and 40 degrees Celsius. Appendix B - Power Supply contains load considerations and BTU calculations.
The disk drive bay is located in the front of the SafeStor\FT behind the front panel. The purpose of the disk drive bay is to provide a location for mounting up to twelve SCSI hard disk drives.
The disk drive bay contains six groups of two disk drive connectors each. Each group is designed to accommodate two third-height 3.5" disk drives, allowing the maximum density of twelve SCSI drives as illustrated in Figure 3-1.
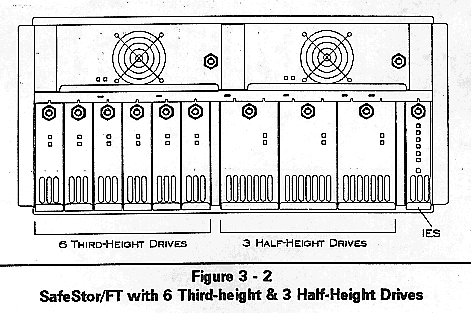
Half-height drives may also be accommodated. Only one half-height drive may be installed in each disk drive group. Both third-height and half-height drives may be installed in the same SafeStor\FT as illustrated in Figure 3-2.
A hot swap feature allows each drive to be removed or replaced without interrupting power to the SafeStor\FT. A key provides security for the drives by locking each drive in place. Power is supplied to a disk drive only when it is locked into position.
If a PCM is installed and a locked disk drive does not receive power, press the Drive Start button on the front of the PCM.
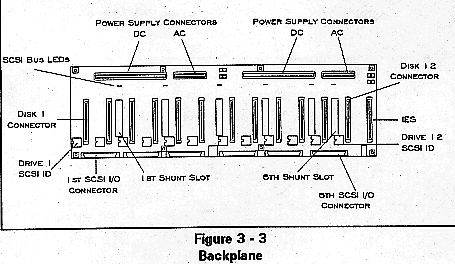
The backplane is mounted vertically in the rear of the disk drive bay. The backplane contains six SCSI bus groups that support two disk drives each. Between each drive group is a smaller slot (referred to as a "shunt slot"). One of the following special Cubix boards may occupy a shunt slot:
. Shunt Boards - join adjacent disk drive groups onto the same SCSI bus
. Terminator Boards - terminate each SCSI bus
The type of board located in each shunt slot determines the configuration of the SafeStor\FT SCSI bus groups. Shunt slots are illustrated in Figure 3-3.
Shunt Boards
The Cubix SCSI backplane technology is based upon the concept of "joining", or "shunting", disk groups together. Between each group are shunt slots. By inserting a Cubix shunt board into a shunt slot, the adjacent two groups are joined, forming a larger SCSI bus. Therefore, the configurable backplane of the SafeStor\FT provides maximum flexibility for disk drive requirements.
The various third-height disk drive configurations that are available by inserting shunt boards into the backplane are illustrated in Table 3 - 1. Half-height configurations are illustrated in Table 3 - 2. Note that third-height and half-height drives may be combined into a single SafeStor\FT (refer to Figure 3-2 ). Instructions for installing shunt boards are included in Chapter 4 - Component Installation.
                           Table 3-1
         SCSI Bus Configurations for Third-Height Drives

# of Bus      1st        2nd        3rd        4th
5th        6th
Segments    Segment    Segment    Segment    Segment
Segment    Segment

   1        12 drives     -          -          -          -
   -
   2        10 drives  2 drives      -          -          -
   -
   2         8 drives  4 drives      -          -          -
   -
   2         6 drives  6 drives      -          -          -
   -
   3         8 drives  2 drives   2 drives      -          -
   -
   3         6 drives  4 drives   2 drives      -          -
   -
   3         4 drives  4 drives   4 drives      -          -
   -
   4         6 drives  2 drives   2 drives   2 drives      -
   -
   4         4 drives  4 drives   2 drives   2 drives      -
   -
   5         4 drives  2 drives   2 drives   2 drives   2
   drives      -
   6         2 drives  2 drives   2 drives   2 drives   2
   drives   2 drives
                           Table 3-2
         SCSI Bus Configurations for Half-Height Drives

# of Bus      1st        2nd        3rd        4th
5th        6th
Segments    Segment    Segment    Segment    Segment
Segment    Segment

   1        6 drives      -          -          -          -
   -
   2        5 drives   1 drive       -          -          -
   -
   2        4 drives   2 drives      -          -          -
   -
   2        3 drives   3 drives      -          -          -
   -
   3        4 drives   1 drive    1 drive       -          -
   -
   3        3 drives   2 drives   1 drive       -          -
   -
   3        2 drives   2 drives   2 drives      -          -
   -
   4        3 drives   1 drive    1 drive    1 drive       -
   -
   4        2 drives   2 drives   1 drive    1 drive       -
   -
   5        2 drives   1 drive    1 drive    1 drive    1
   drive       -
   6        1 drive    1 drive    1 drive    1 drive    1
   drive    1 drive
Terminator Boards
The other type of board that may occupy a shunt slot is a terminator board.
Each SCSI bus must be terminated. This is an electrical bus requirement. To terminate a SCSI bus in a SafeStor\FT, a special terminator board must be installed in the shunt slot following the last group in the bus. If the shunt boards are installed first to join the necessary bus groups together, all shunt slots that do not contain a shunt board will by definition follow the last group of each bus on the backplane. Installing a terminator board in each of the remaining shunt slots will terminate each SCSI bus in the SafeStor\FT. Instructions for installing terminator boards are included in Chapter 4 - Component Installation.
In some installations, the SCSI bus may be continued outside of the SafeStor\FT. In this case, no terminator board should be installed on the portion of the bus residing in the SafeStor\FT.
The PCM (Power Control Module) is installed in units not equipped with an IES. The purpose of the PCM is to spin-up the disk drives in the SafeStor\FT.
When power is applied to the PCM, it automatically brings up all of the disk drives in the SafeStor\FT to which power is also applied. Therefore, when power is turned on to a SafeStor\FT equipped with a PCM, all disk drives installed in the unit will automatically be brought up with the system.
Since the disk drives support a hot swap feature, power to a disk drive may be cycled while the SafeStor\FT is operational. In this event, operator intervention is required to spin up the disk drive. A pushbutton on the front of the PCM is provided for this purpose. Refer to the description of the PCM Drive Start Button in the Front Panel section later in this chapter.
The IES (Intelligent Environmental Sensor) is an optional component that provides diagnostics and a management interface for the SafeStor\FT. The IES is a printed circuit board that may be installed in place of the PCM. Because the IES is an intelligent module, the Drive Start button required by the PCM is not needed if an IES is installed.
The IES continuously monitors the environmental conditions of the SafeStor\FT, including the fan rotation and power supply voltages. In the event of a fault, the IES will illuminate the appropriate diagnostic LEDs. The IES will also send an alarm to BCVision, which will notify the user and generate a SNMP trap to notify CMS of the failure.
WARNING!
Do not connect the SafeStor\FT to a Cubix Data Highway managed by a version of BCVision prior to v2.3. The optional Intelligent Environmental Sensor (IES) in the SafeStor\FT is not compatible with earlier versions of BCVision. Disregarding this warning may cause an IES in the SafeStor\FT to cease functioning.
The front panel of the SafeStor\FT contains ventilation slots that allow the user to view the disk drive LEDs. If an IES is installed, its diagnostic LEDs are visible through the front panel. Otherwise, the Drive Start button on the PCM may be accessed through the front panel.
Disk Drive LEDs
On the front if each disk drive are two LEDs:
. Disk power - This green LED is illuminated while the disk drive is receiving power. Note that power is not applied to the disk drive until it is locked into the SafeStor\FT (refer to the key lock description).
. Disk activity - This green LED is illuminated whenever disk drive reads or writes occur.
IES LEDs
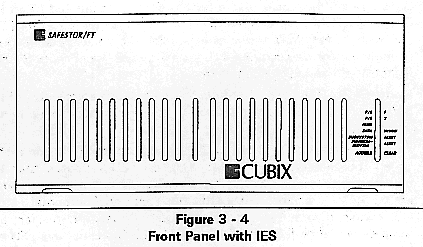
The optional IES contains a column of diagnostic LEDs and an Audible Clear pushbutton as illustrated in Figure 3-4:
. P/S 1 (top LED) - Green indicates that the first power supply is functioning properly; amber indicates a failure on the first power supply.
. P/S 2 (2nd LED) - Green indicates that the second power supply is functioning properly; amber indicates a failure on the second power supply.
. Fans (3rd LED) - Green indicates that the fans are rotating properly; amber indicates a fan failure. Note that the fans represented by this LED are the fans in the rear of the unit. The status of the power supply fans is reported by the P/S LEDs.
. Data Hiway (4th LED) - If the SafeStor\FT is connected to an IES Supervisory System, a green LED indicates that the SafeStor\FT is communicating with BCVision as expected. An amber LED indicates no IES data highway communications. If no IES Supervisory System is installed, this LED will be amber.
. System Alert (5th LED) - Green indicates that the electronics of the SafeStor\FT are functioning properly; amber indicates that a failure has occurred.
. Environmental Alert (bottom LED) - If the SafeStor\FT is connected to an IES Supervisory System, a green LED indicates that the environmental parameters in the SafeStor\FT are within tolerance limits. An amber LED indicates an environmental alert. Environmental parameters include power voltages, fan rotation, and temperature. If no IES Supervisory System is installed, this LED will be amber.
Audible Clear
If an alarm occurs in the SafeStor\FT, the alarm will cause the speaker to sound in addition to illuminating the appropriate LED on the diagnostic panel. The speaker will continue to sound until the alarm clears or the Audible Clear pushbutton is pressed.
PCM Drive Start Button
If a PCM is installed instead of an IES, the Drive Start pushbutton is accessible via the front panel. When power is applied to the PCM, it automatically starts all disk drives in the SafeStor\FT. If power to a disk drive is cycled after the PCM is operational, press the Drive Start pushbutton to spin-up the disk drive. Pressing the Drive Start pushbutton will have no affect on disk drives already in operation.
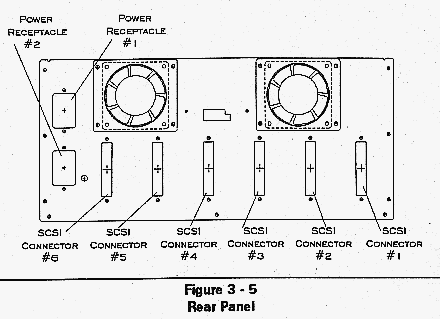
All external cabling to the SafeStor\FT is installed via the rear panel. Refer to Figure 3-5.
The connectors on the rear panel are explained below. Instructions for using these connectors to install the subsystem are in Chapter 2 - Installation.
. Power receptacles - There are two receptacles, one for each power supply, labeled PS1 (supplies power to the first power supply) and PS2 (supplies power to the second power supply).
. IES In and IES Out - These connectors are used to attach the SafeStor\FT to a Cubix Data Highway if an IES Supervisory System is installed. Warning: Do not connect a SafeStor\FT to a Cubix Data Highway supervised by a version of BCVision prior to v2.3.
. SCSI connectors - Openings for up to six fast or fast/wide SCSI connectors are labeled 1 to 6. When viewing the SafeStor\FT from the rear, the SCSI connectors are assigned to the six possible SCSI bus groups one to six from right to left.
This document, and all Web contents, Copyright © 1997
by Cubix Corp., Carson City, NV, USA.