 |
|
|
|
QL 4222
Chapter 5 - Configuration Changes
Reasons for Change
If the configuration parameters (designated server and QL network address) change, it is necessary to reconfigure the QL drivers with the new parameter information. The installation utility provided with the QL software writes this information into the driver file. Therefore, if the configuration changes, the installation utility must be run again so that the QL driver is updated.
Changing the Designated Server
It is necessary to update the designated server information stored in the QL driver under any of the following reasons:
Changing the QL Net Address
If the address specified when the QL driver is bound to the protocol on the server or router containing the QL boards, the QL Net Address must be reconfigured using the installation utility. For more information on QL network addressing, refer to Chapter 2 - Installation.
Configuration Steps
INSTALL <ENTER>
Note: For configuration changes it is important that INSTALL be run from the SYS:CUBIX/QLx000 directory of the current designated server. If INSTALL is run from a floppy drive (A: or B:), it will attempt to perform a full installation and overwrite existing QL driver files.
A screen similar to Figure 5 - 1 is displayed.
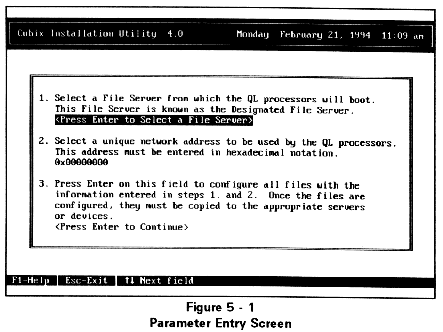
Specify the Designated Server. Press <ENTER> and a list of currently connected file servers is displayed on a screen similar to Figure 5 - 2.
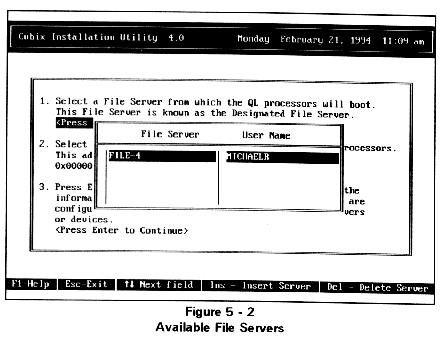
Use the arrow keys to highlight the designated server and press <ENTER>. To login to a server not listed, or to establish supervisory privileges on a server, press <INSERT> and select the desired server from the list displayed. If there are too many existing connections for this workstation to login to another server, an existing connection may be removed by highlighting the server no longer required and pressing the <DELETE> key.
Note: The connection to the default server may not be deleted, nor may a connection established by the Novell Directory Services.
INSTALL will also create the object in the bindery of the new designated server required by the QLVision management utility.
As INSTALL progresses through the installation, it builds a log file documenting its activities and functions. This log file, INSTALL.LOG, is written to the CUBIX/QL3000 or CUBIX/QL4000 directory of the current file server. This file is useful for troubleshooting purposes if problems occur during the configuration.
When INSTALL completes configuring the QL files, it will optionally display or print a README file explaining the remaining steps which must be performed to complete the installation process. The instructions below are the same as the instructions in the file. The file is only provided as an added convenience.
Note: If the designated server is being changed, copy the files from the CUBIX/QLx000/LOGIN on the old designated server to the LOGIN directory on the new designated server. Otherwise, copy the file from the CUBIX/QLx000/LOGIN on the designated server to the LOGIN directory on that same server.
Note: If the boards are installed in a MPR with no volume mounted, copy the files to the MPR boot diskette (wherever SERVER.EXE is located).
This document, and all Web contents, Copyright © 1997 by Cubix Corp., Carson City, NV, USA.