 |
|
|
|
QL 4222
Chapter 2 - Installation
Preparation
Before the QL hardware and/or software may be installed, the following information must be determined. Installation cannot be completed without the answers to the questions below.
What is the name of the Designated Server?
The designated server is the server on which the QL files will be installed. In diskless installations, the designated server is the file server from which the QL workstations boot. The designated server is written into the driver file by the QL Installation Utility. Therefore, if the designated server is changed after installation, the Installation Utility must be run again and the new server specified. Refer to Chapter 5 - Configuration Changes for more information.
Enter the name of the designated server in the space provided and proceed to the next question. If a more detailed description of the designated server is desired, one is provided below.
Designated Server: ______________________________________________________
Designated Server
If the QL boards are installed in a file server, this file server is usually specified as the designated server. However, if the boards are installed in a router, a file server on the LAN should be selected as the designated server.
In installations where QL workstations are not configured to boot from a local disk drive, but instead will perform a "remote boot", the designated server assumes an additional function.
To perform a remote boot, QL workstations boot from a file on a file server. This file contains an image of a DOS bootable diskette, and is called the "image file". QL workstations boot from the image file exactly as they would from a floppy diskette drive.
During installation, the user must select a designated server. The QL drivers are configured to search the designated server for the image file. Therefore, if a need arises to change the server from which the QL workstations boot after the initial installation is performed, the drivers must be reconfigured for the new designated server.
What is the net address?
The QL network address defines the unique network segment used by the QL workstations and bound to the protocol stack. The QL Net Address is written into the driver file by the QL Installation Utility. Therefore, if the QL Net Address is changed after installation, the Installation Utility must be run again and the new address specified. Refer to Chapter 5 - Configuration Changes for more information.
If both QL 3222 and QL 4222 types of boards are being installed, two network addresses must be assigned (one for each board type). Enter the net addresses in the space provided and proceed to the next question. If a more detailed description of the net address is desired, one is provided below.
QL 3000 Series Net Address: ______________________________________________________
QL 4000 Series Net Address: _______________________________________________________
QL Net Address
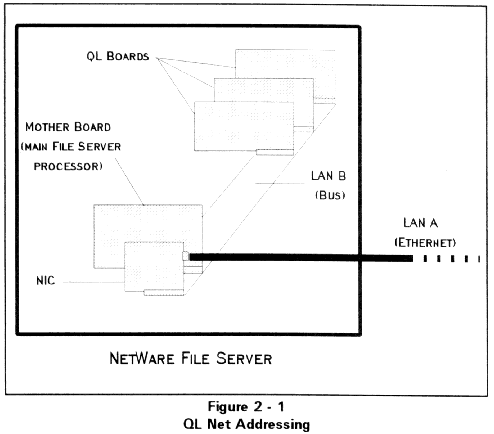
Nodes (workstations and file servers) on NetWare networks are identified by a net number and a node number, or address. QL workstations residing within a single server or router function as nodes on their own network segment with their own unique network address. These network segments are typically referred to as LAN A, LAN B, etc. using Novell terminology. Each QL workstation is assigned a unique node address on the network segment. Node numbers are assigned to QL workstations using DIP switches on the boards as explained during the installation instructions. The net address will be the same number specified when the Cubix driver is bound to the protocol (e.g. IPX). Refer to Figure 2 - 1 for an illustration of network addressing.
For example, the following commands load the QL 4000 Series server driver:
bind ipx to QL4000 net = xx
where xx is the QL Network Address
If multiple QL boards belonging to the same QL Series are installed in a server or router, they will share one net address. However, if both QL 3000 and QL 4000 Series workstations are installed in the same server/router, two network addresses are required: one for the QL 3000 network and one for the QL 4000 network.
What are the IRQ assignments?
The QL boards require an interrupt (IRQ) on the file server or router in which the boards are installed. The interrupt is specified on the command line when the QL driver is loaded on the server or router; no hardware configuration is required. Interrupts 7, A, B, and F hexadecimal (7, 10, 11, and 15 decimal) are supported (IRQ A is the default). If more than one QL board of the same type (QL 3222 or QL 4222) is installed, the boards will share the same interrupt. However, if both QL 3222 and QL 4222 boards are installed in the same server or router, each type of board requires its own interrupt assignment.
Enter the interrupt assignments in the spaces provided and proceed to the next question. A more detailed explanation of the IRQ assignments is included below.
QL 3000 Series IRQ Assignment: _______________________________________________
QL 4000 Series IRQ Assignment: ________________________________________________
IRQ Assignment
The interrupt configuration described above refers to an interrupt on the CPU of the file server or router. This allows the QL to interrupt the server or router when bus communications are required. An interrupt on the QL CPU is also required to allow the server or router to interrupt the QL. This interrupt is not configurable (refer to the Hardware Reference for a complete list of QL interrupt assignments).
What are the I/O Addresses?
The server or router uses a block of I/O addresses to communicate with the QL workstations. The block is configured by setting the first, or base, I/O address using a DIP switch on the QL board as explained during the installation instructions. The same address must also be specified when the QL driver is loaded on the server or router. If more than one QL board of the same type (QL 3222 or QL 4222) is installed, the boards will share the same I/O address block; however, if both QL 3222 and QL 4222 boards are installed, two I/O address blocks must be allocated (one for each QL type).
The QL 3222 requires eight consecutive I/O addresses starting at hexadecimal 220, 230, 320, or 330 (220 is the default base address). The QL 4222 requires thirty-two consecutive addresses starting at hexadecimal 200, 220, 300, or 320 (200 is the default).
Enter the base I/O address assignments below.
QL 3000 Series Base I/O Address: _________________________________________________
QL 4000 Series Base I/O Address: _________________________________________________
The QL 3222 boards require a 16 Kbyte shared memory window in the memory of the file server or router. The shared memory window consists of dual port RAM that resides on the QL board, but is directly accessible to the server or router. The memory addresses used are specified when the QL 3222 driver is loaded on the server or router; no hardware configuration is required. The shared memory window may start at hexadecimal address C000, C400, C800, CC00, D000, D400, D800, or DC00 (the default is CC00).
If multiple QL 3222 boards are installed, they will share the same memory window. The QL 4222 boards do not require a shared memory window. Enter the starting address for the shared memory window in the space provided below.
16 Kbyte Shared Memory Window: ________________________________________________
Will the Reset on DCD/DSR feature be enabled?
NOTE: This question must be answered only if a QL board is being installed. If a software update is being performed, and no QL boards are being installed, skip this question and proceed to the installation instructions.
Enter the state of the Reset on DCD/DSR function in the space provided. For a more detailed description of this function, refer to the discussion below.
State of Reset on Loss of DCD/DSR: _________________________________________
Reset on Loss of DCD/DSR
One practical usage of this feature is to force the QL workstation to reset between remote sessions. This ensures users that they are connecting to a newly initialized system. It also verifies that users are properly disconnected from the network when their session terminates (i.e., a user will not remain logged into a NetWare after "hanging up" the phone).
Depending upon the system configuration, the state of DCD, DSR, or a combination of both signals will indicate that the telephone signal connection is established and that the modem is ready. Most configurations support DCD. However, if a multiplexor is installed between the QL COM1 port and the modem, it may be necessary to monitor DSR instead.
Installation Overview
This chapter describes the proper installation procedures for the QL software in each of following scenarios:
Note: As network configurations change, it is sometimes necessary to modify the configuration specified during the QL installation (Designated Server and/or Network Address) without performing a complete installation of all QL files. Refer to Chapter 5 - Configuration Changes for instructions of changing these configuration parameters.
Both installation scenarios require running the Cubix installation utility, INSTALL.EXE, on the QL Series Installation Diskette. This utility prompts the user for the installation parameters and informs the user as the software installation progresses. For advanced users, the installation utility can be invoked with command line parameters that override the user interface. Refer to the Advanced Installation Features section at the end of this chapter for command line options.
NOTICE: Installing QL boards requires that the SNMP.NLM
(file date 4/6/93 or later) be installed and loaded on the NetWare device which will
contain QL boards. This file is contained in the Novell
SNMP Agent Update, which may be downloaded from the Cubix BBS.
Installation Instructions
Requirements
Installation Steps
Note: Throughout the installation instructions, "QLx" refers to QL3 or QL4, depending upon the type of QL product being installed.
If a driver update is being performed, and no QL boards are being installed, proceed to step 4.
1. Refer to the answers to questions 4 and 6 in the Preparation section to set the Mode Switch (DIP Switch Block SW2) on each QL board being installed. Figure 2 - 2 and Table 2 - 1 illustrate the switch location and settings on QL 3222 boards. Figure 2 - 3 and Table 2 - 2 illustrate the switch location and settings on QL 4222 boards.
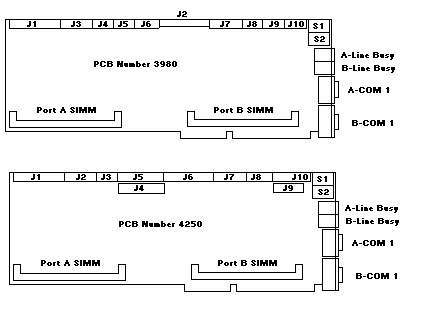
Figure 2-2
QL3222
Table 2-1
QL 3222 Switch SW2 Summary
| Function | 1 | 2 | 3 | 4 | 5 | 6 | 7 |
| * Select Base I/O Address 220 | on | on | on | ||||
| Select Base I/O Address 230 | on | off | on | ||||
| Select Base I/O Address 320 | off | on | on | ||||
| Select Base I/O Address 330 | off | off | on | ||||
| * Proc B: Disable reset Option | off | off | on | ||||
| Proc B: Reset on loss of DCD | off | on | on | ||||
| Proc B: Reset on loss of DSR | on | off | on | ||||
| * Proc A: Disable reset Option | off | off | on | ||||
| Proc A: Reset on loss of DCD | off | on | on | ||||
| Proc A: Reset on loss of DSR | on | off | on |
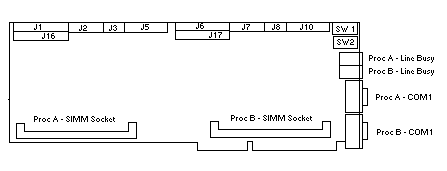
Figure 2-3
QL4222
Table 2-2
QL 4222 Switch SW2 Summary
| Function | 1 | 2 | 3 | 4 | 5 | 6 | 7 |
| * Select Base I/O Address 200 | on | on | on | ||||
| Select Base I/O Address 220 | on | off | on | ||||
| Select Base I/O Address 300 | off | on | on | ||||
| Select Base I/O Address 320 | off | off | on | ||||
| * Proc B: Disable reset Option | off | off | on | ||||
| Proc B: Reset on loss of DCD | off | on | on | ||||
| Proc B: Reset on loss of DSR | on | off | on | ||||
| Proc B: Reset on loss of DCD/DSR | on | on | on | ||||
| * Proc A: Disable reset Option | off | off | on | ||||
| Proc A: Reset on loss of DCD | off | on | on | ||||
| Proc A: Reset on loss of DSR | on | off | on | ||||
| Proc A: Reset on loss of DCD/DSR | on | on | on |
* = Factory Setting
2. Configure the node number of each QL workstation. This is accomplished using DIP Switch Block SW1 (refer to Figure 2 - 2 for QL 3222 switch locations, and Figure 2 - 3 for QL 4222 switch locations). The address for each workstation installed must be unique on the network segment. Therefore, if more than one board of the same type (i.e. QL 3222 or QL 4222) is being installed into one file server or router, SW1 must be configured to set the unique address for each QL.
Note: For an explanation of net and node addressing on a NetWare network, refer to the QL Net Address description in the Preparation section of this chapter.
Since each QL board contains two workstations, or nodes, the seven switches on SW1 determine the seven high order bits of the address for each node. The low order bit for the Processor A node is assumed to the 0, while it is assumed to be 1 for the Processor B node. The default node addresses are 2 (Processor A) and 3 (Processor B). Number the nodes on one network segment consecutively, starting with node number 2.
Table 2-3
Node Number Switch Settings
| # | Switch SW1 | # | Switch SW1 | # | Switch SW1 |
| 002 | 7 off | 052 | 2,4,7 off | 0A2 | 1,3,7 |
| 004 | 6 | 054 | 2,4,6 | 0A4 | 1,3,6 |
| 006 | 6,7 | 056 | 2,4,6,7 | 0A6 | 1,3,6,7 |
| 008 | 5 | 058 | 2,4,5 | 0A8 | 1,3,5 |
| 00A | 5,7 | 05A | 2,4,5,7 | 0AA | 1,3,5,7 |
| 00C | 5,6 | 05C | 2,4,5,6 | 0AC | 1,3,5,6 |
| 00E | 5,6,7 | 05E | 2,4,5,6,7 | 0AE | 1,3,5,6,7 |
| 010 | 4 | 060 | 2,3 | 0B0 | 1,3,4 |
| 012 | 4,7 | 062 | 2,3,7 | 0B2 | 1,3,4,7 |
| 014 | 4,6 | 064 | 2,3,6 | 0B4 | 1,3,4,6 |
| 016 | 4,6,7 | 066 | 2,3,6,7 | 0B6 | 1,3,4,6,7 |
| 018 | 4,5 | 068 | 2,3,5 | 0B8 | 1,3,4,5 |
| 01A | 4,5,7 | 06A | 2,3,5,7 | 0BA | 1,3,4,5,7 |
| 01C | 4,5,6 | 06C | 2,3,5,6 | 0BC | 1,3,4,5,6 |
| 01E | 4,5,6,7 | 06E | 2,3,5,6,7 | 0BE | 1,3,4,5,6,7 |
| 020 | 3 | 070 | 2,3,4 | OCO | 1,2 |
| 022 | 3,7 | 072 | 2,3,4,7 | 0C2 | 1,2,7 |
| 024 | 3,6 | 074 | 2,3,4,6 | 0C4 | 1,2,6 |
| 026 | 3,6,7 | 076 | 2,3,4,6,7 | 0C6 | 1,2,6,7 |
| 028 | 3,5 | 078 | 2,3,4,5 | 0C8 | 1,2,5 |
| 02A | 3,5,7 | 07A | 2,3,4,5,7 | 0EC | 1,2,5,7 |
| 02C | 3,5,6 | 07C | 2,3,4,5,6 | 0CC | 1,2,5,6 |
| 02E | 3,5,6,7 | 07E | 2,3,4,5,6,7 | 0CE | 1,2,5,6,7 |
| 030 | 3,4 | 080 | 1 | 0D0 | 1,2,4 |
| 032 | 3,4,7 | 082 | 1,7 | 0D2 | 1,2,4,7 |
| 034 | 3,4,6 | 084 | 1,6 | 0D4 | 1,2,4,6 |
| 036 | 3,4,6,7 | 086 | 1,6,7 | 0D6 | 1,2,4,6,7 |
| 038 | 3,4,5 | 088 | 1,5 | OD8 | 1,2,4,5 |
| 03A | 3,4,5,7 | 08A | 1,5,7 | ODA | 1,2,4,5,7 |
| 03C | 3,4,5,6 | 08C | 1,5,6 | ODC | 1,2,4,5,6 |
| 03E | 3,4,5,6,7 | 08E | 1,5,6,7 | ODE | 1,2,4,5,6,7 |
| 040 | 2 | 090 | 1,4 | 0E0 | 1,2,3 |
| 042 | 2,7 | 092 | 1,4,7 | 0E2 | 1,2,3,7 |
| 044 | 2,6 | 094 | 1,4,6 | 0E4 | 1,2,3,6 |
| 046 | 2,6,7 | 096 | 1,4,6,7 | 0E6 | 1,2,3,6,7 |
| 048 | 2,5 | 098 | 1,4,5 | OE8 | 1,2,3,5 |
| 04A | 2,5,7 | 09A | 1,4,5,7 | OEA | 1,2,3,5,7 |
| 04C | 2,5,6 | 09C | 1,4,5,6 | OEC | 1,2,3,5,6 |
| 04E | 2,5,6,7 | 09E | 1,4,5,6,7 | OEE | 1,2,3,5,6,7 |
| 050 | 2,4 | 0A0 | 1,3 | OFO | 1,2,3,4 |
All switches shown are in OFF position
3. Install the QL workstations in one of the following:
To install the boards:
Note: Depending upon the enclosure in which the QL board is installed, additional hardware installation may be required for disk drives, the line busy feature, etc. Instructions to perform these installation procedures are included in Chapter 9 - Hardware Reference. Instructions for connecting I/O to the QL workstations are also included in the Hardware Reference.
4. Load the SNMP.NLM (dated 4/6/93 or later).
5. Make a working copy of the QL Series Installation Diskette using the DOS DISKCOPY command and place the original diskette in a safe place. Do not use the original diskette for the rest of the installation process.
6. If this is a driver update, and new drivers are being installed on the same designated server as existing QL drivers, rename the SYS:CUBIX/QL3000 or SYS:CUBIX/QL4000 directory. Be aware that a new image file will be installed so any custom changes that have been made to the old image file will need to be applied to the new image file after the update is complete.
7. From a workstation equipped with a floppy drive (A or B), log onto the network and login to the designated server as SUPERVISOR.
8. Execute the Cubix installation utility to copy and configure the necessary QL files onto the designated server.
At the DOS prompt, insert the QL Series Installation Diskette into the floppy drive. Change to that floppy drive, and type:
INSTALL <ENTER>
Note: For initial installations it is important that INSTALL be run from the A: or B: floppy drive. INSTALL should only be run from a file server or hard drive to change configuration parameters. A full installation is not performed unless INSTALL is run from the A: or B: drive.
Upon executing INSTALL, a screen similar to Figure 2 - 4 will be displayed.
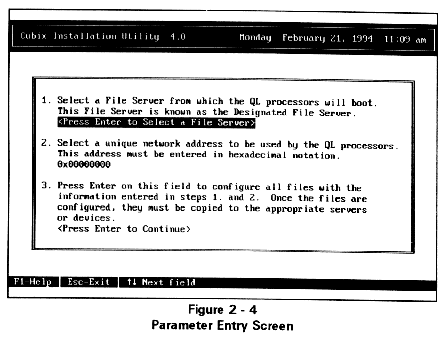
9. Specify the Designated Server (refer to question 1 of the preceding Preparation section). Press <ENTER> and a list of currently connected file servers is displayed on a screen similar to Figure 2 - 5.
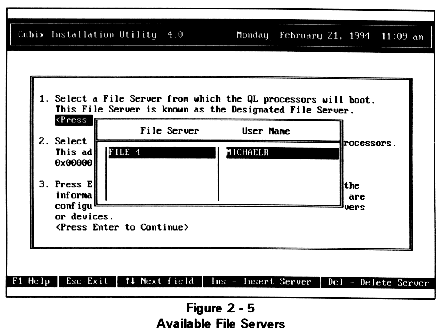
Use the arrow keys to highlight the designated server and press <ENTER>. To login to a server not listed, or to establish supervisory privileges on a server, press <INSERT> and select the desired server from the list displayed. If there are too many existing connections for this workstation to login to another server, an existing connection may be removed by highlighting the server no longer required and pressing the <DELETE> key.
Note: The connection to the default server may not be deleted, nor may a connection established by the Novell Directory Services.
10. Specify the QL Network Address. Enter in hexadecimal the unique network address selected in response to question 2 in the preceding Preparation section and press <ENTER>.
11. Complete the installation utility. INSTALL performs the following functions:
SYS:CUBIX/QL3000/LOGIN/QL32_DOS.LOD (for QL 3222 installations)
SYS:CUBIX/QL4000/LOGIN/QL4_DOS.LOD (for QL 4222 installations)
NOTICE! The INSTALL utility will install an image file on the designated server. It is the installer's responsibility to ensure that a DOS license is acquired for each QL processor that will boot
from this image file.
As INSTALL progresses through the installation, it builds a log file documenting its activities and functions. This log file, INSTALL.LOG, is written to the CUBIX/QL3000 or CUBIX/QL4000 directory of the designated server. This file is useful for troubleshooting purposes if problems occur during installation.
When INSTALL completes copying and configuring the QL files, it will optionally display or print a README file explaining the remaining steps which must be performed to complete the installation process. The instructions below are the same as the instructions in the file. The file is only provided as an added convenience.
12. If drivers are being updated in an existing QL installation, follow the steps below; otherwise, proceed to step 13.
If the QL workstations that are to be updated are equipped with hard disk drives, follow the instructions below.
Disk Drive Updates for DOS
To update disk drives formatted for DOS:
On each QL workstation to be updated, change to the SYS:/CUBIX/QLx000/HDDRV directory on the designated server. If there is not a monitor and keyboard attached to the QL workstation, QLVision or a remote communications application may be used to establish a remote control link with the workstation.
Invoke the update application by typing QL3_UPDT or QL4_UPDT and answer the prompts as they are displayed.
Disk Drive Updates for OS/2
To update disk drives formatted for OS/2:
Copy the QL OS/2 workstation driver file (Qlx_OS2.SYS) from the designated server to the QL local drive in the C:\NETWARE directory.
Copy the OS/2 mouse driver, CBXMOUSE.SYS, from the designated server to the QL local drive in the C:\OS2 directory.
Modify the CONFIG.SYS file to include:
Modify the NET.CFG file to include:
where 14 is the number of communication buffers the OS/2 Requester can use, and 4210 provides support for a maximum packet size of 4 Kbytes.
13. On the designated server, copy all files from the SYS:/CUBIX/QLx000/LOGIN directory to SYS:/LOGIN on the same server.
14. Install the drivers and supporting software on the device containing the QL boards. The appropriate files to install depend upon the version of NetWare running on the device as follows:
Note: If the boards are installed in a MPR with no volume mounted, copy the files to the MPR boot diskette (wherever SERVER.EXE is located).
15. Modify the AUTOEXEC.NCF file on the server or MPR containing the QL boards. Invoke the QLx_EXEC.NCF file by adding one of the following commands to the AUTOEXEC.NCF file:
or
QL4_EXEC (if QL 4000 Series processors are installed in the device)
16. Modify STARTUP.NCF on the device containing the QL boards. Invoke the QLxSTART.NCF file by adding one of the following commands to the STARTUP.NCF file:
or
QL4START (if QL 4000 Series processors are installed in the device)
17. Reboot the server or MPR containing the QL boards. This allows the changes made to the AUTOEXEC.NCF and STARTUP.NCF files to take effect.
18. Create a user group named QLVISION on the designated server. Using the Novell utility SYSCON, add the names of all users who should be allowed to run the QLVision management utility to this group. Refer to Chapter 4 - QL Management for more information on QLVision security.
19. If the QL workstations are not equipped with disk drives, edit the QLUSER.BAT file in the /LOGIN directory of the designated server. Add the commands necessary to invoke the appropriate application software. For more information on the QLUSER.BAT file, refer to the QL Files chapter.
20. If diskless QL workstations will run Windows in enhanced mode, modify the [386enh] section of the SYSTEM.INI file used by this workstation to exclude the memory used by the dual port RAM.
emmexclude=ee00-efff (for QL 3222 workstations), or
emmexclude=cc00-cfff (for QL 4222 workstations)
21. Run the QLVision utility to ensure that all of the QL Series workstations are functioning properly. QLVision resides on the designated server as SYS:/CUBIX/QLx000/UTILITY/QLVISION.EXE. If problems arise, refer to Chapter 3 - Troubleshooting.
22. Use QLVision to configure the Cubix Processor Recover (CPR) function as desired. CPR monitors QL workstations and automatically resets a non-responsive QL processor. Instructions for using QLVision may be found in Chapter 4 - QL Management.
23. If the Cubix Management System (CMS) is installed, follow the instructions in the subsequent CMS Support section.
At this point, the installation is complete.
It may be necessary to make changes to the configuration files (such as CONFIG.SYS, AUTOEXEC.BAT, NET.CFG, etc.) on the QL workstations. If the QL workstations are equipped with disk drives, attach a monitor and keyboard to the workstation (as described in the Hardware Reference chapter) or use a remote communication application to connect to the workstation via the LAN. Then make the changes to the configuration files as required.
If the QL workstations are diskless, changing the configuration files requires changing the image file. Refer to Chapter 6 - Custom Image Files for instructions to create a custom image file. Before creating a custom image file, verify that the QL workstations function using the default image file shipped with the QL software (SYS:CUBIX/QL3000/LOGIN/QL32_DOS.LOD or SYS:CUBIX/QL4000/LOGIN/QL4_DOS.LOD). Do not change the default image file.
CMS Support
Follow the instructions below to configure the QL workstations for Cubix Management System (CMS) support.
Instructions
SYS:CUBIX/QLx000/LOGIN/CMSNET.CFG
For CMS to manage the QL workstation, the CMSNET.CFG file must be modified to include the IPX address of the CMS console as the trap target. The CMS console refers to the workstation running the Windows-base CMS application. Note that the semicolon (";") preceding this statement must be deleted. To determine the address of the CMS console, log into the network from the CMS console and enter he command:
userlist /a
The current users and the network address of the workstation from which each user is logged in will be displayed. An asterisk will indicate the line describing the CMS console.
Note: The network address must be specified in the format xxxxxxxx:yyyyyyyyyyyy, where xxxxxxxx is an eight digit hexadecimal net number and yyyyyyyyyyyy is a twelve digit hexadecimal node number.
config
The value displayed as the "IPX Internal Network Number" represents the net address of the QL Supervisor. The node address is one. Construct the complete address in the format xxxxxxxx:000000000001, where xxxxxxxx is the eight digit hexadecimal net number displayed on the console and 000000000001 is twelve digit representation of the node number. Insert this complete address into the Cubix Node Agent section of the NET.CFG file as the SupervisorAddress:
Cubix Node Agent
TrapInterval = 30
SupervisorAddress =put address here
DeviceType = QL
SYS:ETC/TRAPTARG.CFG
In the ProtocolIPX section of this file, add the same trap target address determined in step 1 and placed in the CMSNET.CFG file.
Complete CMS configuration instructions may be found in the Cubix Management System Installation Guide.
Advanced Installation Features
The user may specify the installation parameters on the INSTALL command line. Invoking this feature allows experienced users to bypass the user interface while performing an installation. INSTALL will not request or display any information if command line parameters are specified unless an error is encountered, in which case an error message is displayed and the installation is aborted.
Command Line Parameters
Option Description
-s=server where server specifies the designated server name
-n=net address where net address specifies the hexadecimal QL network address
@options file where options file specifies the name of a file containing the installation parameters
F Refer to the Installation chapter for a description of these parameters.
Usage
INSTALL [-s=server] [-n=net address] [@options file]
Options File Format
The installation parameters may be read from an options file by specifying the name of the file preceded by "@" on the INSTALL command line. The options file must be an ASCII file beginning with an "[Installation]" identifier. One or more installation parameters may follow this identifier.
Format:
DesignatedServer=server
QLNetAddress=net address
where server specifies the name of the designated server and net address is the hexadecimal QL network address.
Rules
The net address must be specified in hexadecimal.
No command line parameters are case sensitive.
If any command line parameters are specified, all installation parameters must be specified via the command line.
Command line parameters are read from left to right, with the right-most parameters overriding options to the left.
Examples
This will install the QL software on network address 26 hexadecimal using SERVER_ONE as the designated server.
2. INSTALL @INSTALL.TXT
where INSTALL.TXT contains the following text:
[Installation]
DesignatedServer=SERVER_TWO
QLNetworkAddress=2C
This will install the QL software on network address 2C hexadecimal using SERVER_TWO as the designated server.
3. INSTALL -s=SERVER_ONE -n=2C @INSTALL.TXT
where INSTALL.TXT contains the following text:
[Installation]
DesignatedServer=SERVER_TWO
This will install the QL software on network address 2C hexadecimal using SERVER_TWO as the designated server.
This document, and all Web contents, Copyright © 1997 by Cubix Corp., Carson City, NV, USA.