ERS/FT II
Power Supply Replacement
Important Note!
On the top of each power supply is a label (approximately 1 x 3 inch) with the power supply ratings. The label is either white or blue in color. Do not install power supplies in a dual power supply system with different colored labels.
1. Turn power off to the system.
Single Power Supply System: Turn off power to the system, and remove the power cord from the AC receptacle on the back of the system.
Dual Power Supply System: Turn off power to the supply being replaced, and remove the power cord from the AC receptacle for that power supply.
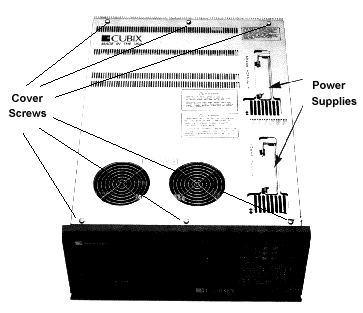
2. Remove the system's top cover:

Figure 1 - ERS/FT II Top Cover
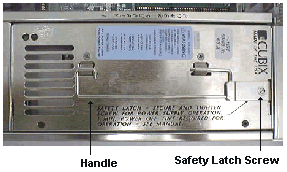
3. Unscrew the safety latch securing the power supply (see figure 2).

Figure 2 - Power Supply Safety Latch and Handle
4. Pull up on the handle to remove the power supply.
5. Insert the new power supply.
6. Lay the handle flat under the safety latch, and secure the safety latch by tightening the safety latch screw.
7. Replace the top cover and secure with the quarter turn fasteners.
8. Plug in the power cord and turn on system power.
The green LED on the top of the power supply should be on. If it is not, check the following.
Systems | Circuit Boards | Other Products | Software | Hardware Identifier
Other Vendors | Technical Notes | Downloads | Search | Support Home Page
This document, and all
Web Site contents, Copyright ©
2000 by Cubix Corp., Carson City, NV, USA.