 |
|
|
|
ERS/FT Multiplexor
The multiplexor muxes the keyboard, video, mouse, reset, and floppy disk drive signals from each Cubix processor to a single set of devices. The keyboard, video, and mouse signals are multiplexed from each Cubix processor to the "Video Out" connector of each ERS/FT Subsystem. The reset signal from each Cubix processor is multiplexed to the reset pushbutton on the front console. The floppy disk drive controller signals from each BC processor are multiplexed into a single shared drive located on the front panel.
Operation of the multiplexor is controlled from the Front Console as described below.
The "up" and "down" pushbuttons control the selection of up to 8 processors. The "reset" pushbutton is shared among all BC processors. The pushbutton labeled "Enable/Disable" enables and disables the multiplexor.
"Up/Down" Pushbutton
Depressing either of these pushbuttons either increments or decrement the mux by one channel position. Switches mounted on the multiplexor PCB determine the maximum number of enabled processors - one through eight. Therefore, continuously pushing the "up" pushbutton increments the mux to the position associated with the maximum number of processors and then rolls over to display "1". Conversely, continuously pushing the "down" pushbutton decrements the multiplexor selection to "1" and then rolls to the maximum number of enabled processors.
"Enable/Disable" Pushbutton
If the mux is enabled (i.e., a number 1 to 8 is displayed) depressing this pushbutton "DISABLES" the keyboard/video/mouse signals, preventing them from leaving the subsystem, and also disables the reset pushbutton and the multiplexed floppy drive. Depressing this switch again "ENABLES" the mux and connects the video, keyboard, mouse, floppy and reset pushbutton to BC processor Number One. The multiplexor is considered "ENABLED" whenever a port number (1-8) is displayed.
Display
A seven segment display is used. The "O" is used to indicate OFF or Mux "DISABLED". The numbers 1-8 indicate which processor is connected to the video, keyboard, mouse, floppy disk, and reset pushbutton.
Keyswitch
The key switch, when placed in the locked position, disables the multiplexor when all option switches are in the OFF state. Refer to Appendix F for the description of the mux when the option switches are ON.
Power Supply Indicators
The "on-line" and "fault" lights provide an indication of the status of each of the power supplies. Note that if a power supply is not installed, neither the on-line nor the fault light is illuminated.
Group Enable Switch
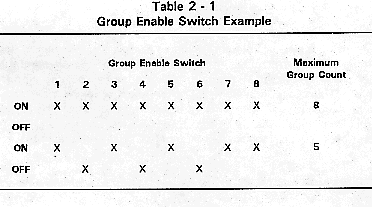
This eight position switch, mounted on the multiplexor I/O PCB, is used to indicate to the multiplexor which processor positions are active and determines the maximum count. The group enable switch is mounted in an accessible location on the multiplexor so it can be set by factory technicians prior to shipment. It can also be easily changed in the field by a system integrator or end-user, if desired. Refer to Table 2-1 for an example.
If an enabled group either doesn't have a BC processor installed or the group power is turned off, all devices will appear to be disconnected if that group is selected by the multiplexor. For example, selecting a group with it's power turned off will display a blank screen on the monitor.
Note: Enabling any mux in a daisy-chain series of FT Subsystems immediately disconnects all other muxes.
Option Switch
A four position switch mounted adjacent to the group enable switch is used to select the following options:
Group Power Switching
Switches and power-on lights for each group are located under the fan panel inside the Fault Tolerant Resource Subsystem. Powering down an individual group requires a tool (small pen or screwdriver) and turns off all DC power to the slots and hard disk drives associated with that group. There are individual LED's on the backplane near the L-brackets indicating the presence of +5vdc for each slot. The purpose of this is to enable the technician to ensure each slot in a group has power off to prevent the accidental removal of any module with power on.
CAUTION: Disable MUX ("0" displayed) before turning the power off in any group. See chapter 6, Troubleshooting and Preventative Maintenance, for details.
CAUTION: Always place the insulating barrier (Cubix eng no 300-s06710) between the PCB to be removed and an adjacent PCB that still has power on. This insulating barrier is designed to be stored on the left hand side of the subsystem.
Systems | Circuit Boards | Other Products | Software | Hardware Identifier
Other Vendors | Technical Notes | Downloads | Search | Support Home Page
This document, and all
Web Site contents, Copyright ©
2000 by Cubix Corp., Carson City, NV, USA.