 |
|
|
|
Chapter 3
Installation & Operation
Preinstallation Inspection
Installation
Connecting a Monitor, Keyboard, and Mouse
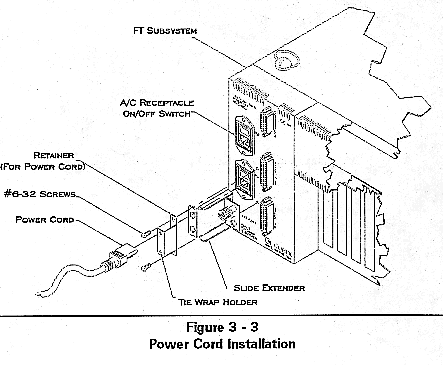
Installation - Power Cord Retainer
In addition to the MultiServ/FT Subsystem, the following items should be included in the MultiServ/FT Subsystem shipping container:
Item  Cubix Part Number    Qty
Description

1     DOC 806A             1      MultiServ/FT
                                  Subsystem
                                  User's
                                  Guide (this
                                  document)

  2     *222-SLIDES-HDWR     1    Slide mounting
                                  hardware

  3       *300-S07200        1    Drawer retainer

  4       *300-S03710        2    Bracket & slide
                                  extension, for 30"
                                  deep cabinet (to be
                                  installed on each
                                  outer slide member on
                                  site)

  5    *403-A0159-115VAC     2    MultiServ/FT 115V or
                                  240V AC input cord
      -A0160-240VAC               assembly (cord
                                  retainer bracket is
                                  tie-wrapped to AC
                                  Cord).   240VAC cord
                                  is for connection to
                                  Cubix System 1010
                                  Cabinet only.

  6                          2    Keyswitch keys (taped
                                  to power cord)

7     300-S06710           1      PCB Insulating
                                  Barrier -  (stored on
                                  left hand side,
                                  inside subsystem)


  * Preinstalled in Cubix Cabinet at factory

  If any of these items are missing please contact Cubix
  Customer
  Service at (800) 829-0551, 7:00 am - 5:00 pm, Pacific
  Time, Monday
  through Friday, 8:00 am - 4:00 pm, Pacific Time, Saturday.
Upon receiving the Cubix MultiServ/FT Subsystem, perform the following inspection described in the following sections.
ATTENTION:
THE COVER ON THE FT SUBSYSTEM SHOULD BE REMOVED BY SERVICE PERSONNEL ONLY!
CAUTION: THE FT SUBSYSTEM HAS MORE THAN ONE POWER SUPPLY CORD. DISCONNECT 2 POWER SUPPLY CORDS BEFORE SERVICING TO AVOID ELECTRIC SHOCK.
Stand Alone Rack Mount Subsystem
1. Remove the subsystem from its shipping box and place it on a workbench or table.
2. Remove the top cover(s).
3. Perform a visual inspection of the subsystem. Verify that all drives and boards are properly seated and all cables are securely connected.
4. Verify power supplies are properly seated and power supply safety latch is tightened (located on the top of the power supply case).
5. Verify labels on top of power supply cases specify the proper input voltage (115 VAC or 230 VAC).
* If the input voltage label is incorrect DO NOT power up the subsystem. Refer to Chapter 5 - Field Replaceable Units for instructions to remove the power supply.
Subsystem Mounted into a Cubix Cabinet
1. Remove the cabinet from its shipping box and place it in an upright position.
2. Release the thumb screw from the retainer bracket at the rear of each MultiServ/FT Subsystem.
3. Extend each subsystem - one at a time - on its slides.
4. Refer to #2 in the Stand Alone Rack Mount Subsystem section above to continue the preinstallation inspection on each drawer.
1. Connect the Cubix supplied DB-25 cable on the rear of the MultiServ/FT Subsystem to the plug labeled "VIDEO OUT". Connect the other end to the free standing or to the Cabinet mounted video, keyboard, mouse interface module.
2. Connect a VGA monitor, keyboard, and mouse to the Video/Keyboard/Mouse Interface Module. (See next section for a detailed explanation.)
3. Connect the power cords to the subsystem and apply power (refer to Figure 3-3).
4. Enable the multiplexor and select the first BC Series processor using switch on front panel.
5. The BC Series processor will boot, perform a memory test, and then display a prompt to enter the BIOS Setup program. Enter the setup program, and enter the necessary information such as time, date, hard drive type, etc. For detailed information on the BIOS Setup program refer to the BC Series Installation Guide provided with the BC Series processor installed.
6. Insert a bootable DOS diskette into the "Multiplexed Drive".
7. Reset the processor using the reset button on the front panel.
8. The BC Series processor will reboot and load DOS.
9. Select next BC Series processor.
10. Repeat steps 5 to 9 for each group containing a BC Series processor.
11. If a hard disk is installed in the subsystem, format the drive to make it DOS bootable. Then run the BIOS setup program, and change the "System Boot up Sequence" under ADVANCED CMOS SETUP to C:, A:. This will allow each BC processor to boot from its hard disk. Repeat this step for each group with a hard disk.
12. Power off the subsystem.
13. Proceed with the network operating installation.
14. Install the LAN Adapters into each group to be used in the subsystem.
15. Install any other devices such as I/O boards, fax or internal modems at this time.
16. Power on the system.
17. Insure that the BC processor in each group boots properly.
18. Copy the necessary LAN Adapter drivers and network shell files to the hard disks or floppies.
19. Reset each group and verify they successfully attach to the network.
20. When all groups are working properly, power down the system and insure that all of the boards are properly secured. Reinstall the cover.
21. Install the system software.
* If installation is for a desktop unit, leave at least 4" of air space along the right fan grills and the top fan grills for proper airflow.
Subsystem Installed in Cubix Cabinet
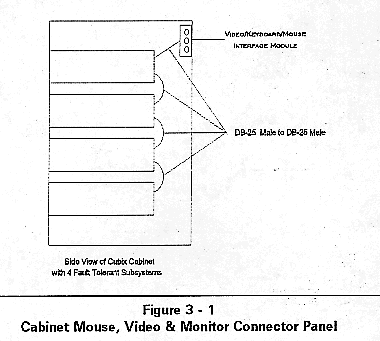
1. Connect the Cubix supplied DB-25 male-to-male cable to the "VIDEO OUT" connector on the bottom drawer. Connect other end to the "VIDEO IN" connector in the next subsystem. See Figure 3-1.
2. Continue the daisy chain connections to the top drawer.
3. Connect top drawer "VIDEO OUT" to the Video/Keyboard/Mouse interface module at top rear of the Cubix cabinet.
4. From the top of the cabinet, route VGA video, keyboard, and mouse cables into the cabinet via a 1.75" access hole in the top cover and connect cables to the video, keyboard, mouse interface module outputs.
Subsystem Not Installed in a Cubix Cabinet
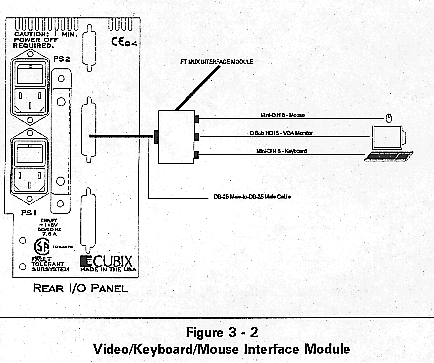
1. Connect the Cubix supplied DB-25 male to male cable on the rear of the MultiServ/FT Subsystem to the plug labeled "VIDEO OUT". Connect the other end to the mux video/keyboard/mouse interface module. Refer to Figure 3-2.
2. Connect a VGA monitor, keyboard, and mouse to the video/ keyboard/mouse interface module's appropriate plugs.
1. Loosen the screw, located at the rear left hand area of the drawer, which is securing the lower flange of the AC power receptacle and on/off switch.
2. Slip the slotted flange of cord retainer under the head of the loosened screw. Push up on the retainer to bottom screw against the end of the slot and tighten screw. Figure 3-3
This document, and all Web contents, Copyright © 1997
by Cubix Corp., Carson City, NV, USA.