GlobalVision
Quick Start Guide
GlobalVision is equipped with an extensive help system; therefore, this manual will not attempt to document the user interface of GlobalVision. Instead this manual will provide an overview of the GlobalVision architecture and instructions for GlobalVision installation.
Overview
GlobalVision is the Cubix management system for managing Cubix devices in a LAN/WAN environment. GlobalVision provides monitoring, alarming, supervisory control, and usage reporting from a central management console. GlobalVision provides all network communications using SNMP (Simple Network Management Protocol).
Cubix Device Types
GlobalVision manages five types of devices.
Components
GlobalVision consists of two main software components.

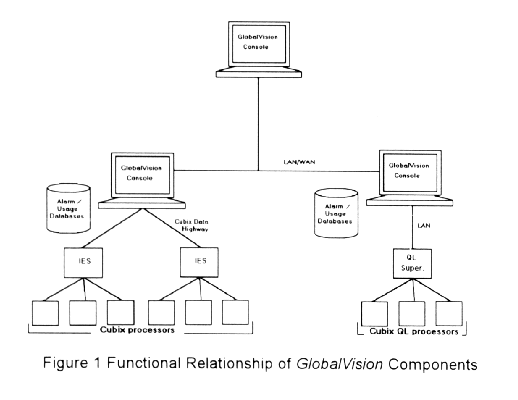
Figure 1 Functional Relationship of GlobalVision Components
GlobalVision Console Software
A GlobalVision Console is a Windows NT workstation running the GlobalVision application. The GlobalVision application provides the user interface for the management of Cubix devices. A GlobalVision Console also collects and stores data from the GlobalVision Agents. Multiple GlobalVision Consoles can communicate with each other and share information. A user at a GlobalVision Console can manage devices that are physically attached to the Console and also devices which are attached to remote GlobalVision Consoles.
Additionally, each GlobalVision Console maintains two databases: the Alarm Database and the Usage Database. The Alarm database stores alarms that have occurred on the IES modules that are physically attached to the GlobalVision Console and any alarms that have been reported by QL Supervisors associated with the GlobalVision Console. The Usage Database stores usage information on the Cubix processors that are associated with the GlobalVision Console. A GlobalVision Console can access information from the local database and a remote GlobalVision Console’s database in the form of reports.
GlobalVision Agents and IES Responders
Cubix processors managed by GlobalVision require a SNMP Agent and an IES Responder driver.
SNMP Agents
In order for GlobalVision to receive usage and inventory information from Cubix processors, a SNMP Agent must be installed on each processor. Alarms are also generated by these agents in the form of SNMP traps.
Note that the GlobalVision Console serves as a proxy SNMP Agent for the IES Module and provides IES status and IES-related alarms.
IES Responder drivers
The IES Responder drivers running on the Cubix processors support GlobalVision by responding to the IES status poll. The driver used depends on the operating system installed on the processor. Refer to Agent Workstation Setup for additional information about each driver.
Before You Begin
The GlobalVision Console application is installed on any Intel x86 based desktop system running Windows NT (v3.51 or greater, Workstation or Server).
Before you begin, ensure you have the following diskettes:
Installation Procedure
Console Physical Installation
To install the IES Data Highway, consult the hardware installation guide for the Cubix product containing the IES module.
Console Software Installation
Preliminary
Install TCP/IP or IPX/SPX protocols before installing the GlobalVision Console.
The GlobalVision Console installation provides the option of installing Microsoft ODBC files. Ignore instructions for installing these files if Microsoft ODBC has been previously installed.
Remove or disable the SNMP Service if it has been previously installed.
Installation Instructions
If you did not choose to install ODBC files, skip to step 19.
Configuration of Remote GlobalVision Consoles
In addition to managing the devices connected to a GlobalVision Console it is possible for one GlobalVision Console to manage the devices connected to other GlobalVision Consoles across a LAN or WAN. This management includes not only the ability to see and manipulate devices across the LAN or WAN, but also the ability to receive and display alarms across the LAN or WAN. In order for this management to take place a "connection" must be made between two GlobalVision Consoles. In the following discussion a "Local GlobalVision Console" is the console from which you are working. A "Remote GlobalVision Console" is any other GlobalVision Console on the LAN or WAN. To Create a "connection" between a Local GlobalVision Console and a Remote GlobalVision Console perform the following:
On the Local GlobalVision Console:
To receive alarms from a remote GlobalVision Console perform the following:
Note: Any GlobalVision Console can act as either a Local or Remote GlobalVision Console simultaneously. Thus, it is possible for two GlobalVision Consoles to monitor each other’s devices. Additionally, any GlobalVision Console can monitor multiple Remote GlobalVision Consoles.
Note: A GlobalVision Console that is not managing any devices locally should not be configured as a Remote GlobalVision Console because it has nothing to be managed. This console could be used to manage other GlobalVision Consoles, however.
Agent Workstation Setup
The following sections explain the installation of the GlobalVision Agent (and any required support files) for the DOS/Windows 3.x, Windows95, Windows NT, and NetWare operating systems.
Before You Begin
Before you begin installing GlobalVision Agents you should have the following information available:
Install Directory - Location where GlobalVision files will be installed.
GlobalVision Console Address - For IPX networks this is the network number and MAC address of the NT station where GlobalVision is installed. For example:
00000080:0020940200D5
For TCP/IP networks, this is the IP address, of the NT station where GlobalVision is installed.
128.135.127.201
(Refer to the section Determining the IPX or IP Address of the GlobalVision Console.)
Trap Interval - The frequency, in seconds, at which the GlobalVision Agent sends trap information to the GlobalVision Console. Thirty seconds is suggested.
IES Address - The IES (Intelligent Environmental Sensor) Data Highway address (1 - 31) assigned to the processor board. This address is set with either two rotary switches on the end bracket of the IES module for the ERS/FT and ERS II or one DIP switch on the surface of the IES for the ERS/FT II or SafeStor/FT II. For more information regarding setting the Data Highway Address refer to the hardware installation manual for the subsystem being used.
Group - The backplane group (segment) number
(1 - 8) where the processor board is installed. The group number is displayed on the front
panel of the enclosure.
DOS and Windows 3.x
The Cubix DOS IES Responder, CBXIES.SYS, supports GlobalVision by providing the primary status for Cubix processors. The Cubix SNMP Agent for DOS provides status, inventory and usage information to the GlobalVision Console.
Preliminary
Remove write protection from the GlobalVision DOS/Windows Agent diskette before performing the following procedure.
Installation Instructions
Windows 95
The Cubix DOS IES Responder, CBXIES.SYS, supports GlobalVision by providing the primary status for Cubix processors. The Cubix Windows 95 SNMP Agent provides status, inventory and usage information to the GlobalVision Console.
Installation Instructions
Note: The Windows 95 SNMP service is required by the GlobalVision Windows 95 Agent. The SNMP service is automatically installed by the Cubix Windows NT/95 Agent Setup.
Windows NT
The Cubix NT IES Responder, CBXIES.SYS, supports GlobalVision by providing the primary status for Cubix processors running Windows NT. The Cubix SNMP Agent for Windows NT provides status, inventory and usage information to GlobalVision.
Note: The Windows NT SNMP service is required by the GlobalVision NT Agent. Install and configure the SNMP service before installing the GlobalVision Windows NT Agent.
To configure the SNMP Service for Windows NT:
Installation Instructions
Windows NT 3.51:
Windows NT 4.0:
NetWare
Primary status of Cubix Processors used as NetWare file servers is provided by two separate IES Responder drivers. CBXIES.SYS is the responder for DOS, and CBXIES.NLM is the responder for NetWare. The Cubix SNMP Agent for NetWare is CBXNDNW.NLM. In addition, there is a preload utility, CBXNWPLU.EXE.
Installation Instructions
Install will copy CBXIES.SYS and CBXNWPLU.EXE to your root directory. Install will modify your CONFIG.SYS to load CBXIES.SYS and will execute CBXNWPLU.EXE to create the data file CBXNWPLU.DAT.
Setup Instructions
Setup will create CBXNODE.NCF and will copy CBXNDNW.NLM and CBXIES.NLM to your root SYSTEM directory. Setup will create CBXNODE.INI and modify TRAPTARG.CFG in your ETC directory.
Note: If the old IES Responder, BCACTIVE.NLM, is loaded by AUTOEXEC.NCF, it should be removed. Previous references to SNMP.NLM should also be removed from AUTOEXEC.NCF.
Sample Files for Cubix Processor Setup
The following pages provide sample NET.CFG files for IPX and IP support on the DOS/Windows Agent Workstation. Sample CBXNODE.INI, and TRAPTARG.CFG required by Cubix Processors running NetWare are also included.
NET.CFG for IPX Support on DOS//Windows Workstation
Link Driver PCNTNW
Frame Ethernet_802.3
NetWare DOS Requester
checksum = 0
FIRST NETWORK DRIVE = F
PREFERRED SERVER=ADMIN1
VLM = WSSNMP.VLM
VLM = WSTRAP.VLM
VLM = WSREG.VLM
VLM = WSASN1.VLM
VLM = MIB2IF.VLM
VLM = CBXNODE.VLM
Cubix Node Agent
TrapInterval = 30
DataHighwayAddress = 14
Group = 7
DeviceType=BC
Transport Provider IPX
trap target = 00000017:0001c05df05f
Desktop SNMP
enable monitor community = any
monitor community = "public"
enable control community = specific
control community = "public"
enable trap community = specific
trap community = "public"
sysName = "Suzanne Marshall x294"
sysLocation = "Building 2"
sysContact = "suzanne@admin.com"
snmpEnableAuthenTraps = on
NET.CFG for IP Support on DOS/Windows Workstation
Link Driver PCNTNW
Frame Ethernet_II
NetWare DOS Requester
CHECKSUM=0
FIRST NETWORK DRIVE=F
VLM = WSSNMP.VLM
VLM = WSTRAP.VLM
VLM = WSREG.VLM
VLM = WSASN1.VLM
VLM = MIB2IF.VLM
VLM = CBXNODE.VLM
Desktop SNMP
enable monitor community = any
monitor community = "public"
enable control community = specific
control community = "public"
enable trap community = specific
trap community = "public"
sysName = "Lab #5"
sysLocation = "Lockheed.CarsonCity.USA"
sysContact = "702.888.1000"
snmpEnableAuthenTraps = on
Transport Provider UDP
trap target = 129.1.0.3
Cubix Node Agent
TrapInterval = 30
DataHighwayAddress = 14
Group = 7
DeviceType=BC
Link Support
Buffers 8 1500
MemPool 4096
Protocol TCPIP
PATH TCP_CFG C:\IPNET\TCP
ip_address 129.1.0.2
ip_netmask 255.255.00.00
ip_router 129.1.0.1
NWIP
NWIP_DOMAIN_NAME NWIP.DOPEY.COM.
NSQ_BROADCAST ON
NWIP1_1 COMPATIBILITY OFF
AUTORETRIES 1
AUTORETRY SECS 10
CBXNODE.INI for NetWare File Server
[CUBIX NODE AGENT]
TrapInterval = 30
DataHighwayAddress = 31
Group = 1
DeviceType = BC
TRAPTARG.CFG for NetWare File Server
#####################################################
# traptarg.cfg
#
# SNMP Agent Trap Target ( Destination) Configuration
#
# File format:
#
# Protocol <name>
# Specifies the beginning of a list of names or
# addresses of managers to which to send traps using the
# protocol specified by <name> if that protocol is
# registered as a service provider to the SNMP Agent.
#
# All destinations must be preceded by white space
# Each destination must be listed on a separate line.
#
# The Protocol keyword, left justified, signifies the
# start of a new protocol section.
#
# Comments are preceded by the hash mark, and proceed
# to the end of the line.
#
#####################################################
Protocol IPX
# In this section you can put SNMP managers that want to receive
# traps from the local node over IPX. Managers can be identified
# by NetWare service name (a NetWare filer server name, for example)
# or by IPX address
00000007:00001b0ad24d
00000007:0000c099f05f
00000007:00001b404622
00000007:0000c08ff05f
Protocol UDP
# In this section you can put SNMP managers that want to receive
# traps from the local node over UDP. Use either IP address or
# name. By default, the local node sends traps at least to itself
Support File Installation for QL Series Processors
GlobalVision Support
GlobalVision requires QL Series Installation Disk V5.05 or higher.
QL Supervisor
SYS:\ETC\TRAPTARG.CFG
Trap=<community name> Control=<community name> Monitor=<community name>
Note: The QL software will create a QLX.INI file. The Trap Interval is configured in this INI file as 30 seconds. This value may be modified by changing the following line:
[QL SUPERVISOR AGENT]
TRAPINTERVAL=XX
where XX in the desired trap interval in seconds (300 max.)
Determining the IPX or IP Address of the GlobalVision Console
To determine the IPX address of the GlobalVision Console in a NetWare environment, log on to the network from the GlobalVision Console and enter the following command from a DOS window.
ipxroute config
The following similar information will be displayed.
Net:1 network number 0000007, frame type 802.3
device AMDDCNI (00209404048A)
Thus, the IPX address of the GlobalVision Console is 0000007:00209404048A
You also can enter this command:
userlist /a
The current users and the network address of the workstation from which each user is logged in will be displayed. An asterisk will indicate the address of the GlobalVision Console. Write down the network address for later reference.
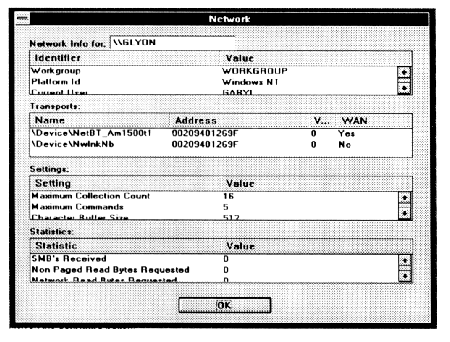
Alternatively, the IPX node address can be determined by selecting Windows NT Diagnostics from the Administrative Tools Program Group, and selecting Network. The node address is the twelve-digit hex address listed under Transports.

F Important: The IPX network address must be in the format xxxxxxxx:yyyyyyyyyyyy, where xxxxxxxx is an eight digit hexadecimal net number and yyyyyyyyyyyy is a twelve digit hexadecimal node number.
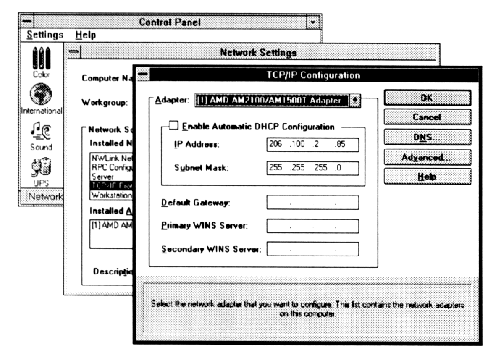
To determine the IP address of the GlobalVision Console, select Control Panel from the Main Program Group, select Network, then TCP/IP Protocol, and finally, Configure. The IP address is listed in the TCP/IP configuration dialog.

The IP network address must be in the format xxx.xxx.xxx.xxx, where xxx is a decimal number between 0 and 255.
This document, and all Web contents, Copyright © 1997 by Cubix Corp., Carson City, NV, USA.