 |
|
|
|
FT
Subsystems
Chapter 4 - Expansion Subsystem
Overview
Power Supply
Processor Bay
Multiplexor/Front Panel
Drive Bay
Input/Output
Auxiliary Junction Panels
System Considerations
FT Expansion Subsystem Software Support
Expansion Subsystem Interface Board (A3480)
Host Computer Interface Board (A3470)
DMA Setting
I/O Address Settings
Early "Wait" Signal
The Cubix Fault Tolerant Expansion Subsystem extends the bus of a standard AT class computer and is designed to be installed into a Cubix Cabinet or a customer furnished RETMA standard enclosure.
The Cubix Expansion Subsystem consists of 16 ISA slots. Since one host slot and one expansion slot are required for the interface boards, the Expansion Subsystem extends the host computer by 14 slots. Up to eight Expansion Subsystems can be connected to the host computer with each accommodating 8- or 16-bit I/O boards.
Installation consists of inserting the host interface board in the host computer and the Expansion interface board in the Expansion Subsystem and connecting the two with the provided cable. Refer to Chapter 5 for detailed installation instructions.
Although the Expansion Subsystem has been tested with some non-Cubix 8- and 16-bit I/O boards, there is no guarantee of compatibility with boards not manufactured by Cubix Corporation. Refer to Chapter 5 for a detailed list of the type of boards known to not work in the Expansion Subsystem.
Overview
The Cubix Fault Tolerant (FT) Expansion Subsystem consists of six main sections: * The Power Supply Bay houses two 375 watt power supplies which provide power to the subsystem. * The Processor Bay contains the 16-slot passive ISA backplane. * The Multiplexor/Front Panel permits the subsystem processors to share a VGA monitor, keyboard, mouse, floppy disk drive, and reset pushbutton. * The Drive Bay supports the floppy and hard disk drives. * The Input/Output Panel provides power entry and signal routing. * Auxiliary Junction Panels are options which provide mountings and space for auxiliary I/O adapter boards.
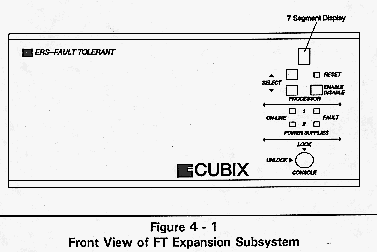
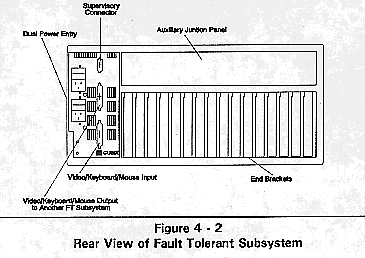
Figure 4-1 and Figure 4-2 show the front and rear views of the FT Expansion Subsystem.
The Cubix FT Expansion Subsystem contains two internal 375 watt load sharing, switching power supplies. Each supply is fan cooled. When the power supply load is properly limited to 375 watts average, and the air inlet temperature of the subsystem is maintained between 00C and 400C, the power supply will provide long trouble-free service. Please refer to Appendix B for Power Supply Load Considerations.
Figure 4-3
shows the Fault Tolerant 14+2 ISA Backplane.Features of this backplane are:
  * Between slots 14 and 15 is a connector that permits shunting
    together groups one and two to form a contiguous 16 slot backplane.
    (The shunt board, #A3900 is normally inserted into this connector.)

  * LED indicators are located at the end of the ISA connector nearest
    the auxiliary junction panel.  Each LED is on when +5vdc is present
    on the slot.

  * An 8 amp fuse on the +5vdc for each slot provides protection
    for the operator and external peripherals in the event of PCB
    failure.

  * A Multiplexed floppy drive power connector.

  * A LED indicator located near the multiplexed floppy drive fuse.
    This LED is on when the +5vdc voltage for the floppy drive is
    present.

  * A Multiplexed floppy drive power fuse of 8 amps.

  * Drive power connectors (quantity 8).  These are normally used
    to provide power for up to 8 hard disk drives.

  * A Supervisor connector - for Cubix IES use.
The multiplexor muxes the keyboard, video, mouse, reset, and floppy disk drive signals from each Cubix processor to a single set of devices. The keyboard, video, and mouse signals are multiplexed from each Cubix processor to the "Video Out" connector of each ERS/FT Subsystem. The reset signal from each Cubix processor is multiplexed to the reset pushbutton on the front console. The floppy disk drive controller signals from each processor are multiplexed into a single shared drive located on the front panel.
Operation of the multiplexor is controlled from the Front Console as described below. Refer to Figure 4-1, FT Expansion Subsystem Front Panel.
The "up" and "down" pushbuttons control the selection of up to 8 processors. The "reset" pushbutton is shared among all connected processors. The pushbutton labeled "Enable/Disable" enables and disables the multiplexor.
"Up/Down" Pushbutton
Depressing either of these pushbuttons either increments or decrements the mux by one channel position. Switches mounted on the multiplexor PCB determine the maximum number of enabled processors - one through eight. Therefore, continuously pushing the "up" pushbutton increments the mux to the position associated with the maximum number of processors and then rolls over to display "1". Conversely, continuously pushing the "down" pushbutton decrements the multiplexor selection to "1" and then rolls to the maximum number of enabled processors.
"Enable/Disable" Pushbutton
If the mux is enabled (i.e., a number 1 to 8 is displayed) depressing this pushbutton "DISABLES" the keyboard/video/mouse signals, preventing them from leaving the subsystem, and also disables the reset pushbutton and the multiplexed floppy drive. Depressing this switch again "ENABLES" the mux and connects the video, keyboard, mouse, floppy and reset pushbutton to BC processor Number One. The multiplexor is considered "ENABLED" whenever a port number (1-8) is displayed.
Display
A seven segment display is used. The "O" is used to indicate OFF or Mux "DISABLED". The numbers 1-8 indicate which processor is connected to the video, keyboard, mouse, floppy disk, and reset pushbutton.
Keyswitch
The key switch, when placed in the locked position, disables the multiplexor when all option switches are in the OFF state. Refer to Appendix F for the description of the mux when the option switches are ON.
Power Supply Indicators
The "on-line" and "fault" lights provide an indication of the status of each of the power supplies. Note that if a power supply is not installed, neither the on-line nor the fault light is illuminated.
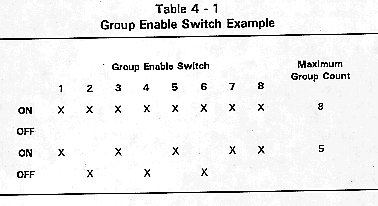
Group Enable Switch
The group enable switch is mounted in an accessible location on the multiplexor so it can be set by factory technicians prior to shipment. It can also be easily changed in the field by a system integrator or end-user, if desired. This eight position switch, mounted on the multiplexor I/O PCB, is used to indicate to the multiplexor which processor positions are active and determines the maximum count. Refer to Table 4-1 for an example.
If an enabled group doesn't have a processor installed, all devices will appear to be disconnected if that group is selected by the multiplexor. For example, selecting an unconnected group will display a blank screen on the monitor.
Enabling any mux in a daisy-chain series of FT Subsystems immediately disconnects all other muxes.
Option Switch
A four position switch mounted adjacent to the group enable switch is used to select the following options:
  * Monitor only (when locked, only the monitor is connected)

  * Monitor-KB-mouse only (when locked, only the Monitor-KB-Mouse
    are connected)

  * Floppy/Group 1 (when locked, the floppy is forced to be connected
    to Group 1)

  * Master keyswitch selection (locking this subsystem will force
    all connected subsystems to also be locked)
Appendix F describes the operation of the multiplexor in detail and the effect of the four option switches. It also contains detailed information about the two PCBs comprising the multiplexor.
The standard disk drive bay in the Expansion Subsystem will accommodate up to nine third-height 3.5" hard disk drives.
Each disk drive requires two connections: one for power and one for data. The disk drives obtain power from connectors on the ISA backplane - nine connectors are supplied. The data cables for each IDE disk drive installed in the subsystem are connected directly to the Cubix processor IDE disk drive controller header located on the top edge of the board. The cable is a 40-pin ribbon.
An optional disk drive bay capable of supporting either nine 3.5" TH hard disk drives or up to eighteen 2.5" TH hard disk drives is also available.
Each 2.5" disk support bracket can handle one 3.5" TH drive or two 2.5" hard drives. The 2.5" drives only require one connector each. Both IDE data and +5 volts drive power are routed through one 44-pin 2mm ribbon connector. The cable may be directly connected to Cubix QL 3222 processors.
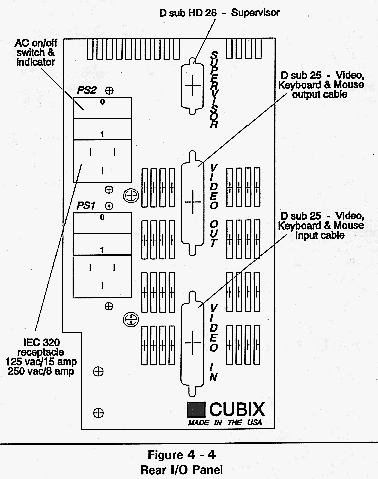
Figure 4-4 shows the connectors on the rear entry panel.
The SUPERVISOR (DsubHD26) connector and cable route the supervisory signals and are identical to the connector and cable used in the Enhanced Resource Subsystem. The VIDEO OUT/VIDEO IN (DB25) connectors and cables route the keyboard, video, and mouse signals into and out of the Fault Tolerant Subsystem and into another subsystem in a daisy-chained fashion.
The two receptacles and AC input switches are associated with each power supply. These receptacles permit separate AC power inputs to each FT power supply.
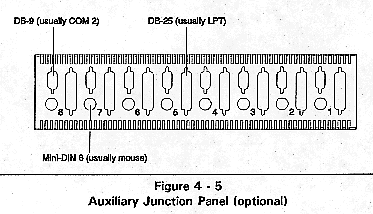
Optional Auxiliary Junction Panels may be installed in the Cubix Fault Tolerant Subsystem. The Auxiliary Junction Panel is installed in the top rear panel of the subsystem and allows the user to customize solutions for a wide range of I/O requirements.
The Cubix processor boards provide several I/O functions via internal headers. To access the I/O, these headers are connected to an I/O adapter printed circuit board (PCB) installed in an auxiliary junction panel.
The panel, illustrated in Figure 4-5, provides space to install up to eight DB-25, eight DB-9, and eight Mini-DIN connectors. Typically this panel is used to provide parallel printer, COM2, and mouse support.
Multiple Fault Tolerant Subsystems can be connected together in a daisy-chained fashion allowing single keyboard, video, and mouse devices to be shared among Fault Tolerant Subsystems.
The Video Out connector of the last subsystem would normally be cabled to the rear panel of the Cubix Cabinet thereby enabling the customer to connect a keyboard, video, and mouse into standard connectors. An interconnection box is also available to break-out the DB25 connector signals into industry standard connectors for VGA monitor, keyboard, and PS/2 mouse.
ERS versus FT Considerations
It is possible for ERS and FT subsystems to share the same monitor, keyboard, and mouse. This requires using the FT mux break-out module and routing the FT monitor/KB/mouse cables to one port of a Cabinet Multiplexor. Using the Cabinet Mux, select either a specific ERS Subsystem or the daisy-chained FT Subsystems.
Supervisor Function
Cubix IES can monitor and report Expansion Subsystem power, temperature, and ISA slot fusing.
Software controlled bus isolation and a readable status port are provided on each Expansion Subsystem. However, the software must be provided by the user (it is not currently available from Cubix Corporation). This section provides a detailed description of this capability.
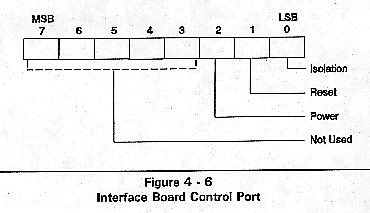
The A3470 host Expansion Subsystem interface card has a software addressable hardware port. It is mapped into 8-bit processor I/O address space and is readable and writable. The purpose of this control port is to provide a mechanism to remotely determine or modify the operational status of an attached Expansion Subsystem. In addition, the Expansion Subsystem may be isolated from the host ISA bus with this port. Status of the Expansion Subsystem Isolation, Reset, and Logic Power may be read from the control port.
A Logic 1 written to this bit isolates the attached Expansion Subsystem from the host by tri-stating inputs from control, interrupt, and DMA request lines, and tri-stating output lines from Data (D0-15) and Address (A0-19) to the Expansion Subsystem. A Logic 0 reconnects the Expansion Subsystem to the host.
Bit 0 may be read as follows:
      Logic 1  =  Isolated

      Logic 0  =  Not Isolated
While the subsystem is isolated from the host it can be powered off and on without affecting the host system. Maintenance can be performed as follows:
1. Write a logic 1 to bit 0 of the interface board's control port.
2. Read bit 0 - verify it is a logic 1 indicating that the subsystem is isolated.
3. Power down the subsystem.
4. Perform subsystem maintenance.
5. Power on the subsystem.
6. Write a logic 0 to bit 0 of the interface board's control port.
7. Read bit 0 - verify it is a logic 0 indicating that the subsystem is no longer isolated from the host.
Bit 1 Definition: Read Only
Bit 1 is the output of the Reset circuit to the attached Expansion Subsystem ISA Bus RESET DRV pin.
A Logic 1 indicates that the Expansion Subsystem is being held in reset for one of the following reasons:
  * Power at the Expansion Subsystem is off

  * The interface cable is disconnected

  * The RESET DRV signal on the host bus is set
A Logic 0 indicates the Expansion Subsystem is not in reset.
Bit 2 Definition: Read Only
Bit 2 represents +5V from the Expansion Subsystem. A Logic 1 indicates that the attached Expansion Subsystem is powered on. A Logic 0 indicates the subsystem is powered off, or the interface cable is disconnected.
The Expansion Subsystem is ready to communicate with the host bus when:
   Bit 0  =  0

   Bit 1  =  0

   Bit 2  =  1

  Bits 3 through 7 are not used.
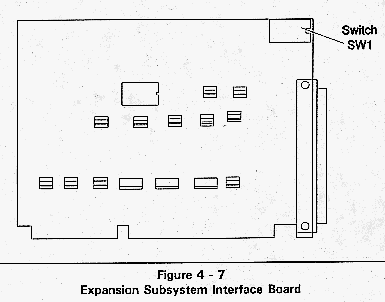
This interface board (Figure 4-7) is installed in the Cubix Expansion Subsystem.
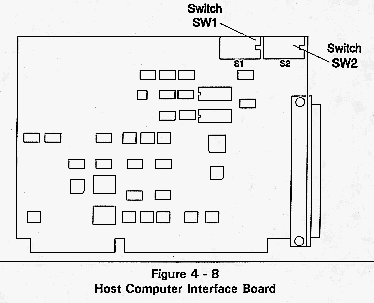
This interface board (Figure 4-8) is installed in the host computer.
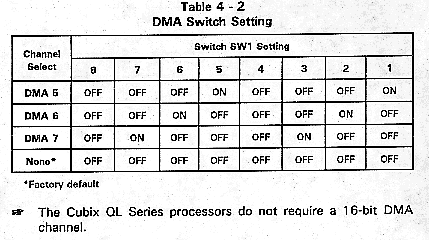
The Cubix Expansion Subsystem provides support for the 8-bit DMA channels 0, 1, and 3. No special configuration is required to support these channels. In addition, the subsystem may optionally support one 16-bit DMA channel 5, 6, or 7. Channels 2 and 4 are not supported.
If one or more boards installed in the Expansion Subsystem requires 16-bit DMA transfers, the interface board must be configured to support the DMA channel required. Only one 16-bit DMA channel may be selected per Expansion Subsystem.
To configure a DMA channel, select the same channel on both the host interface board and the corresponding Expansion Subsystem interface board. If installing multiple Expansion Subsystems in a single host system, each subsystem may be configured with a unique DMA channel. However, the DMA channel selected for an Expansion Subsystem must match the DMA channel selected on the host interface board connected to it.
DMA channels 5, 6, and 7 are supported. Select the desired channel using switch SW1 on both the host and the subsystem interface boards. Table 4-2.
The Cubix QL Series processors do not require a 16-bit DMA channel.
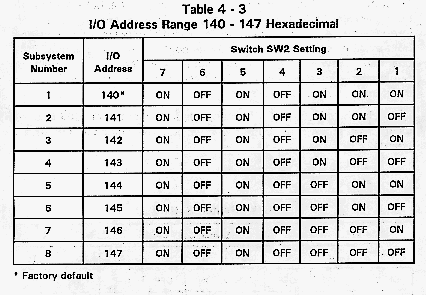
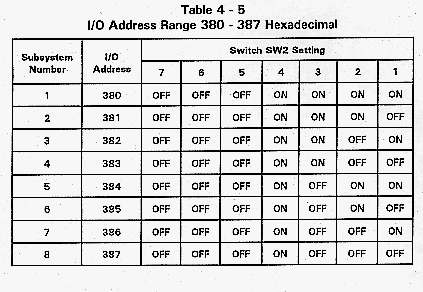
Each Cubix Expansion Subsystem must have a unique I/O address. There are three ranges of eight I/O addresses available to allow the installation of up to eight Expansion Subsystems in one host computer. If multiple subsystems are installed, each subsystem must be configured with a unique address. It is recommended (though not required) that these addresses be consecutive. Configure the address using switch SW2.
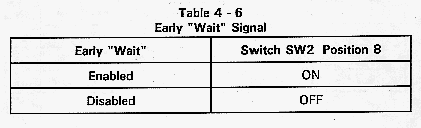
The "RDY" signal can be configured to go false when I/O addresses used by Cubix QL Series processors are accessed. When enabled, the host "RDY" signal is dropped approximately 75 - 80ns, allowing the QL Series processor to assert a wait state if necessary. This helps accommodate host computers which sample "RDY" quickly.
If Cubix QL Series processors are to be installed in the Expansion Subsystem, set this option to ENABLED using position 8 of switch SW2. Table 4-6.
This document, and all Web contents, Copyright © 1997
by Cubix Corp., Carson City, NV, USA.