 |
|
|
|
FT
Subsystems
Appendix F - Multiplexor Assembly
FT Multiplexor Assembly
FT Multiplexor Description
Operation
Multiplexor Configuration Switches
The multiplexor subassembly distributes redundant (dual) battery power, speaker signals, and supervisory (PA3030 or IES) I/O control to BC processors within the Cubix FT Subsystem. 12vdc power is provided for two cooling fans. Access to four option switches, eight configuration switches, and two battery testers is also provided. The subassembly also multiplexes a single monitor, keyboard, mouse, reset switch, and floppy diskette for use by each processor in the subsystem.
Power Distribution (Refer to Figure F-1)
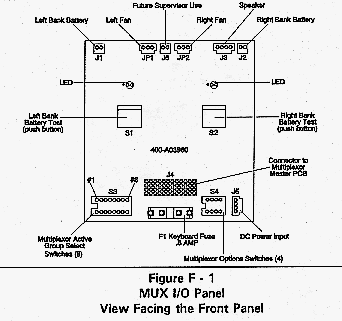
+5vdc,+12vdc, and -12vdc power is input via connector J5, a 4 position locking header, on PC assembly A4200. F1, a .8A, 125V, 5x20mm fuse, provides +5vdc protection to the external keyboard and mouse.
JP1 and JP2 are 3 position locking headers which provide +12vdc for the redundant cooling fans in the processor bay. The +5vdc and -12vdc voltages required to operate the main multiplexor PC assembly A4070, are transported between PC assemblies on J4 and J35 (24-pin female, through-board headers) located on A4200 and A4070 respectively.
Figure F-1View Facing the Front Panel
Battery Power Distribution
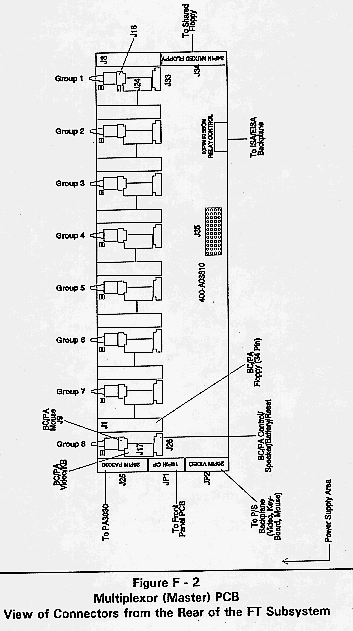
Connectors J1 and J2 on A4200, 2 position locking headers provide input for two +6vdc battery sources used for CMOS memory power. These two voltages are routed to the A4070 main multiplexor PC assembly on J4 and J35. CMOS memory backup power is distributed to each BC Series processor on pin 3 of connectors J33 through J26 on PCB A4070.
Speaker Connections
The BC Series processors installed in the FT Subsystem share a common speaker output. An 8 ohm permanent magnet speaker is attached to J3 on PC Assembly A4200. The BC Series processor speaker outputs are attached to the multiplexor A4070 on pin 4 of J33 through J26.
Figure F-2View of Connectors from the Rear of the FT Subsystem
Supervisory SupportIf the optional Cubix PA3030 or IES Supervisor board is installed in this FT Subsystem, it must be directly connected to the multiplexor (A4070) via J25, a 26-pin ribbon cable connector. If the Supervisor board is installed in a different subsystem, then J25 is connected to the power supply MIB, A3830.
Processor Reset
The multiplexor provides the ability to reset the BC Series processors installed in the FT Subsystem. The recessed front panel reset button is connected to the BC processor selected by the multiplexor. This demultiplexed reset signal is connected to the BC Series processors via pin 5 of J33 through J26.
Video/Keyboard/Mouse Multiplexor
A single VGA monitor, PS/2 keyboard, and PS/2 mouse may be shared by all of the BC Series processors installed in a FT system. The required signals and keyboard/mouse power are output from the A3810 multiplexor on JP2, a 20-pin ribbon connector. JP2 is cabled down to J7 on the power supply MIB which routes the signals to the rear panel at J15. A 20-pin ribbon cable is then used to cable J15 on the power supply MIB to J4 on the rear panel multiplexor/PA interface panel PC Assembly A3840. The video, keyboard, and mouse signals are then output to J5 and J3, the DB25 daisy-chain output connectors.Each BC Series processor installed in groups 1 through 8 is equipped with a 14-pin video/keyboard header which is connected via a ribbon cable to J24 through J17 on the main multiplexor assembly (4070). 5 pin headers on each BC Series board are connected to 3 pin locking connectors J16 through J9, respectively, on the main multiplexor assembly (4070) to provide mouse support.
To connect the monitor, keyboard, mouse, floppy drive, and reset switch to a specific BC Series processor, follow these steps:1. Press the multiplexor ENABLE/DISABLE pushbutton once to display group 1 on the front panel.2. Advance to the desired group processor by sequentially pressing the "up" select or "down" select pushbutton until the desired group number is displayed on the front panel.When the multiplexor ENABLE/DISABLE switch is pressed a second time, the multiplexor displays "O" and disconnects the monitor, keyboard, mouse, floppy drive, and reset switch from the BC Series processors.
Floppy Diskette Multiplexor
All ERS/FT Subsystems provide a single 3.5" TH floppy drive which is shared among all of the BC Series processors installed in a system.Floppy power is provided on the left front edge of the processor MIB at JP1. The 34-pin data cable from the floppy drive connects to J34 on the main multiplexor PC Assembly A4070. Each BC Series board installed in groups 1 through 8 is equipped with a 34-pin ribbon header which must be connected to J8 through J1 on the main multiplexor PC assembly.
Keyboard
Disabling the mux or switching to a different processor erases the contents of the keyboard buffer, ensuring no characters are inadvertently transferred to a processor upon connection to a keyboard.
Floppy Disk
The multiplexor presents the "CHANGE DISK" signal when connecting to each processor. This forces the processor to access the floppy disk directory, ensuring it always has current information.
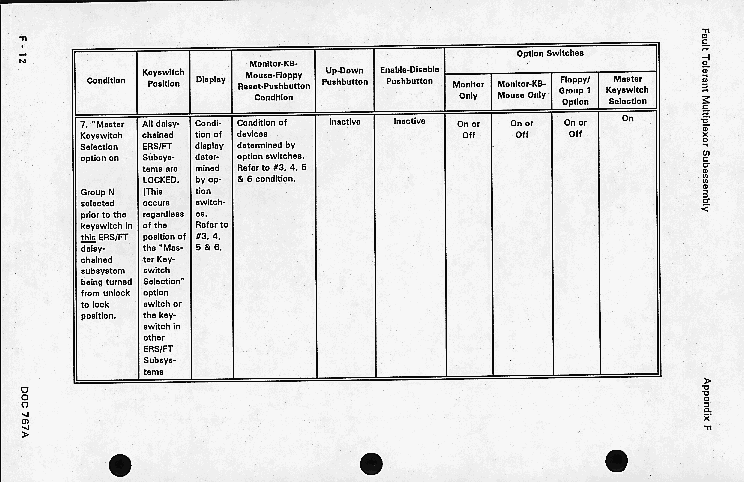
Daisy-chained Subsystems
If two or more FT subsystems are daisy-chained together with VIDEO IN and VIDEO OUT cables, it is possible to turn power off on any single subsystem and still allow the remaining subsystems to use the shared VGA monitor, keyboard, and mouse.
ActiveGroup Select
The total number of groups to be multiplexed in an ERS/FT subsystem can vary from 1 to 8. This number of groups is defined by eight DIP switches S3-1 through S3-8 located on the multiplexor I/O PC Assembly A4200. Each switch defines one of the eight multiplexor input channels as active or inactive. To set a channel active, use a pen or small screwdriver to slide the desired channel input switch "up". Make sure all unconnected inputs have their associated DIP switch "down". The multiplexor will automatically assign the correct group number to the display when the group is selected.
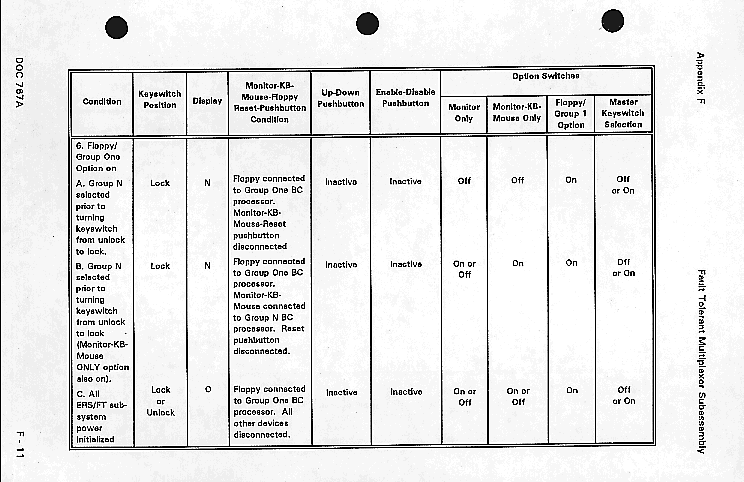
Multiplexor Option Switches
4 optional operation modes are defined for the ERS/FT Multiplexor Subsystem. Options 1, 2, and 4 can be activated only if the front panel keylock switch is in the locked position. Option 3 can be available when the multiplexor is either disabled or the keylock switch is in the locked position. These options are activated with DIP switch S4-1 through S4-4.
Option 1: Selected video channel remains displayed after keylock switch is in locked position. When Option switch S4-1 is moved up to "on", this option is activated. It is overridden by Option 2 if activated.
Option 2: Selected video, keyboard, and mouse channel remains active after keylock switch is in locked position. All other multiplexor functions (floppy, reset) are disabled. When Option 2 switch S4-2 is moved up to "on", this option is activated.
Option 3: Group 1 BC processor is connected to multiplexed floppy drive when multiplexor is locked or disabled. When Option 3 switch S4-3 is moved up to "on", this option is activated.
Option 4: Front panel keylock switch locks all ERS/FT subsystems which are daisy-chained together in a system (i.e. master keylock). When Option 4 switch S4-4 is moved up to "on", this option is activated.
CAUTION: If this option is selected in multiple ERS/FT subsystems, the result is multiple master keylocks. All master keylock switches must be in the unlocked position to enable any ERS/FT multiplexor.
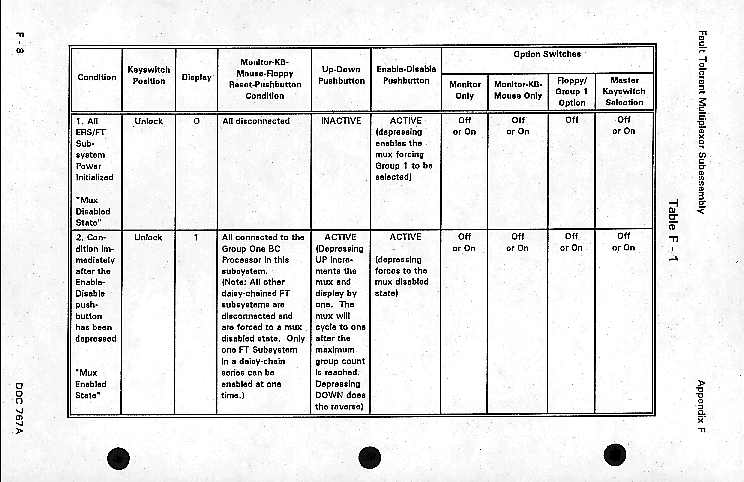
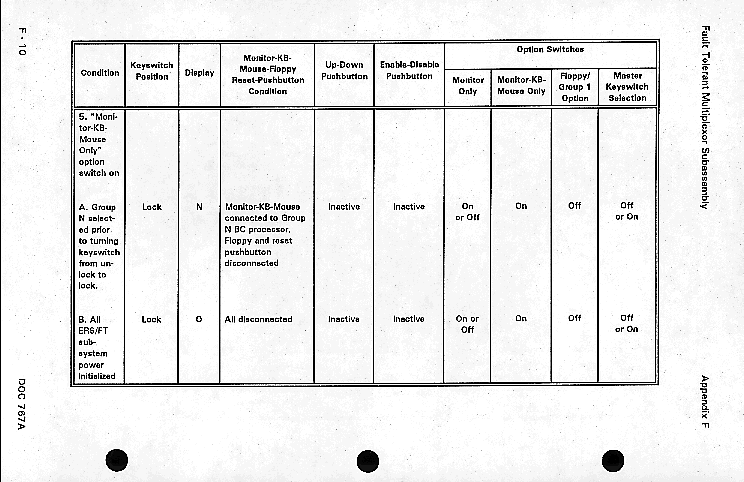
Refer to Table F-1 for a detailed representation of the operation of the multiplexor.
This document, and all Web contents, Copyright © 1997
by Cubix Corp., Carson City, NV, USA.