 |
|
|
|
Expansion
Subsystem
Chapter 3 - Installation and Operation
Preinstallation Inspection
Installation
Important Notes
Upon receiving the Cubix Expansion Subsystem perform the following inspection:
1. Remove the subsystem from its shipping box and place it on a workbench or table.
2. Remove the top cover.
3. Perform a visual inspection of the subsystem. Verify that all boards are properly seated and that all cables are securely connected.
4. Verify that the label near the power receptacle on the rear of the subsystem specifies the proper input voltage (115 VAC or 230 VAC).
! If the input voltage label is incorrect DO NOT power up the subystem. Refer to Chapter 6 - Field Replaceable Units for instructions to remove the power supply and configure the input voltage.
To connect the Cubix Expansion Subsystem to the host computer:
1. Turn off the power to both the Expansion Subsystem and the host computer. Unplug the power cables from the receptacles.
2. Remove the covers from the Expansion Subsystem and the host computer.
! Wait at least five minutes after disconnecting power before touching any components in the host computer; there may be latent power. Observe all normal precautions associated with handling electronic equipment.
3. Set the switch settings on the interface boards (see Chapter 4 -- Hardware Configuration).
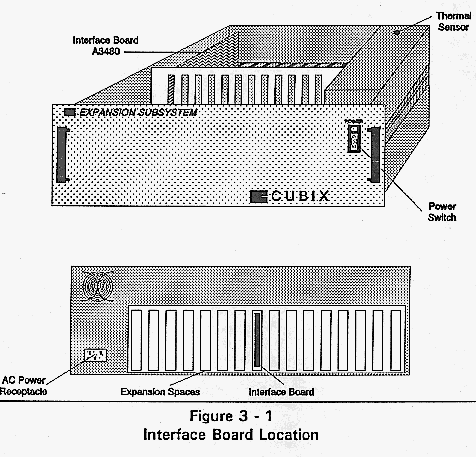
4. Install the Expansion Subsystem interface board (A3480) in the ninth expansion slot of the subsystem (refer to Figure 3-1). Secure the board with the screw provided.
5. Install the host computer interface board (A3470) into a 16-bit slot in the host computer. Select a slot not designed specifically for a memory expansion or special I/O board. Secure the board with a mounting screw.
6. Connect the two units with the provided cable. Secure the connectors on each end with the screws in the connector housing. Avoid any sharp bends in the cable and insure that the cable is not stretched.
7. Install the other boards in the Expansion Subsystem.
Caution: Do not apply power until all boards are installed and the cover is replaced. Never turn on an empty Expansion Subsystem. The power supply requires that a minimum of two boards are installed in addition to the interface board for proper operation.
The user must ensure that the boards installed in the Expansion Subsystem do not exceed its power rating (See Appendix B -- Product Specifications).
8. Install the covers on the Expansion Subsystem and host computer.
9. Connect the power cords. Apply power to the units in the following order: * Power on the Expansion Subsystem * Power on the host computer
To ensure proper ground continuity, the interface boards and the cable must be secured with mounting screws.
Do not put any strain or pressure on the connecting cable. Arrange the hardware so that the cable is not pulled tight.
Never place memory boards (or boards that activate the zero-wait state on the bus) in the Expansion Subsystem. Keep these types of boards in the host computer.
Never apply power to an empty Expansion Subsystem. It must contain at least two boards in addition to the interface board before power is applied.
If special software is written by the user, the Expansion Subsystem may be isolated from the host bus (or other Expansion Subsystems). This allows the Expansion Subsystem to be powered up or down independently of the host (see Appendix A -- Software Support).
In addition to Cubix manufactured boards, the Expansion Subsystem supports most I/O driven boards or boards that have small memory buffers. Most video, mouse, COM, and LPT boards are compatible. Some LAN adapters will also function properly.
! The Expansion Subsystem and interface boards have been tested with many 8- and 16-bit I/O boards and several manufacturer's computers. However, no guarantee of compatibility is implied with boards or computers not manufactured by Cubix.
This document, and all Web contents, Copyright © 1997
by Cubix Corp., Carson City, NV, USA.