 |
|
|
|
ERS II and
ERS/FT II
Chapter 5 - Functions
In addition to the second power supply and integrated IES, the ERS/FT II subsystem provides the following functions not supported by the ERS II subsystem:
Each function is explained below.
* The ERS/FT II also provides subsystem environmental LEDs on the front panel that are not included on the ERS II. These LEDs are explained as ERS/FT II front panel functions in Chapter 3.
ERS/FT II subsystems include the following LEDs:
Slot Power LEDs
A group of sixteen green LEDs is located on the top bracket of the multiplexor panel. These LEDs are interspersed with the amber shunt board LEDs explained below (refer to Figure 5-1 ). The green LEDs reflect the +5vdc fuse power for each individual slot within the subsystem. Each LED is aligned with the slot it represents.
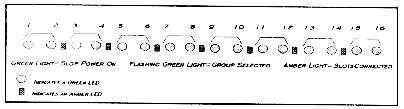
Figure 5-1
LED Configuration
In addition to illustrating the +5vdc state on each slot, the LEDs on the top bracket are used to indicate which BC group is currently selected. BC groups are selected via the BC Group pushbuttons on the front panel of the subsystem. The LEDs indicate the selected group in the following fashion:
If a fuse is blown, the corresponding green LED will either be solid off if the group containing the fuse is not selected, or off and occasionally pulsing if the group is selected.
Although these LEDs normally represent the status of slot power, when the subsystem is turned on the LEDs will not show the correct state of the slots until initialization is complete. Therefore, in addition to the LEDs on the top bracket of the subsystem, a second group of sixteen LEDs is located on the backplane itself. These LEDs will always reflect the correct state of +5vdc to the slots.
Shunt Board LEDs
A group of seven amber LEDs are located on the subsystem top bracket. These LEDs are interspersed with the green slot power LEDs previously described. The amber LEDs indicate the presence or absence of a shunt board between every two ISA slots on the backplane. Each amber LED is aligned with a possible shunt board location. Refer to Figure 5-1 for an illustration of the LED configuration.
If a shunt board is installed in the shunt slot between two slots, the corresponding amber LED will be on. If no shunt board is installed, the amber LED will be off.
* For backplanes that do not contain a shunt slot between every two slots (such as on an EISA backplane), the shunt LEDs indicate whether a group separation exists between the slots. Regardless of whether the groups are joined by traces on the backplane itself or by shunt boards, the shunt LEDs will accurately represent the backplane configuration.
The backplane of the ERS/FT II contains sixteen slots that may be divided into a maximum of eight groups. Each group may function as a separate computer residing in the subsystem. The ERS/FT II allows groups to be powered on and off individually without affecting the other groups in the enclosure. This is a helpful maintenance feature as it allows maintenance to be performed on one group without requiring all of the groups in the subsystem to be taken offline.
Group power is controlled by a pushbutton on the front panel. Initially, the ERS/FT II will power on all groups. To power down a group, the operator must select the group via the BC Group pushbuttons, and then press the Group Pwr pushbutton (this button is recessed to prevent accidental power interruptions). To restore power to a group that is powered off, select the group and press the Group Pwr pushbutton again.
When power is applied to the ERS/FT II, the subsystem will reinstate the group power to its condition when the subsystem was turned off. Therefore, if a group is powered down and then the subsystem loses power, when the ERS/FT II is powered on that group will remain off. This feature may be overridden by the operator during the power up sequence (refer to the Automatic Multiplexor Channel Configuration section).
The purpose of the automatic multiplexor channel configuration is to determine which channels on the multiplexor are connected to which BC groups in the backplane. When the ERS/FT II is powered on for the first time, it will automatically perform a self configuration. First the ERS/FT II determines the backplane configuration. This requires applying power to each group in the backplane. The ERS/FT II will locate all BC processors and MP 2008 multiport boards. For a board to be recognized it must be connected to a channel on the multiplexor.
Once a valid configuration is determined by the ERS/FT II, the configuration will be stored in battery-backed CMOS memory. In addition, the state of power to each group is also stored in CMOS. If power is cycled on the subsystem, the ERS/FT II will boot using the configuration stored in CMOS.
To abort the five second countdown and assume the configuration stored in CMOS, press the BC Group Down pushbutton during the countdown displayed on the console upon power up. To force the ERS/FT II to rebuild the configuration, press the BC Group Up pushbutton during the five second countdown. Note that this will have the effect of turning power on to all groups in the subsystem.
* If CMOS does not contain a valid configuration when power is applied to the ERS/FT II, the subsystem will perform an automatic self configuration with no operator input required.
Diagnostic tests are performed every time the ERS/FT II subsystem is powered on. The tests, their corresponding error codes, and their status of fatal or nonfatal are illustrated in Table 5 - 1.
If an error is detected, an error code is displayed using the three digit display on the front panel as follows: the letter "E", indicating an error, is displayed as the BC Group; the first hexadecimal digit of the error code will be displayed as the Multiport Board; and the second hexadecimal digit of the error code will be displayed as the MP Serial Port.
Fatal errors will prohibit subsystem operation until power is cycled and the error is resolved. Nonfatal errors will be displayed briefly (about one second) on the front panel, but they will not prevent the subsystem from functioning.
Table 5 - 1
Power On Self Tests
Hexadecimal Error Code |
Test Description |
Status |
10 |
IES CPU Test | Fatal |
11 |
Processor Bus Test | Fatal |
12 |
PROM Checksum Test | Fatal |
13 |
Read/Write Static RAM Test | Fatal |
14 |
Multiplexor Board Presence Test. This test verifies that the multiplexor board is properly cabled to the IES board. | Fatal |
20 |
Indicates that the system was reset by a hardware watchdog timer. | Nonfatal |
25 |
Analog to Digital Converter Test | Nonfatal |
26 |
Real Time Clock Battery Test | Nonfatal |
27* |
Slot Fuse Test. The slot power LEDs will be illuminated during the time that this error code is displayed on the front panel to indicate which slot is not receiving power. | Nonfatal |
28 |
Floppy Drive Test. Verifies that the floppy drive is active when the subsystem is powered on. This error generally indicates that the floppy cable is backward. | Nonfatal |
29 |
Multiplexor Channel Test. Verifies that the hardware is correctly selecting different mux channels. | Nonfatal |
30 |
Push-button Test. Verifies that no push-buttons indicate they are being pressed. This test fails if the operator is pressing a button on the front panel. | Nonfatal |
31 |
Floppy Fuse Test | Nonfatal |
32 |
Keyboard Fuse Test | Nonfatal |
41 - 48* |
BC Processor Installation Test #1. If more than one BC is found in a single group, the group number is added to 40 hex and displayed as the error code. | Nonfatal |
51 - 58* |
BC Processor Installation Test #2. If no BC is found in a group, the group number is added to 50 hex and displayed as the error code. | Nonfatal |
61 - 68* |
Multiport Configuration Test. If more than one MP board is assigned the same address in the same group, the group number is added to 60 hex and displayed as the error code. This error cannot always be detected. | Nonfatal |
A0* |
Auto-configuration test. If a hard drive is powered by one group while servicing another, this error displays. Note that this error cannot always be detected. | Nonfatal |
A1* |
Power down test. Power to all groups was shut off but, after 15 seconds one or more groups remains in "power on" state. This error generally applies to boards with large amounts of capacitance or faulty power relays. | Nonfatal |
* This test is only performed during self configuration.
Any errors detected while the ERS/FT II is running are displayed on the front panel in the same manner as the Power On Self Test errors. None of the runtime errors are fatal. The runtime errors are explained in Table 5 - 2.
Table 5 - 2
Runtime Errors
Error Code in hexadecimal |
Cause of Error | Subsystem Response |
71 - 78 and 7C |
The operator attempted to switch groups while the floppy was active on the current group. The current group number is added to 70 hex and displayed as the error code (7C represents the Custom Channel). | The group will remain unchanged. The error code will display until the operator releases the BC group push-button. |
81 - 88 and 8C |
The operator attempted to switch groups or enable the subsystem but the processor in the new group cannot be detected by the multiplexor. The group number of the new group is added to 80 hex and displayed as the error code (8C represents the Custom Channel). | The new group is selected, but the channel on the multiplexor cannot be enabled. The error code will be displayed until the operator releases the push-button that caused the error condition to occur. |
90 |
The subsystem is locked or disabled, and the floppy channel 1 option is enabled on the option switch, but no BC processor is connected to channel one on the multiplexor. | The subsystem lock or disable is executed normally. The error code will be displayed briefly and then the display will return to its normal state. |
This document, and all Web contents, Copyright © 1997 by Cubix Corp., Carson City, NV, USA.