Quick Start Guide for
WorldDesk Commuter
(Cubix Document 834B)
This procedure describes how to configure the WorldDesk Commuter server.
Detailed installation instructions are provided in WorldDesk Commuter Hardware
Installation Guide, DOC 811.
Before You Begin
WorldDesk Manager must be installed and operating on a Windows NT or
Windows 95 workstation in order to perform the following procedure. Refer to Quick
Start Guide for WorldDesk Manager, DOC 833, and WorldDesk System
Administrator’s Guide, DOC827 for detailed information.
The following procedure establishes a basic server configuration.
Cubix recommends that the configuration be fully tested and verified as operational before
more advanced WorldDesk configurations are attempted.
Configuring Your Commuter
Power On Sequence
After WorldDesk Commuter has been installed and powered on (see the WorldDesk
Commuter Hardware Installation Guide, DOC 811), the "Power" LED lights and
the following startup sequence begins:
- Power On Self Test: If this test fails, the "Ready" LED
will not light. Review the "Troubleshooting" section in the WorldDesk
Commuter Hardware Installation Guide for possible solutions. If the problem persists,
contact Cubix Customer Service for assistance.
- Network driver loads: When properly connected to a 10Base-T LAN,
the "LAN attached" LED will light when a good connection to a hub is detected.
The "Transmit" LED of ports 0, 1, 2 or 3 will flash when the unit senses the
Ethernet frame type being used. The port number corresponds to the Ethernet frame type
being used by the network. When successfully selected, the transmit LED will extinguish
and the "Ready" LED will begin flashing at one-second intervals..
- Attached modems are initialized. During initial power up,
WorldDesk Commuter senses the Cubix internal modem (PC Card type) and configures them as
required. For external modems (UART) connected to WorldDesk Commuter, the modem type
defaults to "Hayes Compatible."
- WorldDesk software advises all listening WorldDesk Managers and
WorldDesk Servers that it is operational and ready for client activity.
Display Commuter Cluster
- Start the WorldDesk Manager and log in using a valid user name and
password. (The default user name is "administrator" with no password.)
The new WorldDesk Commuter server appears in "CLUSTER1" as
server "UNNAMED" (See Figure 1).
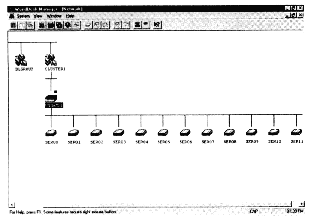
Figure 1 Default Commuter Configuration
- Double-click on "CLUSTER1" then click the right mouse button on
the "UNNAMED" server icon and select "Configuration" from the menu
options.
Assign Cluster and Server Names
- Change cluster name and server name to a name of your
choosing, and assign a unique server number to the new server. The number selected must be
unique among all WorldDesk Servers. When finished, select "OK" to save.
WorldDesk Commuters can exist in IPX/SPX-only clusters; do not assign
a Commuter to a TCP/IP cluster.
- Reboot the WorldDesk by right-clicking on the "UNNAMED" server
icon and selecting "shutdown." Specify zero (0) minutes and complete the
shutdown dialog. The Commuter will automatically reboot.
When the boot cycle is complete the WorldDesk Commuter will appear in
WorldDesk Manager under the newly assigned cluster and server names. If using the internal
modem (PCMCIA Card) version of WorldDesk Commuter, skip to step 10; otherwise, continue
with step 9.
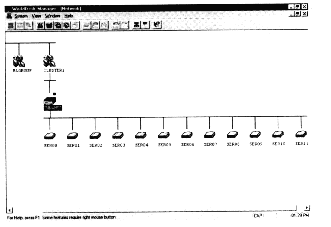
Figure 2 Configured Commuter Cluster
Configure Commuter Ports
- Double-click on the renamed cluster icon and server icons. Select port
"SER00" using the right mouse button, and choose "Configuration." Set
the modem type and port baud rate for your modem. If all modems are the same, use the
"Copy to other ports" button to copy this configuration to the other WorldDesk
Commuter ports. Otherwise, configure each port for the attached modem. These changes take
effect immediately. It is not necessary to reboot.
Designate the Master Server
- If the WorldDesk Commuter Server is being added to an existing WorldDesk
cluster (that is, other WorldDesk Servers are already configured and operating in the
cluster), skip to step 11. Otherwise, select "Change Master Server" from the
Cluster menu options and designate the new server as the cluster master for the new
cluster.
A red square will appear next to the server icon designated as cluster
master. The cluster master is responsible for coordinating cluster configuration changes
among all servers in the cluster.
Select a User/Password Authentication Method
- Right-click on the cluster icon and select the "Security/Cluster
Properties/Permissions" menu option.
The default security configuration requires password authentication for
all dial-in sessions but no authentication is required for management access or dial-out
modem sharing.
- Select the desired method for Remote User Authentication,
Session Settings and Permissions.
- Right-click on the cluster icon and select the
"Security/Authentication Servers" menu option.
- Select an authentication server from the "Other Servers" list
or click on OK to accept the Commuter as the authentication server.
You may specify either the Commuter or a Novell Novell NetWare®
file server for user/password authentication. If you select the Commuter you must create
user accounts for each dial-in user. User accounts are created via the cluster icon’s
"Security/User Management" settings.
If you select a Novell NetWare file server, user/password validation
is performed by the Novell server when a user logs in.
WorldDesk Commuter is now configured for dial-in and dial-out operation.
Install the appropriate WorldDesk dial-in and dial-out clients. Consult the WorldDesk
System Administrator’s Guide, DOC 827, for detailed information about advanced
server configuration.
This document, and all Web contents,
Copyright © 1997 by Cubix Corp., Carson City, NV, USA.
