WorldDesk
Commuter
Chapter 3 - Component Installation
Overview
The following pages provide instructions on how to install
an additional six-port serial or PC Card modem module to expand from six to twelve ports.
Note, if installing both the serial and PC Card modem module in the same WorldDesk
Commuter, be sure to follow the Instructions are also provided for the six-port line busy
module. The line busy module is used so calls can be rerouted when a malfunctioning COM
port is detected.
Adding the Six-port Serial Module
For a total of twelve serial connections, you may install a
second six-port serial module. Before doing so, make sure that besides the serial module,
the following items are available:
- one jumper shunt (packaged with the serial port module)
- one serial modem cable for each serial port connecting to an
external
- modem (see Chapter 1, Customer Supplied Cables for
description)
- a #2 Philips screwdriver
Procedure
1. Power off WorldDesk Commuter by unplugging the power
cord.
2. Remove any cables that may obstruct the installation.
3. On the six-port serial module being added, set the
jumper switch at JP1 by placing a jumper shunt on the posts labeled "A." Figure
3 - 1 shows the location of JP1.

Important . . .Set
this jumper on the bottom serial port module; the module supporting ports 6-11. Do not set
this jumper on serial modules with ports numbered 0-5.
4. Remove WorldDesk Commuter’s lid.
- Facing WorldDesk Commuter’s rear panel, use a #2
Philips screwdriver to loosen the screws at the top left and right corners.
- Push the lid away from you, then lift up to remove.
5. Remove the blank filler panel.
- Using a #2 Philips screwdriver, loosen the screws at each
side of the blank filler panel. Pull the filler panel toward you to remove.
6. Install the serial module.
- Align the six-port serial module with the card guides at
each side of the panel opening and slide the module into place.
- Loosen the screws securing the upper six-port module. Pull
the module toward you until the 50-pin connector on the bottom module can be easily
accessed. (See Figure 3-1 for connector locations.)
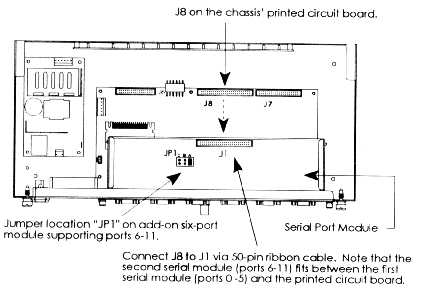
Figure 3-1, Serial Module Connection
- Connect the 50-pin ribbon cable connector to the 50-pin
connector at J1 on the serial module. The 50-pin ribbon cable has three connectors. The
first connects to location J8 on the chassis’ printed circuit board. The second to J1
on the serial module with ports 6-11, and the third to J1 on the serial module with ports
0-5.
- Reinsert the upper module and tighten the screws on both
modules to secure against WorldDesk Commuter’s rear panel.
7. Replace WorldDesk Commuter’s lid and fasten it
securely by turning the screws clockwise.
8. Connect the serial modem cables.
- Connect the serial cable’s DB-9 female connector to the
serial port on WorldDesk Commuter.
- Connect the other cable end to an external modem. If
WorldDesk Commuter is rack mounted, read "Cabinet Installation" and the
cabinet’s manual for instructions on how to cable WorldDesk Commuter to peripherals.
9. Reconnect all exterior cables removed during
installation.
10. Power on all peripherals connected to WorldDesk
Commuter. Then power on WorldDesk Commuter.
11. Using WorldDesk Manager, configure ports 6 through 11.
See WorldDesk Commuter Quick Start Guide for WorldDesk
Manager and WorldDesk System Administrator’s Guide for instructions on how to install
and use WorldDesk Manager software.
Adding the Six-port PC Card Modem Module
For a total of twelve PC Card modem connections, you may
install a second six-port PC Card modem module. Before beginning, make sure that besides
the six-port PC Card modem module, the following items are available:
- one jumper shunt (packaged with the PC Card modem module)
- six PC Card to RJ-11 modem cables with tie wraps (packaged
with PC Card modem module)
- a #2 Philips screwdriver
Procedure
1. Power off WorldDesk Commuter by unplugging the power
cord.
2. Remove any cables that may obstruct the installation.
3. On the six-port PC Card module being added, set the
jumper switch at JP1 by placing a jumper shunt on the posts labeled "A." Figure
3 - 1 shows the location of JP1.

Important . . .
Set this jumper on the PC Card modem module in the bottom
slot; the module supporting ports 6-11. Do not set this jumper on the module with ports
numbered 0-5.
4. Remove WorldDesk Commuter’s lid.
- Facing WorldDesk Commuter’s rear panel, use a #2
Philips screwdriver to loosen the screws at the top left and right corners.
- Push the lid away from you, then lift up to remove.
5. Remove the blank filler panel.
- Using a #2 Philips screwdriver, loosen the screws at each
side of the blank filler panel. Pull the filler panel toward you to remove.
6. Install the PC Card modem module.
- Align the six-port PC Card modem module with the card guides
at each side of the panel opening and slide the module into place.
- Loosen the screws securing the upper six-port module. Pull
the module out until the connectors on the bottom module can be easily accessed. (See
Figure 3-2 for connector locations.)
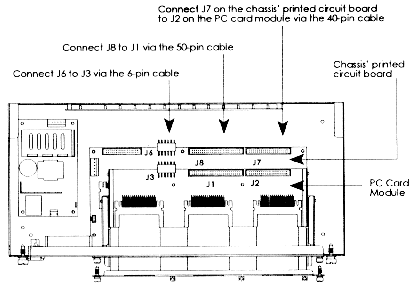
Figure 3-2, PC Card Modem Module Connection
- Connect the 40-pin ribbon cable connector to the 40-pin
connector at J2 on the PC Card modem module. The 40-pin ribbon cable has three connectors:
one connects to J7 on the chassis’ printed circuit board, one to J2 on the module
with ports 6-11 and one to location J2 on the module with ports 0-5.
- Connect the 50-pin ribbon cable connector to the 50-pin
connector at location J1 on the PC Card modem module. The 50-pin ribbon cable has three
connectors: one connects to J8 on the chassis’ printed circuit board, one to J1 on
the PC Card modem module supporting ports 6-11 and, one to location J1 on the PC Card
modem module supporting ports 0-5).
- Connect the 6-wire power cable’s 6-pin connector to the
6-pin connector at location J3 on the PC Card modem module. The 6-wire power cable has
three connectors: one connects to J6 on the chassis’ printed circuit board, one to J3
on the PC Card modem module supporting ports 6-11, and one to location J3 on the PC Card
modem module supporting ports 0-5.
- Reinsert the upper module and tighten screws on both modules
to secure against WorldDesk Commuter’s rear panel.
7. Replace the lid and fasten it securely by turning the
screws clockwise.
8. Connect the modem cables.
- Connect the modem cable’s PC Card modem connector to
WorldDesk Commuter’s PC Card modem connector. There are two PC Card modems per panel
cutout; therefore, two cables will run from each cutout.
- Secure the modem cables to the right of the panel cutout by
inserting the tie wrap through the tie wrap button and wrapping it around the modem
cables. Insert the pointed end of the tie wrap through the square end and pull to tighten.
See Figure 1 - 4 for tie wrap button locations.
- Connect the PC Card modem cable’s RJ-11 connector to a
phone jack or PBX connection.
If WorldDesk Commuter is rack mounted, read "Cabinet
Installation" and the rack mount cabinet’s manual for additional information on
how to accommodate external cable connections.
9. Except for the power cord, reconnect all exterior cables
removed during installation.
10. Power on all peripherals connected to WorldDesk
Commuter. Then power on WorldDesk Commuter by connecting the power cord.
11. Using WorldDesk Manager, configure ports 6 through 11.
See WorldDesk Quick Start Guide for WorldDesk Manager and
WorldDesk System Administrator’s Guide for instructions on how to install and use
WorldDesk Manager software.
Adding Mixed Six-port Modules to the Same
WorldDesk Commuter
If adding a six-port PC Card Modem Module to a WorldDesk
Commuter already equipped with a Serial Port Module or vise versa, use these instructions.
Before beginning, make sure that besides the six-port module you have the following items
available:
- one jumper shunt (packaged with each six-port module)
- a #2 Philips screwdriver
- one cable package containing the following cables:
one 40-pin ribbon cable
one 50-pin ribbon cable
one 6-wire power cable
Depending on the six-port module ordered you may not use
all the cables packaged. Refer to the installation instructions to determine which
cable(s) are required.
If adding a serial module:
- one serial modem cable for each serial port connecting to an
external modem (see Chapter 1, Customer Supplied Cables for description).
If adding a PC Card modem module:
- six PC Card to RJ-11 modem cables with tie wraps (packaged
with PC Card modem module)
Procedure
- Power off WorldDesk Commuter by unplugging the power cord.
- Remove any exterior cables that may obstruct the
installation.
- Set the jumper switch at JP1 by placing a jumper shunt on
the posts labeled "A."
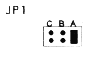
Important . . .
This jumper is set on the bottom module only; the one
supporting ports 6 - 11. If installing both a serial port module and a PC Card modem
module in the same WorldDesk Commuter, always install the PC Card modem module in the
bottom slot.
- Remove WorldDesk Commuter’s lid.
- Facing WorldDesk Commuter’s rear panel, use a #2
Philips screwdriver to loosen the screws at the top left and right corners.
- Push the lid away from you, then lift up to remove.
- Remove the blank filler panel or the six-port
module being replaced.
- If removing a six-port module, make sure any cables
connected to the locations shown in Figure 3-3 are removed before continuing with step 6.
- Using a #2 Philips screwdriver, loosen the screws at each
side of the panel or module. Remove the panel or module by pulling it toward you.
- Install the new module.
- Align the module with the card guides at each side of the
panel opening and slide it into place.
- If installing the module in the bottom slot, loosen the
screws securing the top module. Pull the top module out until the connector(s) on the
bottom module can be easily accessed. (See Figure 3-3 for connector locations.)
- Connect the new 50-pin ribbon cable to connector J8 on the
chassis’ printed circuit board and to connector J1 on the module.
If installing the PC Card modem module:
- Connect the new 40-pin ribbon cable to connector J7 on the
chassis’ printed circuit board and to connector J2 on the PC Card modem module.
- Connect the new 6-wire power cable to connector J6 on the
chassis’ printed circuit board and to connector J3 on the PC Card modem module.
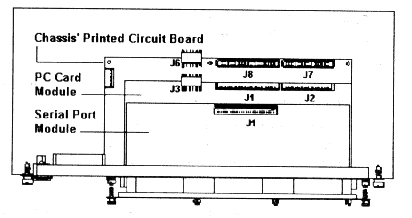
Figure 3-3, Connector Locations when
installing Mixed Module Types
- If the top module was removed, reinsert it and
tighten the screws on both modules.
- Replace the lid and fasten it securely by turning the screws
clockwise.
- Connect the modem cables.
If installing the PC Card modem module:
- Connect the PC Card modem cable’s connector to
WorldDesk Commuter’s PC Card modem connector. There are two PC Card modems per panel
cutout; therefore, two cables will run from each cutout.
- Secure the modem cables to the right of the panel cutout by
inserting the tie wrap through the tie wrap button and wrapping it around the modem
cables. Insert the pointed end of the tie wrap through the square end and pull to tighten.
Trim excess tie wrap length. See Figure 1 - 4 for tie wrap button locations.
- Connect the PC Card modem cable’s RJ-11 connector to a
phone jack or PBX connection.
If installing the serial port module:
- Connect the serial cable’s DB-9 female connector to the
serial port on WorldDesk Commuter.
- Connect the other cable end to an external modem.
If WorldDesk Commuter is rack mounted, read "Cabinet
Installation" and the rack mount cabinet’s manual for additional information on
how to accommodate external cable connections.
- Except for the power cord, reconnect all exterior
cables removed during installation.
- Power on all peripherals connected to WorldDesk Commuter.
Then power on WorldDesk Commuter by connecting the power cord.
- If necessary use WorldDesk Manager to configure the new
ports.
See WorldDesk Quick Start Guide for WorldDesk Manager and
WorldDesk System Administrator’s Guide for instructions on how to install and use
WorldDesk Manager software.
Connecting the Six-port Line Busy Module
The optional Six-port Line Busy Module is used to simulate
an "off hook" (line busy) condition when a malfunctioning COM port is detected
or WorldDesk Commuter is powered off. When the Telco switch or PBX senses a line busy
condition, calls are rerouted to the next available "on hook" (not busy) line.
Designed for use with WorldDesk Commuter, each line busy
module supports up to six serial COM port connections. The line busy module may be
installed as a table top or rack mount unit. When rack mounting the line busy module, make
sure the cabinet supports 19-inch RETMA standards. Table top and cabinet installation
procedures are located toward the end of this chapter.
Figure 3 - 4 shows the line busy module’s connector
locations. Figure 3 - 5 illustrates connections from the line busy module to WorldDesk
Commuter and external modems via the octopus, line busy, and telco cables.
For additional information on the Line Busy feature, refer
to the WorldDesk System Administrator’s Guide.
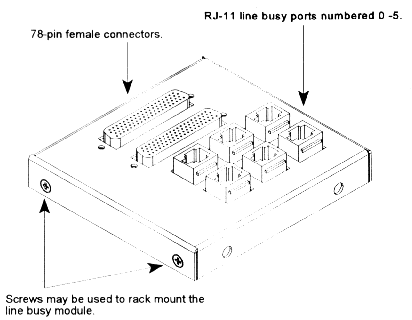
Figure 3-4, Six-port Line Busy Module
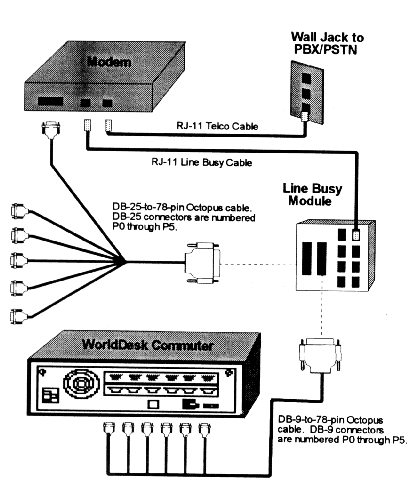
Figure 3-5, Line Busy Module Cable
Connections
Octopus Cables
Cubix ships each Six-port Line Busy Module with two
"octopus" shielded cables. These cables convert the 78-pin high density
connectors on the line busy module to six serial connections each. One cable connects to
the DB-9 RS-232 connectors on WorldDesk Commuter and the other to DB-25 RS-232 external
modem connections. Pin-outs for the RS-232 connections are standard. See Table 3 - 1.
Table 3-1, Octopus Cable's RS-232 Pinout
1
|
Chassis Grount
|
|
2
|
Transmit Data
|
(TXD) output
|
3
|
Receive Data
|
(RXD) input
|
4
|
Request to Send
|
(RTS) output
|
5
|
Clear to Send
|
(CTS) input
|
6
|
Data Set Ready
|
(DSR) input
|
7
|
Signal Ground
|
(GND)
|
8
|
Data Carrier
Detect
|
(DCD) output
|
20
|
Data Terminal
Ready
|
(DTR) output
|
22
|
Ring Indicator
|
(RI) input
|
Line Busy and Telco Cables
"Line busy" and "telco" cables are
required to connect the line busy module to the modem’s RJ-11 phone and telco
connections. These cables are not shipped as part of the standard package; however, you
may order them by contacting our sales department for assistance.
Table Top Installation
Before beginning, make sure that besides the six-port line
busy module and octopus cables, the following items are available:
- telco cables for each modem connected to a PBX or telco wall
jack
- line busy cables - one for each modem to which the line busy
module is being connected
Procedure
Figure 3 - 5 shows connector locations referenced in the
following procedure.
- Power off peripherals.
- Connect the line busy module to the serial connections on
WorldDesk Commuter via the 78-pin to DB-9 octopus cable.
- Connect the cable’s 78-pin connector to the line busy
module’s 78-pin connector.
- Connect the cable’s DB-9 connectors to WorldDesk
Commuter’s serial connectors (ports 0-5 or 6-11).
- Connect the line busy module to the external
modem’s DB-25 serial port via the 78-pin to DB-25 octopus cable. Up to six modems may
be connected to the line busy modules.
- Connect the cable’s 78-pin connector to the line busy
module’s 78-pin connector.
- Connect the cable’s DB-25 connectors to the RS-232
DB-25 connector on the external modem.
- Connect the line busy module to the phone
connection on the external modem via the RJ-11 to RJ-11 line busy cable.
- Connect one end of the line busy cable to a line busy port
on the line busy module. Six ports numbered 0-5 are available.
- Connect the other end of the cable to the phone connector on
the external modem.
- Connect the external modem to the telephone wall
jack or PBX via the telco cable.
- Power on peripherals.
Cabinet Installation
The following instructions assume the line busy module is
being installed in a System 1010. If not, make sure the rack mount cabinet used complies
with 19-inch RETMA standards. Before beginning, make sure that besides the six-port line
busy module and octopus cables, the following items are available:
- telco cables for each modem connected to a PBX or telco wall
jack
- line busy cables one for each modem to which the line busy
module is being connected
- a #2 Philips screwdriver
Procedure
Figure 3-5 shows connector locations referenced in the
following procedure.
- Power off peripherals.
- Mount the line busy module on the RETMA rail behind the
WorldDesk Commuters Chassis. See Figure 3-6.
- Use a #2 Philips screwdriver to remove the screws from the
line busy module. See Figure 3 - 4 for location of screws.
- Place the module so that the holes in which the screws
insert are aligned with the holes on the RETMA rails.
- Holding the module in place, insert the screw through the
RETMA rail holes. Tighten screws to secure the line busy module to the RETMA rail.
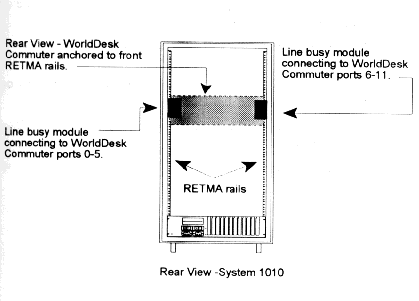
Figure 3-6, Mounting the Line Busy Module to
RETMA Rails
- Connect the line busy module to the serial
connections on WorldDesk Commuter via the 78-pin to DB-9 octopus cable.
- Connect the cable’s 78-pin connector to the line busy
module’s 78-pin connector.
- Connect the cable’s DB-9 connectors to WorldDesk
Commuter’s serial connectors (ports 0-5 or 6-11).
- Connect the line busy module to the external
modem’s DB-25 serial connection via the 78-pin to DB-25 octopus cable. Up to six
modems may be connected to the line busy module via the DB-25 connectors.
- Connect the cable’s 78-pin connector to the line busy
module’s 78-pin connector.
- Connect the cable’s DB-25 connectors to the RS-232
DB-25 connector on the external modem.
- Connect the line busy module to the phone
connection on the external modem via the RJ-11 to RJ-11 line busy cable.
- Connect one end of the line busy cable to a line busy port
(numbered 0-5) on the line busy module.
- Connect the other end of the cable to the phone connector on
the external modem.
- Connect the external modem to the telephone wall
jack or PBX via the telco cable.
- Power on peripherals.
This document, and all Web contents,
Copyright © 1997 by Cubix Corp., Carson City, NV, USA.
