|
|
|
|
WorldDesk
Commuter
Chapter 2 - Hardware Installation
Overview
WorldDesk Commuter may be installed as a table top unit or rack mounted in a cabinet supporting 19-inch RETMA standards. Installation procedures and a list of required parts and tools are included on the following pages.
Note:
If installing the six-port line busy module or upgrading WorldDesk Commuter from six to twelve ports, refer to Chapter 3, Component Installation.
Warning!
This equipment is designed and designated as Class 1 Electronic equipment to meet all required safety standards. Use only properly grounded power cords in good physical condition to power the WorldDesk Commuter unit from properly grounded wall receptacles. The use of fraye, cracked, or abraded power cords, or power cords with a damaged third wire safety ground connection, or power cords without a third wire safety ground, are not the responsibility of Cubix Corporation and will void the warranty. Use only 3/18 AWG SVT or SJT cords with an approved IEC 320/C13 connector to operate the system.
Table Top Installation
Figure 1 - 3, Chapter 1 shows connector locations referenced in the following procedure.
Procedure
Connect the RJ-45 connector on one cable end to the RJ-45 connector labeled 10BT on WorldDesk Commuter’s back panel.
Connect the other cable end to an Ethernet LAN hub.
Connect the serial cable’s DB-9 female connector with the DB-9 male connector on WorldDesk Commuter’s serial port.
Connect the other end to an external modem’s RS-232 serial connector.
Connect the modem cable’s PC Card modem connector to WorldDesk Commuter’s PC Card modem connector. There are two PC Card modems per panel cutout (see information in Chapter 1 regarding connector numbering); therefore, two cables will run from each cutout.
Secure the modem cables to the right of the panel cutout by inserting the tie wrap through the tie wrap button and wrapping it around the modem cables. Insert the pointed end of the tie wrap through the square end and pull to tighten. Cut off excess tie wrap. See Figure 1 - 4 for tie wrap button locations.
Connect the PC Card modem cable’s RJ-11 connector to a phone jack or PBX connection.
Refer to the appropriate WorldDesk Quick Start Guide for installation instructions and the WorldDesk System Administrator’s Guide for configuration instructions.
Cabinet Installation
WorldDesk Commuter may be rack mounted in any cabinet supporting 19-inch RETMA standards; however, the following instructions apply to rack mounting WorldDesk Commuter in a Cubix System 1010 cabinet.
Note:
WorldDesk Commuter is 3.5" high (the equivalent of two RETMA units). Up to eight WorldDesk Commuters may be installed in a single System 1010 Cabinet.
Before beginning, make sure that besides the standard package contents, the following items are available:
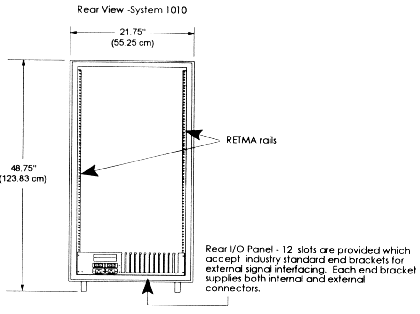
Make sure the I/O panel at the rear of the System 1010 cabinet (see Figure 2-4), is equipped with end brackets providing the required connector types. Note that the I/O end brackets provide both internal and external connectors. Before continuing with this procedure, it may be helpful to read the System 1010 User’s Guide (DOC 788) and the following Important Note.
Important Note!
If planning to connct to external devices via the System 1010's I/O panel, you must supply additional cables to connect from the external connector on the I/O panel's end bracket to the connector on the external device. If the required end bracket is not available, an opening at the bottom of the cabinet facilitates running cables under the System 1010 to the external device. Depending on the distance between the System 1010 Cabinet and the external device, you may need to daisy-chain cables to accomodate the distance.
Procedure
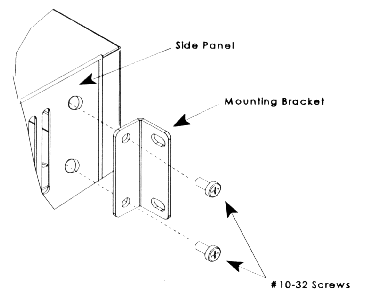
Align one of the mounting brackets (Figure 2 - 1), making sure the "round" holes on the bracket are aligned with the round holes on WorldDesk Commuter’s side panel.
Tighten the mounting bracket to the side of WorldDesk Commuter by inserting a #10-32 screw through the top and bottom bracket holes. Use a #2 Philips screwdriver to tighten the bracket against the side panel. Attach the second bracket using the same procedure.
Figure 2-1, Attaching Mounting Brackets to WorldDesk Commuter
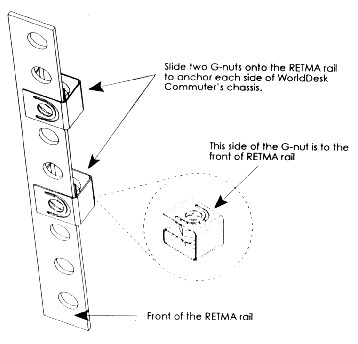
Attach the G-nuts to the RETMA rails as shown in Figure 2 -2. Make sure the holes are aligned so there is no obstruction.
Figure 2-2, Sliding G-nuts onto RETMA Rail
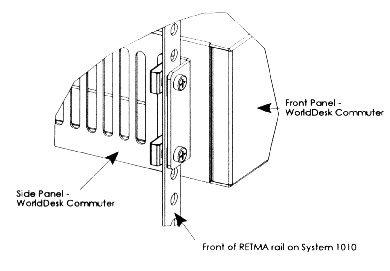
Align the mounting bracket's oblong cutouts with the G-nuts. Using a #2 Philips screwdriver and #10-32 mounting screws, tighten both brackets to the RETMA rails as illustrated in Figure 2 - 3.
Figure 2-3, Anchoring WorldDesk Commuter to the RETMA Rails
From the rear of the System 1010 cabinet, route WorldDesk Commuter's modem and LAN cables down the cabinet's right wall to the I/O end bracket providing the companion connector type.
Connect the modem cable to the I/O end bracket's internal connector.
Connect the LAN cable to the I/O end bracket internal connector.
Connect an additional length of cable to the I/O end bracket's external connector. Connect the other end to the LAN or an external device.
Figure 2-4, I/O Connector Panel Location on System 1010
Make sure the System 1010 and all peripherals connected to WorldDesk Commuter are powered on first.
Insert the AC power cord into WorldDesk Commuter's power receptacle. Plug the other end into the appropriate AC power source.
Refer to the appropriate WorldDesk Quick Start Guide for installation instructions and the WorldDesk System Administrator's Guide for configuration instructions.
This document, and all Web contents, Copyright © 1997 by Cubix Corp., Carson City, NV, USA.