|
|
|
|
Density 1200 System
Chapter 3 - Operation
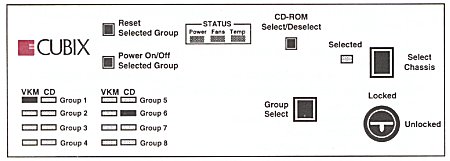
Front Console Controls
The front console controls of the Density Series system provide access to all processor selection and system alarm indicators. Additionally, the front console provides the
ability to reset individual groups without having to open the enclosure. "Group" refers to a group of slots on the backplane that are connected together and contain a SP or DP Series plug-in computer, thus comprising one computer in the system. The panel shown below is for 8 groups. Your panel may be slightly different.
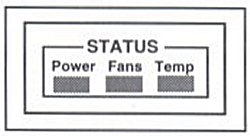
Status LEDs- Display Diagnostic information
Figure 11 Status LEDs |
Power - Green indicates that
the power supplies are functioning properly. Red indicates a failure of one of the power
supplies, or power supply fans. To find the faulty power supply, additional LEDs are
located on each power supply. Fans - Green indicates that the system fans (in the front, below the disk drives) are operating correctly. Red indicates a system fan failure. Temperature - Green indicates system temperature is within acceptable operating parameters. Red indicates system temperature has exceeded acceptable operating parameters. |
VKM and CD LEDs - Displays Group and CD-ROM selection information
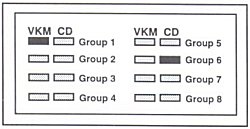 Figure 12 VKM and CD LEDs |
VKM LEDs display the group that
is currently selected for output to the video, keyboard, mouse, and floppy disk drive. The
LEDs also indicate the power status of the selected group. Green indicates power on, red
indicates power off. The CD LEDs display which group is currently selected for connection to the internal CD-ROM drive. The green LED will display on the group where the CD-ROM drive is assigned. Figure 12 shows group 1 selected for VKM output, and the internal CD-ROM connected to the processor board in group 6. |
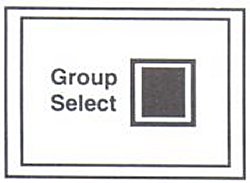
Group Select - Selects another group
Figure 13 Group Select |
The operator may use the Group Select
pushbutton on the front panel to choose which group will control the output to the
VKM. The group selected will be displayed under the VKM LED columns. The LED will be green
if the power to the group is on, red if the power is off. When a group is selected, its channel on the multiplexor is enabled, thus connecting the selected group to the monitor, keyboard, mouse, and floppy drive. Several of the other front panel operations apply only to the selected group. The Group Select pushbutton is disabled if the console is locked. |
Reset Selected Group
Figure 14 Reset Selected Group |
The Reset Selected Group
pushbutton is used to select a new group. This pushbutton is recessed to prevent
accidental resets. To reset a group depress the Reset Selected Group button using a
pointed object (such as a pen) to push the button. Next, use the Group Select button
to choose the new group. The VKM LEDs will indicate which group is selected. The Reset Selected Group pushbutton is operational only if the chassis is selected (selected group LED is on) and the console is unlocked. |
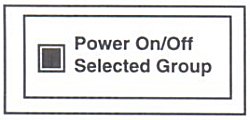
Power On/Off Selected Group
Figure 15 |
The power to individual groups may be turned on or off
via the Power On/Off Selected Group pushbutton. The pushbutton is
recessed to prevent a group from being unintentionally powered on or off. Use the Group Select button to select the group to power on or off. The VKM LEDs will indicate which group is selected. Use a pointed device (such as a pen) to press the pushbutton. The pushbutton functions as a toggle, turning power on if it is already off or turning power off if it is already on. The VKM LED for the selected group will indicate the power status; green if power is on, red if power is off. Pressing the Power On/Off Selected Group pushbutton applies power to or removes power from the selected group only. Other groups in the system are not affected. |
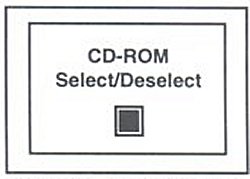
CD-ROM Select/Deselect - Assigns the CD-ROM drive to a group
Figure 16 CD-ROM Select |
The CD-ROM Select/Deselect
pushbutton allows you to assign the CD-ROM drive to an individual group. Use the Group Select button to select the group (the VKM LEDs will indicate which group is selected). When the proper group is selected, push the recessed pushbutton to assign the drive to that group. The CD LED will now be on (green) indicating that the CD-ROM drive is now assigned to that group. Note: The operating system for the selected group must have the proper CD-ROM drivers installed, and MUST be rebooted before it will see the attached CD-ROM drive. |
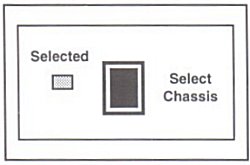
Select Chassis
Figure 17 Select Chassis |
The monitor, keyboard, and mouse may be shared by all
systems installed in a single Cubix cabinet . The Select Chassis pushbutton determines which system is enabled or disabled to control these devices. Only one system may be selected at a time. When a system is enabled, the muxed devices are under its control. In addition, the group reset and power on/off functions are operational, allowing a group to be reset or powered on or off via buttons on the console. The LED labeled "Selected" is illuminated when a system is selected. When a system is disabled, the muxed devices are not available to the system and the group reset and power functions are not operational. Note that a disabled system can access none of the muxed devices, including the floppy drive (to override this feature refer to the Mux Option Configuration, Table 2). Note that a system is also automatically disabled when another system that is sharing the muxed devices is enabled. |
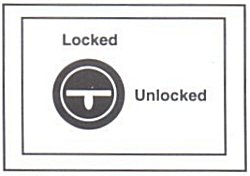
Console Key Lock
|
A Console Key Lock resides on the front panel (Figure 18). When locked, it disables video, keyboard and mouse control based on the Mux Option Switch settings (Table 2). |
This document, and all Web contents, Copyright © 2000 by Cubix Corp., Carson City, NV, USA.