BCVision
Chapter 2 - Installation
The IES Supervisory System software is provided on a 3.5" high density diskette.
The following software applications are provided:
Two Management Information Bases (MIBs) are also provided for use by CMS and other SNMP-compliant network management systems:
In addition, the following Novell files provide network communications and SNMP support. They must be installed on the BC Supervisor per the following instructions:
LSL.COM
IPXODI.COM or TCPIP.EXE
VLM.EXE
WSSNMP.VLM
WSTRAP.VLM
WSREG.VLM
WSASN1.VLM
MIB2IF.VLM
MIB2PROT.VLM (required for TCP/IP installations only)
STPIPX.COM or STPUDP.COM
Installation Instructions
1. If the subsystem to be controlled by the IES Supervisory System was not already equipped with an IES Supervisory System, install the IES hardware module. If the subsystem is an ERS II, refer to the installation instructions in the Series II Subsystem User’s Guide. If a SafeStor/FT, refer to the SafeStor/FT User’s Guide. Otherwise, refer to the IES Module Hardware Installation Guide. Repeat this procedure for each subsystem to be connected to the IES Supervisory System.
2. Connect the Cubix Data Highway to each subsystem with an IES. If an ERS II or an ERS/FT II, refer to the installation instructions in the Series II Subsystem User’s Guide. If the subsystem is a SafeStor/FT, refer to the SafeStor/FT User’s Guide. Otherwise, refer to the IES Module Hardware Installation Guide.
3. Connect the BC Supervisor to the Cubix Data Highway. If the subsystem containing the BC Supervisor is an ERS II or an ERS/FT II, refer to the installation instructions in the Series II Subsystem User’s Guide. Otherwise, refer to the IES Module Hardware Installation Guide.
4. Make a backup copy of the IES Supervisory System Diskette. Use this copy during installation, storing the original in a safe place.
5. Install the control software on each BC processor excluding the BC Supervisor. The software to be loaded depends upon the operating system installed on the BC as the following list indicates:
DOS - Load the BCSETUP.SYS device driver
OS/2 - Load the BCSETOS2.SYS device driver
NetWare - Load the BCACTIVE.NLM NetWare Loadable Module
WINNT - Load the BCACTVNT.SYS device driver
The control software is located on the BC Series Installation Diskette. Installation instructions are included in the BC Series Software Installation Guide.
Warning!
The Control software must be loaded on each BC processor connected to an IES before the automatic Cubix Processor Recovery (CPR) function is enabled. Once CPR is enabled, the IES resets any BC processor that is not running BCSETUP.SYS, BCSETOS2.SYS, BCAVTIVE.NLM, or BCACTVNT.SYS.
6. On the BC Supervisor, copy the following files from the IES Supervisory System Diskette onto the processor’s boot disk.
BCMASTER.EXE
BCVISION.EXE
BCVISION.DAT
BCVISION.HLP
IESFRMWR.BIN
7. If the BC Supervisor is to support network communications, copy the appropriate network driver onto the boot disk. While usually desired, network communications are not required by BCVision except to provide CMS and/or SNMP support.
8. If the IES Supervisory System is to be managed by CMS or another SNMP-compliant management application, SNMP support must be installed. To provide SNMP support for the IPX network communication protocol, follow the IPX Installation instructions in this chapter. To provide SNMP support for TCP/IP, follow the TCP/IP Installation instructions. Installation of SNMP support is optional.
9. Verify that all BC Series processors attached to an IES are running with the appropriate control software (BCSETUP.SYS, BCSETOS2.SYS, BCACTIVE.NLM, or BCACTVNT.SYS).
10. Run BCVision on the BC Supervisor as described for the protocol installed in the IPX Installation and TCP/IP Installation sections. Select OK in response to the Password prompt (no password is required until one is configured).
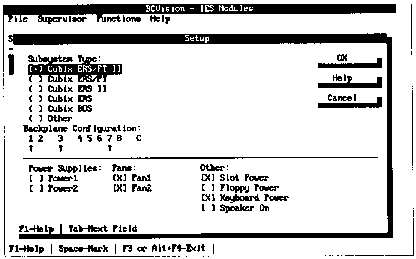
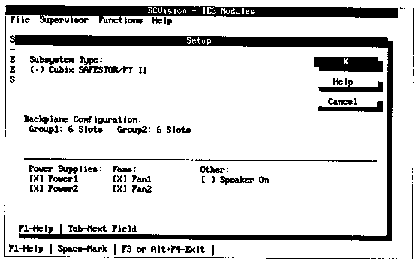
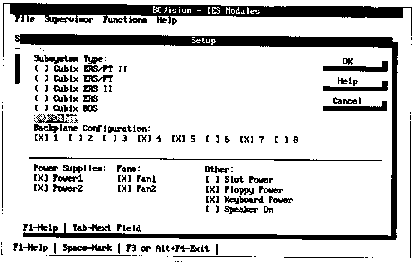
11. Configure the first subsystem connected to the BC Supervisor via the Cubix Data Highway. Select the Setup option from the Functions Menu. When prompted for the data highway identification number, enter the number (1 to 31) set during the hardware installation on the IES in the subsystem being configured. Depending upon the type of subsystem monitored by the specified IES, one of the screens illustrated in Figures 2 - 1 through 2 - 3 will be displayed.
Note! If BCVision cannot communicate with the desired IES, verify that the IES is connected to the Cubix Data Highway.

Figure 2-1
Configure ERS/FT II Subsystem

Figure 2-2
Configure SafeStor/FT II Subsystem

Figure 2-3
Configure Non-ERS/FT II Subsystems
12. If the subsystem being configured is a Cubix ERS/FT II, Figure 2 - 1 is displayed. The Backplane Configuration section is used to indicate the groups in use, where "C" represents the Custom Channel on the ERS/FT II multiplexor. The groups designated with an up-arrow correspond to groups that contain BC processors and are connected to the multiplexor. These fields cannot be modified. Proceed to step 13.
If the subsystem is a Cubix SafeStor/FT, Figure 2 - 2 is displayed. The backplane configuration is indicated in the SCSI Drive Groups display. The groups indicated as "in use", correspond to groups containing SCSI drive adapters. These fields cannot be modified. Proceed to step 13.
If Figure 2 - 3 is displayed, follow the steps 12a and 12b:
12a. Specify as the Subsystem Type. The subsystem type should appear on the front of the subsystem enclosure. Select the subsystem type from the list displayed.
12b. Specify the Backplane Configuration. Proper configuration of this field is based upon the type of subsystem. If the subsystem is a Cubix Branch Office System (BOS), mark the first five groups as "in use." Otherwise, this field defines the backplane configuration of the subsystem. Each subsystem may contain up to eight groups; therefore, the multiplexor in the subsystem contains eight sets of connectors (one for each possible group). Specify as "in use" the groups which correspond to the multiplexor connectors attached to a BC processor.
Refer to the explanation of the Setup function in the BCVision chapter for more information.
13. Verify the other configuration fields. Be aware that in the ERS, ERS/FT, and BOS subsystems, only lock rotor fans can be monitored. Since lock rotor fans are not always installed, the number of fans will default to zero in these subsystems. Change this number to reflect the number of lock rotor fans in the subsystem, if necessary. Note that the ERS II, ERS/FT II, and SafeStor/FT subsystems are equipped to monitor both lock rotor and non-lock rotor fans.
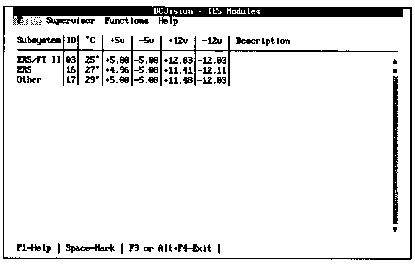
14. Each IES that has been configured will be displayed on a screen similar to Figure 2 - 4. Repeat steps 11 through 13 for each subsystem connected to the IES Supervisory System that is not displayed on this screen.

Figure 2-4
IES Status Screen
If an IES indicates a fault condition to the IES Supervisory System, the IES is displayed in red on this screen. To view the specific alarms causing a fault condition, use the arrow keys to highlight the red IES, and select the View IES Detail option from the Functions Menu. The current alarms for this IES will be displayed.
15. If CMS is not installed, select the Set SNMP Status Trap Rate option from the Supervisor Menu. Specify a refresh rate of zero. This disables the status trap intended for CMS from being generated by the BC Supervisor. If CMS is installed, do not set this rate to zero.
16. If desired, enter an appropriate name or description for each IES. Use the arrow keys to highlight the IES to be named, and select the View IES Detail option from the Functions Menu. To name or describe the highlighted IES you may enter up to 31 alphanumeric characters in the Description field.
Note! When naming the BC Supervisor include the keyword "Super" (case insensitve), in its Description field. BCVision automatically checks the Description field for this keyword and when found, prevents the processor from being placed offline.
17. If desired, synchronize the date and time in all of the subsystems with the date and time of the BC Supervisor. Select the Mark All option from the Functions Menu. Then select the Set Date and Time option from the same menu.
F
This feature is supported only if the IES in the subsystem contains a real time clock. An error message will be generated for each IES that does not support this feature. This error message may be ignored.18. If desired, enable the Cubix Processor Recovery (CPR) automatic reset function on some or all of the BC processors installed in each subsystem:
Repeat these steps for each IES containing BC processors requiring CPR configuration.
Warning!
The Control software must be loaded on each BC processor connected to an IES before the automatic Cubix Processor Recovery (CPR) function is enabled. Once CPR is enabled, the IES resets any BC processor that is not running BCSETUP.SYS, BCSETOS2.SYS, BCAVTIVE.NLM, or BCACTVNT.SYS.
19. Protect BCVision from unauthorized use by configuring a password. Select Set Password from the Supervisor Menu, and enter the password. The password will not be displayed on the screen. Enter the same password a second time for verification.
Warning!
Once a password is specified, BCVision will require the user to enter this password each time that BCVision is invoked. If the password is not entered correctly, BCVision will not run.
20. The system is now installed and configured. For more information on BCVision functions, refer to the BCVision chapter.
21. If desired, you may check the configuration for each subsystem and view the associated status screen. Use the arrow-keys to select the IES and press <Enter> to display the status screen.
For example, if checking the SafeStor/FT configuration. Use the arrow-keys to select the IES labeled "SafeStor" in the Subsystem field and press <Enter>. The SCSI Drive Status screen appears. Press <Esc> to toggle back to the IES Modules screen.
To configure IPX support on the BC Supervisor requires two products from Novell:
On the BC Supervisor workstation, install the Requester for DOS and Desktop SNMP. Several files plus those below are placed on the BC Supervisor’s disk drive. If using a Cubix hard disk drive pre-loaded with BCVision, the files within brackets are already installed on the disk.
LSL.COM
IPXODI.COM
[VLM.EXE]
[WSSNMP.VLM]
[WSTRAP.VLM]
[WSREG.VLM]
[WSASN1.VLM]
[MIB2IF.VLM]
[STPIPX.COM]
These Cubix files should already be installed:
BCMASTER.EXE
BCVISION.EXE
BCVISION.DAT
BCVISION.HLP
IESFRMWR.BIN
Once all files are in place, append the following sections to the NET.CFG file created by the Requester for DOS installation:
NetWare DOS Requester
USE DEFAULTS = OFF
VLM = WSSNMP.VLM
VLM = WSTRAP.VLM
VLM = WSREG.VLM
VLM = WSASN1.VLM
VLM = MIB2IF.VLM
Desktop SNMP
enable monitor community = any
monitor community = "public"
enable control community = specific
control community = "public"
enable trap community = specific
trap community = "public"
sysName = "IES Supervisory System v1.20"
sysLocation ="Company.City.Department"
sysContact = "Administrator 123.456.7890"
snmpEnableAuthenTraps = on
Transport Provider IPX
trap target = 00001234:000012345678
Where trap target must be the IPX address of the device that will receive the traps from BCVision. If CMS is installed, the trap target must be set to the address of the CMS console (more information on CMS installation).
The parameters sysName, sysLocation and sysContact are optional fields that may be included for display purposes.
To invoke BCVision using the IPX protocol, load the following programs in this order:
LSL.COM
<DRIVER.COM>
IPXODI.COM
VLM.EXE
STPIPX.COM
BCMASTER.EXE
BCVISION.EXE
Where <DRIVER.COM> is the network adapter driver for the adapter installed. The Management Console (identified as the trap target) will receive traps from BCVision if fault conditions exist. A SNMP browser may be used to supervise the IES System by compiling it with the Cubix MIBs (BC.MIB and IES.MIB).
TCP/IP support on the BC Supervisor requires two Novell products:
On the BC Supervisor workstation, install the LAN Workplace for DOS and Desktop SNMP. Many files plus those below are placed on the BC Supervisor’s disk drive:
LSL.COM
TCPIP.EXE
VLM.EXE
WSSNMP.VLM
WSTRAP.VLM
WSREG.VLM
WSASN1.VLM
MIB2IF.VLM
MIB2PROT.VLM
STPUDP.COM
These Cubix files should already be installed:
BCMASTER.EXE
BCVISION.EXE
BCVISION.DAT
BCVISION.HLP
IESFRMWR.BIN
Once all files are in place, append the following sections to the NET.CFG file created by the LAN Workplace for DOS installation:
NetWare DOS Requester
USE DEFAULTS = OFFVLM = WSSNMP.VLM
VLM = WSTRAP.VLM
VLM = WSREG.VLM
VLM = WSASN1.VLM
VLM = MIB2IF.VLM
VLM = MIB2PROT.VLM
Desktop SNMP
enable monitor community = any
monitor community = "public"
enable control community = specific
control community = "public"
enable trap community = specific
trap community = "public"
sysName = "IES Supervisory System v1.20"
sysLocation ="Company.City.Department"
sysContact = "Administrator 123.456.7890"
snmpEnableAuthenTraps = on
Transport Provider UDP
trap target = 123.45.678.90
Where trap target must be the IP address of the device that will receive the traps from BCVision. The parameters sysName, sysLocation and sysContact are optional fields that may be included for display purposes. Also, note that the LAN Workplace for DOS TCP/IP transport protocol uses the Ethernet_II frame type. If any other frame types are desired (i.e. Ethernet_802.3), add them to the Link Driver section of the NET.CFG file.
To invoke BCVision using only the TCP/IP protocol, load the following programs in this order:
LSL.COM
<DRIVER.COM>
TCPIP.EXE
VLM.EXE
STPUDP.COM
BCMASTER.EXE
BCVISION.EXE
Where <DRIVER.COM> is the network adapter driver for the adapter installed. The Management Console (identified as the trap target) will receive traps from BCVision if fault conditions exist. A SNMP browser may be used to supervise the IES System by compiling it with the Cubix MIBs (BC.MIB and IES.MIB).
If the management system in use is Novell’s NMS, TCP/IP support must be installed with IPX support (Novell’s NMS requires IPX support). To add TCP/IP support, install the LAN Workplace for DOS software on the NMS Console. Run the NMS setup utility and add TCP/IP support, specifying the TCP/IP software added by LAN Workplace for DOS.