 |
|
|
|
BC F Series
Chapter 3 - Hardware Installation
Hardware Installation
Installation in a Cubix Enclosure
PCI Extension - Overview and Installation
The BC F Series boards support PCI bus extension via the connection of an optional PCI bus extender card. The extender card, which connects to the 80-pin connector at location J16 on the BC board, extends the PCI bus to an ERS/FT II PCI Master Interconnect Board (MIB). When installed in the ERS/FT II subsystem, the ISA connectors on the BC board and the PCI connectors on the PCI bus extension card simultaneously engage the ISA and PCI connectors on the MIB. Note: the only subsystem supporting PCI extension is the ERS/FT II.
Two PCI extension cards are available, passive and active. The passive extension card is used on PCI MIBs with one or two PCI expansion slots. The active PCI extension card is equipped with a PCI-to-PCI bridge controller that extends the PCI bus to a maximum of four external controllers. The active PCI extension card is designed for use with MIBs having three to four PCI adapter slots for each BC F Series board installed. MIBs having fewer than three PCI adapter slots per BC installed will not support the active PCI extender card. Note: The only MIB supporting the active card is the 2x5 PCI + 2x2 ISA. For additional information on MIBs that support PCI bus extension, refer to "PCI MIB Configurations," in the documentation accompanying the Series II Subsystem. Both the active and passive PCI bus extender cards are illustrated on the following pages.
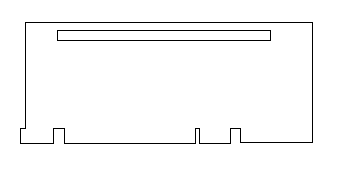
Figure 3-1 Active PCI Bus Extender Card
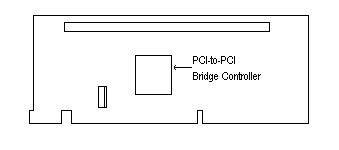
Figure 3-2 Passive PCI Bus Extender Card
PCI Bus Extender Card Installation
The PCI bus extender card is shipped with four #6 screws and two spacers. These parts are used to secure the extender card to the BC processor.
Figure 3 - 3 illustrates the location of parts referenced in the following instructions.
Installation Instructions:
Note: The ERS/FT II PCI MIB’s have dedicated bus master positions that accept BC boards equipped with the PCI bus extender card. Care should be taken to see that edge connectors on both the BC board and the extension card are properly aligned before inserting them into the MIB slots. For more detail on how to install the BC into the ERS/FT II subsystem and MIB configurations supporting PCI bus extension refer to the documentation that accompanied the ERS/FT II subsystem.
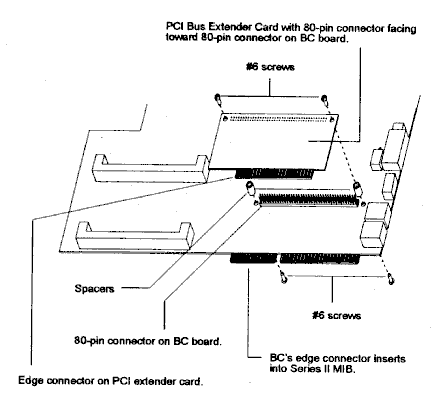
Figure 3-3
Connecting the PCI Bus Extender Card to the BC Processor Board
Optional Video, Keyboard & Mouse
The video, keyboard, and PS/2 style mouse signals are normally cabled from headers on the top of the BC board to a Cubix multiplexer where they are ultimately brought out to standard connectors and attached to a monitor, keyboard, and mouse. If a multiplexer is not used, Cubix can provide an optional adapter. This adapter is a printed circuit board and bracket that provide an interface between the BC headers and the Mini-DIN 6 and HD DSUB-15 connectors needed to connect a VGA monitor and PS/2 style keyboard and mouse. These optional connectors may be installed in an empty slot (where the end bracket of a board would normally be), or in the additional connector space of an auxiliary junction panel. Refer to "Peripheral Adapter Installation" for mounting instructions.
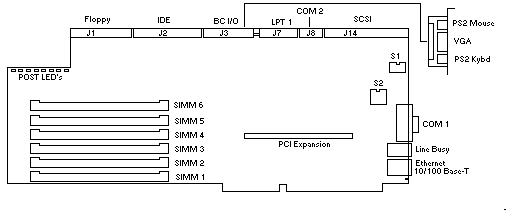
Figure 3-4
Video/Keyboard/Mouse Adapter Connected to the BC Processor
Optional LPT1
An optional parallel port may be added to function as LPT1 on the BC. This requires a Cubix LPT1 printed circuit board adapter and bracket which provide an interface between the BC header and the DB-25 connector. The optional connector may be installed in an empty slot (where the end bracket of a board would normally be), or in the additional connector space of an auxiliary junction panel. Refer to the Peripheral Adapter lnstallation section later in this chapter for mounting instructions.
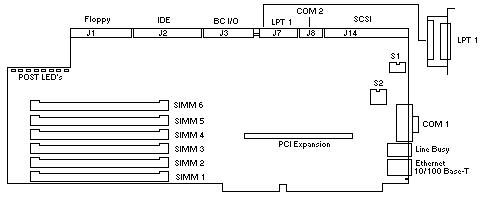
Figure 3-5
LPT1 Adapter Connected to the BC Processor
Optional COM2
An optional second serial port may be added to function as COM2 of the BC. Connecting COM2 requires a Cubix printed circuit board adapter and bracket, which provide an interface between the BC header and the DB-9 connector. The connector may be installed in an empty slot (where the end bracket of a board would normally be), or in the additional connector space of an auxiliary junction panel. Refer to the Peripheral Adapter Installation section later in this chapter for mounting instructions.
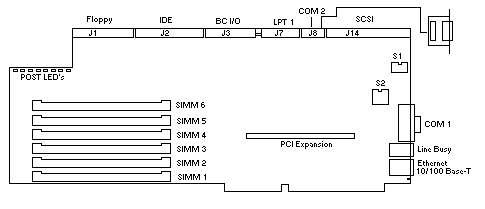
Figure 3-6
COM2 Adapter Connected to the BC Processor
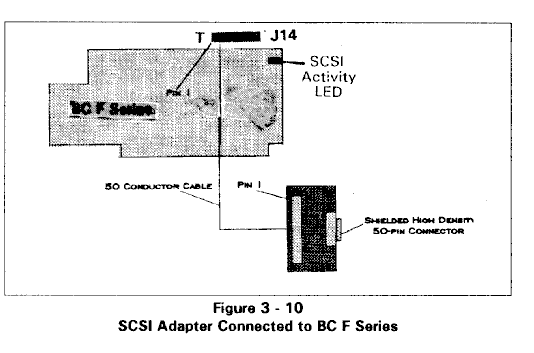
SCSI Device Installation
The BC F Series supports up to seven SCSI devices. These are connected via a 50-pin ribbon header (J14) located near the end bracket. Devices that are internal to the system enclosure may be cabled directly to J14 while devices external to the enclosure are connected via an adapter board that converts the 50-pin ribbon cable to a high density 50-pin shielded connector. Refer to the Peripheral Adapter lnstallation section later in this chapter for mounting
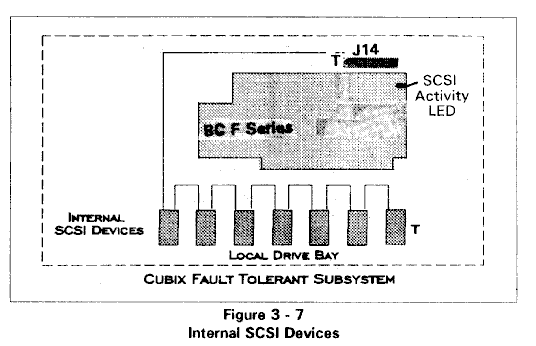
instructions. SCSI devices may be all internal (Figure 3-7), all external (Figure 3-8), or a mixture of internal and external (Figure 3-9).
Note! "T" indicates point of termination.
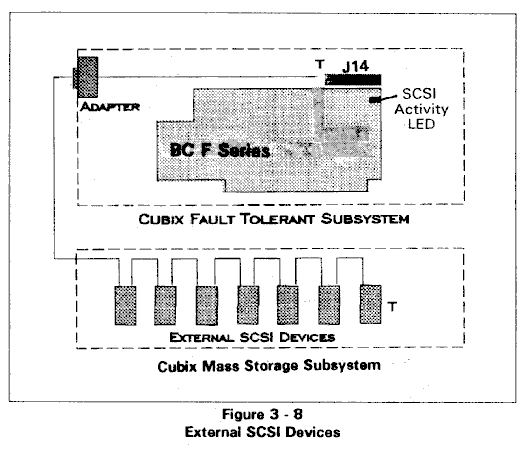
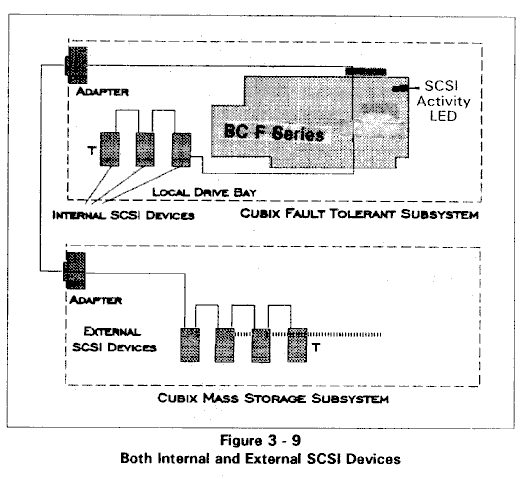
SCSI cables must be terminated at their end points as shown by the "T" in the illustrations. The BC F Series can be configured to supply termination at its connector (refer to Chapter 2).
Termination should be configured as "enabled" if the SCSI interface is not used. The last device on the SCSI cable must also supply a termination load to the cable. SCSI devices not at the end of the cable must have their termination loads disconnected. Enabling and disabling a SCSI device's termination may involve a switch or shunt setting or the installation or removal of resistive SIP or DIP packages on their circuit board. Consult the installation manual for the SCSI device to determine its termination options.
Peripheral Adapter Installation
Follow the steps below to install optional Cubix adapter boards for peripheral devices such as video, keyboard, mouse, and LPT1.
Alternately, if the adapter is being installed into a Cubix auxiliary junction panel, the bracket provided with the adapter should be removed. Unscrew the connector from the bracket and install the adapter into the desired panel opening.
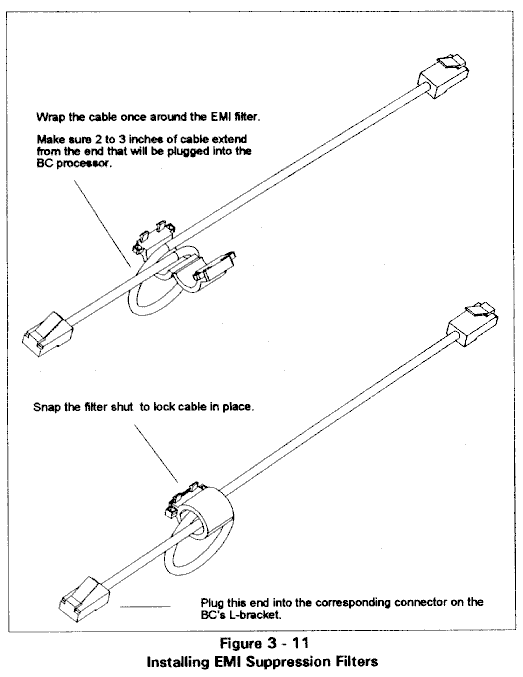
EMI Suppression Filter Installation
Installation Instructions:
Software Installation & Configuration
Overview
To fully utilize all of the features integrated into the BC Series processors, the following software drivers and utilities are available:
BC Series Software - support for mouse and Cubix Supervisory System.
Ethernet Drivers - support for the on board 10/100 Base-T Ethernet interface (refer to the appendices for installation instructions).
Video Drivers - support for enhanced video resolutions.
SCSI Drivers - support for the on board SCSI interface (refer to PC-SCSI Software Installation Guide for installation instructions).
BC Series Software Installation
This section summarizes the procedure necessary for installation of the BC Series Software Installation Diskette. The subsequent sections detail the software options dependent upon the operating system and environment.
The functions provided by the BC Series Software are:
Remote mouse and keyboard support - required when the BC processor is functioning as a remote control host for a remote system using a mouse and/or keyboard, and no mouse or keyboard is physically attached to the BC host processor.
Mouse multiplexer support - required if a single mouse is shared via a Cubix multiplexer between multiple BC processors.
Cubix Supervisory System support - required for BC processors installed with a Cubix Supervisory System.
BC Series Software
The BC Series Software is designed to support a Logitech mouse only. The BC Series Software Installation Diskette contains the following files in the specified directories:
README.DOC - describes the files on the diskette.
OS2\BCSETOS2.SYS - provides Cubix Supervisory System support for BC processors installed with the OS/2 operating system.
OS2\CBXMOUSE.SYS - a mouse driver required to support mouse multiplexing in OS/2 environments.
DOS\BCSETUP.SYS - includes both mouse and Cubix Supervisory System support for BC processors with DOS and WINDOWS installed. A mouse driver (e.g. Logitech's MOUSE.COM or Microsoft's MOUSE.EXE) must be loaded for BCSETUP.SYS to provide mouse support.
DOS\VHOTFIX.386 - provides mouse multiplexer support in WINDOWS environments. VHOTFIX.386 must be loaded with BCSETUP.SYS and a mouse driver to provide mouse support.
NETWARE\BCACTIVE.NLM - provides Cubix Supervisory System support for BC processors installed with Novell NetWare 3.x/4.x server software.
The term "boot drive" refers to the drive from which the BC Series processor will boot.
DOS Environment Installation
BCSETUP
The Cubix DOS device driver BCSETUP.SYS supports the Cubix Supervisory System by providing an interface between the IES module and a BC processor running DOS. BCSETUP.SYS also provides remote mouse and keyboard support as well as mouse multiplexer support.
A mouse driver (e.g. Logitech's MOUSE.COM or Microsoft's MOUSE.EXE) must be loaded for BCSETUP.SYS to provide mouse support.
To install this driver on disk drives formatted with the DOS operating system, copy the BCSETUP.SYS file from the \DOS directory of the BC Series Software Installation Diskette to the root directory of the boot drive. Next, add the following line to CONFIG.SYS file in the root directory of the drive:
device = bcsetup.sys
This sets the following defaults:
Remote Mouse Support Enabled
Mouse Multiplexer Support Enabled
Interrupt Selection 15
Keyboard Type 101/102 Keys
The following is a list of options that may be used with this command. Place them on same line in the CONFIG.SYS file. Command line options are not case sensitive.
Command Line Option Explanation
-n 83/84 key keyboard
-M disable remote mouse support
-nl disable mouse multiplexing support
-i=x or hook interrupt x (decimal) for the Cubix
-int=x supervisor interface, where x= 10, 15 or "no". The "i=no" option disables the supervisor interface support in BCSETUP and frees interrupts 10 and 15.
-ep enables BC processors equipped with a BC NET UART (e.g., BC F Series), to be monitored by an IES I (original) module when installed in an ERS II subsystem. To determine if an IES I module is installed in the ERS II subsystem, refer to the following section "How to Differentiate an IES I from and IES II Module."
Do not use the -ep command if an IES II (enhanced) module is installed in the ERS II subsystem.
Command Line Examples
For example, to load BCSETUP for an 83/84 key keyboard, without mouse emulation, and hooking interrupt 1 0 for the supervisor interface support, the command line in the CONFIG.SYS file would appear as follows:
device = bcsetup.sys -n -m -i = I0
All BC mouse software is designed to be used explicitly with Logitech PS/2 style mice. If non-Logitech mice are to be used, the command line option -nl should be entered in the config.sys file following the mouse emulation software filename:
device= bcsetup.sys -nl
The -nl option disables the synchronizing algorithms specific to Logitech mice. As a result, mouse multiplexing is not supported.
Finally, reboot the BC processor to allow the modifications in the CONFIG.SYS file to take effect.
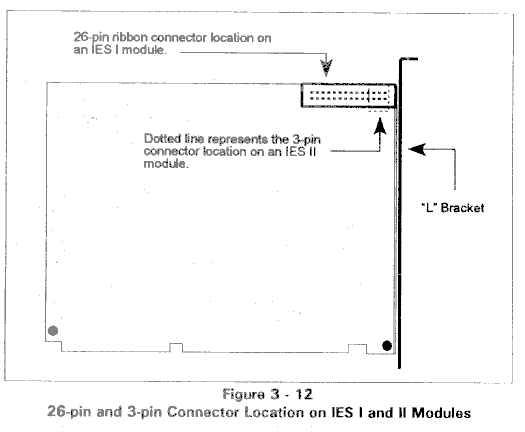
How to Differentiate an IES I Module from an IES II Module
To determine if an IES I module is installed in the ERS II subsystem, remove the subsystem’s cover and locate the IES module. As shown in Figure 3-12, either a 26-pin ribbon connector or a 3-pin molex connector will be located at the top of the board next to the "L" bracket. If the connector is a 26-pin ribbon connector, the module is an IES I. If a 3-pin molex connector, the module is an IES II.
Windows Environment Installation
VHOTFIX
The Cubix virtual device driver VHOTFIX.386 will "hot fix" a mouse in the Windows environment, allowing a mouse to function properly if it is attached locally to the BC processor after Windows is invoked, or if it is attached through a Cubix multiplexer and multiplexed to the BC processor after Windows is invoked.
To install this virtual device driver with Windows, first install BCSETUP as described in the DOS Environment Installation section. Locate the directory containing Windows virtual device driver files. They may be identified by their .386 extensions and are usually located in the \WINDOWS\SYSTEM directory. Copy the file VHOTFIX.386 from the \DOS directory of the BC Series Software Installation Diskette to the directory containing the other virtual device drivers. Modify the [386enh] section of the Windows SYSTEM.INI file (usually in the \WINDOWS directory) to include the line:
device = vhotfix.386
This program will function only if the device driver BCSETUP.SYS vl.10 or above is loaded in the CONFIG.SYS.
Finally, reboot the BC processor to allow the modifications to take effect.
Windows NT Drivers
Beginning with version 2.10, the BC Series Software Installation Diskette includes the following files required for Windows NT support:
WINNT\BCACTVNT.SYS - provides Cubix Supervisory System support for BC processors installed with the Windows NT operating system.
WINNT\CBXI8042.SYS - a mouse driver required to support mouse multiplexing in Windows/NT environments.
Installation
BCACTVNT
The Cubix device driver BCACTVNT.SYS supports the Cubix Supervisory System by providing an interface between the IES module and a BC processor running Windows NT.
Note: The device driver is now installed to provide Cubix Supervisory support using the default setting IRQ 0f (15 decimal). The following instructions show how to change to IRQ 0a (10 decimal) support.
To change the default IRQ setting:
CBXI8042
CBXI8042.SYS is a complete multiplexed mouse and keyboard device driver for BC Series processors running Windows NT. CBXI8042.SYS replaces the I8042PRT.SYS device driver file.
Note to User: These steps must be followed for the NT Mouse Driver to work properly.
OS/2 Environment Installation
BCSETOS2
The Cubix device driver BCSETOS2.SYS supports the Cubix Supervisory System by providing an interface between the IES module and a BC processor running OS/2.
To install this driver, copy the file BCSETOS2.SYS from the \OS2 directory of the BC Series Software Installation Diskette to the root directory of the boot drive.
Next, add the following line to CONFIG.SYS file in the root directory of the boot drive:
device = bcsetos2.sys
This will give the default option of interrupt 15 (decimal) for the Supervisor interface. If interrupt 1 0 is preferred, it must be specified on the same line in the CONFIG.SYS file. To load BCSETOS2 to use interrupt 1 0, the line in the CONFIG.SYS should appear as follows:
device= bcsetos2.sys -i = 1 0
If BCSETOS2.SYS is not specified in the CONFIG.SYS file, the BC will not support the Cubix Supervisory System and interrupts 1 0 and 1 5 are available for other uses.
Finally, reboot the BC processor to allow the modifications to take effect.
CBXMOUSE
The Cubix device driver CBXMOUSE.SYS provides mouse emulation and mouse multiplexer support for BC Series processors running OS/2 operating system.
To install this driver, copy the file CBXMOUSE.SYS from the \OS2 directory of the BC Series Software Installation Diskette to the \OS2 directory of the boot drive. Next, modify the CONFIG.SYS file in the root directory of the boot drive as follows:
remark out the line:
device = os2\mouse.sys
by placing "REM" in front of it, so that it reads:
rem device= os2\mouse.sys
add the line:
device = os2\cbxmouse.sys
CBXMOUSE.SYS is a fully functional mouse driver that replaces the MOUSE.SYS driver. CBXMOUSE.SYS loads PS/2 mouse support whether or not a mouse is physically present.
All BC mouse software is designed to be used explicitly with Logitech PS/2 style mice. If non-Logitech mice are to be used then the command line option -ni should be entered in the config.sys file following the mouse emulation software filename:
device= cbxmouse -ni
The -nl option disables the synchronizing algorithms specific to Logitech mice. As a result, mouse multiplexing is not supported.
Finally, reboot the BC processor to allow the modification in the CONFIG.SYS to take effect.
CBXMOUSE is intended for use in systems equipped with the Cubix multiplexer. If a mouse is to be shared by multiple OS/2-based processors via the multiplexer, the mouse must be booted on an OS/2 system (i.e. an OS/2-based processor must be selected by the multiplexer when the system is booted).
Windows 95 PS/2 Mouse Driver
This driver provides PS/2 mouse support on processors running Windows 95. If a Cubix mouse driver for Windows 95 was previously installed on a BC processor, the old files must be deleted before installing the new PS/2 mouse driver.
To Remove Old Cubix Windows 95 Mouse Driver Files:
To Install the Cubix PS/2 Mouse Driver for Windows 95:
Note: if using a keyboard instead of a mouse, use the Alt, Tab, Arrow, and Enter keys to move and to select the buttons and options referenced in the following steps.
Operating the Mouse after Installation
To ensure the mouse functions properly during normal operations, be sure to "power on" the system and initiate resets as described below:
Note: Avoid moving the mouse when selecting channels and do not switch channels while the processor reboots.
Resetting a Processor:
Before initiating a "reset," make sure the mouse is attached and its channel selected on the subsystem’s front panel. Also, make sure the processor loads into Windows 95. When the Windows 95 screen appears, the mouse should be functional. If the mouse does not work, disconnect then reconnect the mouse connector.
When powering up the subsystem:
When the subsystem is powered up, make sure at least one processor completes the boot process with the mouse attached and its channel selected. If the mouse does not work, disconnect then reconnect the mouse connector.
NetWare Environment Installation
BCACTIVE
BCACTIVE.NLM is a NetWare Loadable Module (NLM) that supports the Cubix Supervisory System by providing an interface between the IES module and a BC processor running NetWare 3.x/4.x. To install Cubix Supervisory support on a BC processor running NetWare, first install the BCSETUP.SYS device driver on the DOS partition as previously explained in the DOS Environment Installation section. Then install BCACTIVE. NLM on the NetWare partition.
To install the NLM on a BC processor functioning as a NetWare 3.X/4.x server, copy the file BCACTIVE.NLM from the NetWare subdirectory of the BC Series Software Installation Diskette to the SYSTEM subdirectory of the SYS volume of the NetWare server. Next, add the following line to the AUTOEXEC.NCF file on the NetWare partition:
load bcactive 15
This will load BCACTIVE.NLM with the default IRQ 15 configuration. Two interrupt levels are supported by the BC hardware: IRQ 1 0 and IRQ 15. If the IRQ 10 configuration is preferred, modify the load command as follows:
load bcactive 10
BCACTIVE must have a command line parameter specifying the IRQ and this must match the IRQ configuration of BCSETUP. BCACTIVE should not be loaded if BCSETUP is loaded without BC Supervisory System support (bcsetup.sys -INT= NO)
Video Drivers
Cubix currently uses the Cirrus Logic VGA video controller (CL-GD542X) on all BC F Series processor boards. This video controller is 100% VGA compatible and will run most VGA applications "out of the box." However, display drivers are available to improve the resolution for many software applications.
When used with text-based word processing applications, the display drivers improve text resolution, providing greater readability. In graphics applications, the drivers provide greater detail by supporting higher graphics resolutions.
If the BC is a remote control host, the enhanced resolution is often not desirable due to compatibility requirements between the host video and the video configuration on the remote PC.
Acquiring Additional VGA Drivers
There are currently five display driver diskettes produced by Cirrus Logic for the GD-542X chipset, as listed below:
DOS Drivers & Utilities
Windows 3.1 Drivers
OS/2 v2.x Drivers
OS/2 v2.x/Windows 3.x
Windows NT
Cirrus Logic releases new drivers and utilities about three times a year.
The display drivers are not shipped with the BC processor boards, but they may be obtained by employing any of the following four methods.
Method One
If a hard disk drive was purchased from Cubix with a BC Series board that included integrated software (DOS, Windows, etc.), the video drivers are included on the hard drive in the directory \util\vga.
Method Two
The following drivers are available on the Cubix Customer Support BBS:
K542X-Dl.ZIP DOS Drivers & Utilities
K542X-D2.ZIP Windows 3.1 Drivers
K542X-D3.ZIP OS/2 v2.x Drivers
K542X-D4.ZIP OS/2 v2.x/Windows 3.x
K542X-D5.ZIP Windows NT
542XUG.TXT CL-GD542X Drivers User Guide
IDCHIP.EXE Chipset Identifier Utility
The Cubix Customer Service BBS can be reached at 702-888-1003 (no parity, 8 data bits, 1 stop bit, 2400 baud and above).
Method Three
The drivers are available on the Cirrus Logic BBS. The phone number is 510-440-9080 (No parity, 8 data bits, 1 stop bit).
Method Four
For updates (diskettes and manual), call the Cirrus Logic Software Update Service. The phone number is 800-764-7200, Monday through Friday, 8:00am to 5:00pm Pacific Standard Time. There is a $25.00 charge for the kit, plus shipping and handling. Prices are subject to change at the discretion of Cirrus Logic, Inc.
This document, and all Web contents, Copyright © 1997 by Cubix Corp., Carson City, NV, USA.