BC 4035
Chapter 3 - Installation
Hardware Installation
Installation in a Cubix Enclosure
Optional Video Keyboard & Mouse
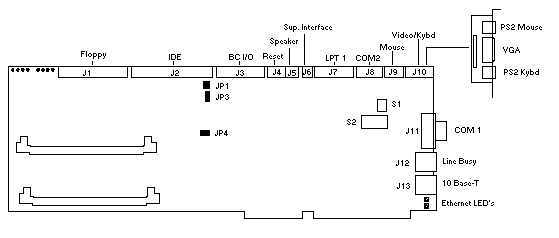
The video, keyboard, and PS/2 style mouse signals are normally cabled from headers on the top of the BC board to a Cubix multiplexor where they are ultimately brought out to standard connectors and attached to a monitor, keyboard, and mouse. If a multiplexor is not used, Cubix can provide an optional adapter. This adapter is a printed circuit board and bracket that provide an interface between the BC headers and the Mini-DIN 6 and HD DSUB-15 connectors needed to connect a VGA monitor and PS/2 style keyboard and mouse. These optional connectors may be installed in an empty slot (where the end bracket of a board would normally be), or in the additional connector space of an auxiliary junction panel. Refer to "Peripheral Adapter Installation" for mounting instructions.

Figure 3 - 1
Video/Keyboard/Mouse Adapter Connected to the BC Processor
Warning!
When header J10 or J3 of a BC processor installed in a Cubix Fault Tolerant subsystem is not connected to the multiplexor, this processor will not support the multiplexed floppy interface.
Optional LPT1
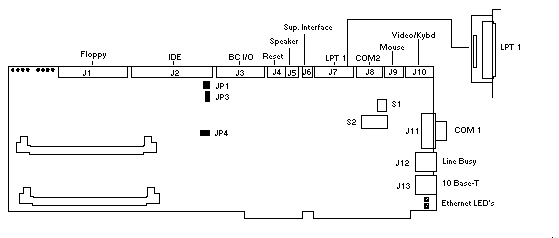
An optional parallel port may be added to function as LPT1 on the BC. This requires a Cubix LPT1 printed circuit board adapter and bracket which provide an interface between the BC header and the DB-25 connector. The optional connector may be installed in an empty slot (where the end bracket of a board would normally be), or in the additional connector space of an auxiliary junction panel. Refer to the Peripheral Adapter Installation section later in this chapter for mounting instructions.

Figure 3 - 2
LPT1 Adapter Connected to BC
Optional COM2 and Mouse
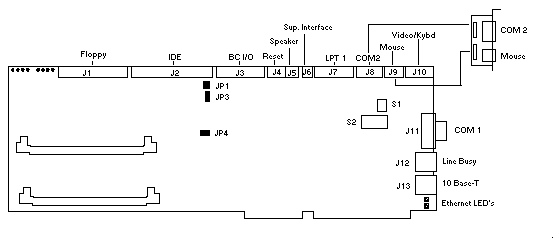
An optional second serial port may be added to function as COM2 of the BC. A PS/2 mouse input port may also be added. If the optional video, keyboard, and mouse adapter previously discussed will be installed, it is not necessary to include the mouse option on this adapter. Connecting COM2 and the optional mouse requires a Cubix printed circuit board adapter and bracket, which provide an interface between the BC header and the DB-9 and Mini-DIN 6 connectors. Both the COM2 and mouse interfaces are provided on the same adapter. These connectors may be installed in an empty slot (where the end bracket of a board would normally be), or in the additional connector space of an auxiliary junction panel. Refer to the Peripheral Adapter Installation section later in this chapter for mounting instructions.

Figure 3 - 3
COM2/Mouse Adapter Connected to BC
Peripheral Adapter Installation
Follow the steps below to install optional Cubix adapter boards for peripheral devices such as video, keyboard, mouse, and LPT1.
Warning!
Make sure the system is powered off and unpluged before beginning this procedure.
Software Overview
To utilize all of the features integrated into the BC 4035 Series processors, the following software drivers and utilities are available:
Cubix Mouse/Keyboard Multiplexing Software
The functions provided by the Mouse/Keyboard Multiplexing Software are:
AMD 10Base-T Ethernet Drivers
The AMD Ethernet Drivers are required if using the on-board Ethernet controller. The driver diskettes provided by Cubix contain the following Ethernet drivers:
Cirrus Logic Video Drivers
The Cirrus Logic Drivers may be required by some operating systems or application programs. The driver diskettes provided by Cubix contain the following video drivers:
Cubix Mouse/Keyboard Multiplexing Software Installation
DOS Environment
The Cubix DOS device driver CBXMOUSE.SYS provides mouse multiplexor support as well as remote mouse and keyboard support.
NOTE: A mouse driver (e.g. Logitech's MOUSE.COM or Microsoft's MOUSE.EXE) must be loaded for CBXMOUSE.SYS to provide mouse support.
To install this driver for use with the DOS operating system:
This sets the following defaults:
The following is a list of options that may be used with CBXMOUSE.SYS. Place options on the same line in the CONFIG.SYS file. Command line options are not case sensitive.
| Command Line Option | Explanation |
| -n | 83/84 key keyboard |
| -nl | Allows non-Logitech mice. Note that if this option is used, mouse multiplexing is not supported. |
Table 3-1
CBXMOUSE.SYS Command Line Options
All Cubix mouse software is designed to be used explicitly with Logitech PS/2 style mice. If non-Logitech mice are to be used, the command line option -nl should be entered in the config.sys file following the mouse emulation software filename:
device = cbxmouse.sys -nl
The -nl option disables the synchronizing algorithms specific to Logitech mice. As a result, mouse multiplexing is not supported. However, remote mouse support will still be available.
4. Reboot the Cubix processor to allow the modifications in the CONFIG.SYS file to take effect.
Windows 3.1x Environment
The Cubix virtual device driver CBXMOUSE.386 will allow a mouse to function properly if it is attached directly to the Cubix processor after Windows is invoked, or if it is attached through a Cubix multiplexor and multiplexed to the Cubix processor after Windows is invoked.
To install this virtual device driver with Windows:
Windows 95 Environment
The Cubix Windows 95 mouse driver provides PS/2 mouse support on Cubix processors running Windows 95.
To Install the Cubix PS/2 Mouse Driver for Windows 95:
Windows NT Environment
CBXI8042.SYS is a complete multiplexed mouse and keyboard device driver for Cubix processors running Windows NT. CBXI8042.SYS replaces the I8042PRT.SYS device driver file provided with Windows NT.
To install the Cubix mouse/keyboard driver for Windows NT, run the InstallShield setup program found in the \WINNT subdirectory of the Cubix Mouse/Keyboard Multiplexing Software diskette:
Follow the prompts provided by the Setup program to install the mouse/keyboard driver.
OS/2 Environment
The Cubix device driver CBXMOUSE.SYS is a fully functional mouse driver that replaces the OS/2 MOUSE.SYS driver. CBXMOUSE.SYS loads PS/2 mouse support whether or not a mouse is physically present.
To install the Cubix mouse driver for OS/2:
All Cubix mouse software is designed to be used explicitly with Logitech PS/2 style mice. If non-Logitech mice are to be used then the command line option -nl should be entered in the CONFIG.SYS file following the mouse emulation software filename:
device= cbxmouse -nl
The -nl option disables the synchronizing algorithms specific to Logitech mice. As a result, mouse multiplexing is not supported. However, remote mouse support will still be available.
Mouse/Keyboard Multiplexing Hints
The Cubix mouse drivers are intended for use in Cubix multiplexor subsystems. This section lists some hints for using the mouse/keyboard effectively.
Acquiring Additional or Updated Drivers
Please refer to the Cubix Customer Service information at the back of this manual
This document, and all Web contents, Copyright © 1997 by Cubix Corp., Carson City, NV, USA.