 |
|
|
|
QL 3002
Chapter 2 - Configuration & Installation
Configuration & Installation
Memory
Board Node Number
I/O Address
Reset on Loss of DCD or DSR
Install Board
This chapter explains how to configure and install a QL 3002 board. Unless otherwise specified, "QL 3002" refers to both the standard QL 3002 and the QL 3002CX. The "QL 3000 Series" includes the QL 3001 and QL 3002 products. The configurable options are:
	*	Memory
	*	Board Node Numbers (Default 2 and 3)
	*	I/O Address (Default 220 Hex)
	*	Reset on loss of DCD or DSR
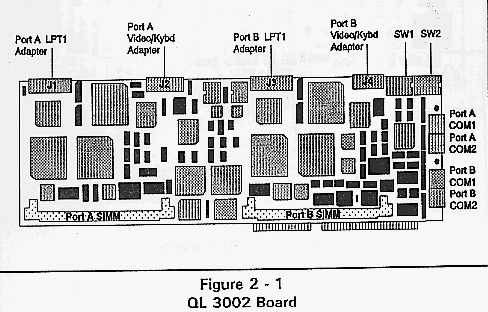
The boards also require an interrupt on the file server or bridge in which they are installed, and also a 16K shared memory window. Both the interrupt and the memory window are shared by all QL 3000 Series boards installed in the server or bridge. These options are software configurable, and are described in the QL 3000 Series Guide to Operations. Figure 2-1.
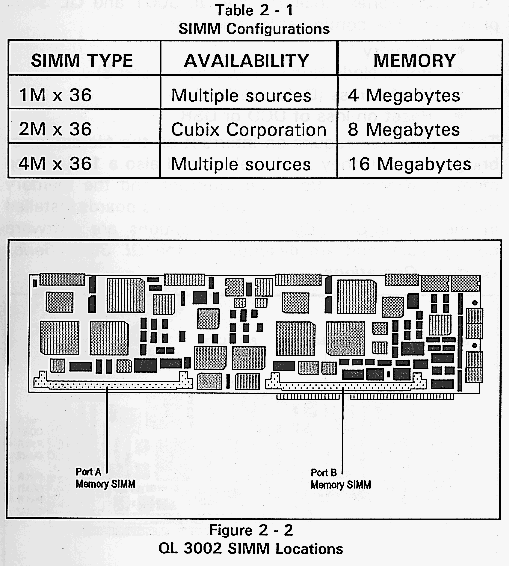
The QL 3002 is equipped with a minimum of 4 MB of RAM per processor. The QL 3002 RAM resides in standard PS\2 type 72pin SIMMs. One SIMM may be installed per processor. Available configurations are:
                    Table 2 - 1
	SIMM Configurations

 SIMM TYPE      AVAILABILITY      MEMORY

 1M x 36          Multiple sources     4 Megabytes

 2M x 36          Cubix Corporation   8 Megabytes

 4M x 36          Multiple sources    16 Megabytes
Figure 2-2, QL 3002 SIMM Locations.
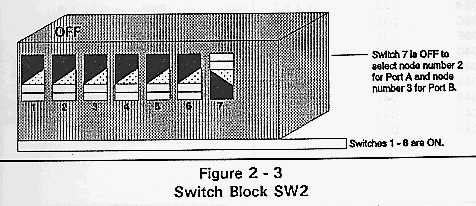
Each node on a Novell network must be identified by a unique address. This address consists of two parts: a network number and a node number. When the Cubix server driver is installed, it must be assigned a unique network number. Each QL 3000 Series node to be supported by the server driver must be assigned a unique node number. The node number is selected by a DIP switch (SW2) on the QL 3002 board. Valid node numbers range from 2 to 249. It is recommended that the QL 3002 node numbers be assigned consecutively beginning with node number 2 as this will maximize network performance.
The QL 3002 board uses a seven position DIP switch to select its node numbers. Since the QL 3002 contains two nodes, these seven switches determine the seven high order bits of the address for each node. The low order bit for the Port A node is assumed to be 0, while it is assumed to be 1 for the Port B node. A switch is OFF when its handle is away from the board. Figure 2-3 shows SW2 set to node numbers 2 and 3. Table 22 shows switch settings for all node numbers.
            	Table 2 - 2
	Node Number Switch Settings for Users


       #  | Switch SW2   | #  | Switch SW2   | #  | Switch
       SW2   |
      ------------------------------------------------------
      ------
      002 | 7       off  |052 | 2,4,7    off |082 | 1,7
      off  |
      004 | 6            |054 | 2,4,6        |084 | 1,6
      |
      006 | 6,7          |056 | 2,4,6,7      |086 | 1,6,7
      |
      008 | 5            |058 | 2,4,5        |088 | 1,5
      |
      ------------------------------------------------------
      ------
      00A | 5,7          |05A | 2,4,5,7      |08A | 1,5,7
      |
      00C | 5,6          |05C | 2,4,5,6      |08C | 1,5,6
      |
      00E | 5,6,7        |05E | 2,4,5,6,7    |08E | 1,5,6,7
      |
      010 | 4            |060 | 2,3          |090 | 1,4
      |
      ------------------------------------------------------
      ------
      012 | 4,7          |062 | 2,3,7        |092 | 1,4,7
      |
      014 | 4,6          |064 | 2,3,6        |094 | 1,4,6
      |
      016 | 4,6,7        |066 | 2,3,6,7      |096 | 1,4,6,7
      |
      018 | 4,5          |068 | 2,3,5        |098 | 1,4,5
      |
      ------------------------------------------------------
      ------
      01A | 4,5,7        |06A | 2,3,5,7      |09A | 1,4,5,7
      |
      01C | 4,5,6        |06C | 2,3,5,6      |09C | 1,4,5,6
      |
      01E | 4,5,6,7      |06E | 2,3,5,6,7    |09E |
      1,4,5,6,7    |
      020 | 3            |070 | 2,3,4        |0A0 | 1,3
      |
      ------------------------------------------------------
      -----|
      022 | 3,7          |072 | 2,3,4,7      |0A2 | 1,3,7
      |
      024 | 3,6          |074 | 2,3,4,6      |0A4 | 1,3,6
      |
      026 | 3,6,7        |076 | 2,3,4,6,7    |0A6 | 1,3,6,7
      |
      028 | 3,5          |078 | 2,3,4,5      |0A8 | 1,3,5
      |
     -------------------------------------------------------
     ------
      02A | 3,5,7        |07A | 2,3,4,5,7    |0AA | 1,3,5,7
      |
      02C | 3,5,6        |07C | 2,3,4,5,6    |0AC | 1,3,5,6
      |
      02E | 3,5,6,7      |07E | 2,3,4,5,6,7  |0AE |
      1,3,5,6,7    |
      030 | 3,4          |080 | 1            |0B0 | 1,3,4
      |
     -------------------------------------------------------
     ------
      032 | 3,4,7        |062 | 2,3,7        |0B2 | 1,3,4,7
      |
      034 | 3,4,6        |064 | 2,3,6        |0B4 | 1,3,4,6
      |
      036 | 3,4,6,7      |066 | 2,3,6,7      |0B6 |
      1,3,4,6,7    |
      038 | 3,4,5        |068 | 2,3,5        |0B8 | 1,3,4,5
      |
     -------------------------------------------------------
     ------
      03A | 3,4,5,7      |06A | 2,3,5,7      |0BA |
      1,3,4,5,7    |
      03C | 3,4,5,6      |06C | 2,3,5,6      |0BC |
      1,3,4,5,6    |
      03E | 3,4,5,6,7    |06E | 2,3,5,6,7    |0BE |
      1,3,4,5,6,7  |
      040 | 2            |070 | 2,3,4        |0C0 | 1,2
      |
     ------------------
     -----------------------------------------|
      042 | 2,7          |072 | 2,3,4,7      |0C2 | 1,2,7
      |
      044 | 2,6          |074 | 2,3,4,6      |0C4 | 1,2,6
      |
      046 | 2,6,7        |076 | 2,3,4,6,7    |0C6 | 1,2,6,7
      |
      048 | 2,5          |078 | 2,3,4,5      |0C8 | 1,2,5
      |
     -------------------------------------------------------
     ------
      04A | 2,5,7        |07A | 2,3,4,5,7    |0CA | 1,2,5,7
      |
      04C | 2,5,6        |07C | 2,3,4,5,6    |0CC | 1,2,5,6
      |
      04E | 2,5,6,7      |07E | 2,3,4,5,6,7  |0CE |
      1,2,5,6,7    |
      050 | 2,4          |080 | 1            |0D0 | 1,2,4
      |
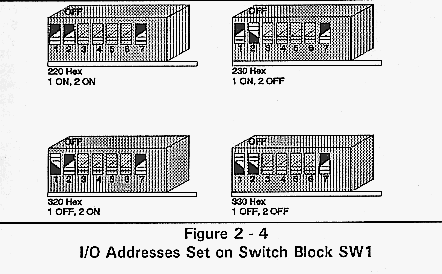
Each QL 3002 board houses a seven position DIP switch (SW1). Positions 1 and 2 select the base I/O address used by the server driver to communicate with the QL 3000 processors. The QL interface requires eight consecutive I/O ports beginning with the base I/O address.
The I/O addresses selected must not be assigned to any non QL 3000 Series devices installed in the file server or bridge hosting the QL 3000 Series boards. However, all of the QL 3000 Series boards installed in this host should have the same base I/O address. Figure 2-4, I/O Addresses Set on Switch Block SW1.
The QL 3002 is typically connected via a COM port to a modem performing remote communications over a telephone line. The COM port monitors the state of the Data Carrier Detect (DCD) or Data Set Ready (DSR) signals coming from the modem. The QL processors can be configured to perform an automatic hardware reset if DCD or DSR is dropped.
One practical usage of this feature is to force the QL processor to reset between remote sessions. This ensures users that they are connecting to a newly initialized system. It also verifies that users are properly disconnected from the network when their session terminates (i.e., a user will not remain logged into NetWare after "hanging up" the phone).
Depending upon the system configuration, either DCD or DSR will indicate that the telephone signal connection is established and that the modem is ready. Most configurations support DCD. However, if a multiplexer is installed between the QL 3002 COM port and the modem, it may be necessary to monitor DSR instead. Refer to the multiplexer manufacturer's documentation for this information. The QL 3002 contains a seven position DIP switch (SW1) that configures this feature.
            	Table 2 - 3
	        Switch Block SW1

 Switch     Description     Switch set    Switch set
 Number                       ON              OFF

            Selects COM
    3       port for both      COM1          COM2
            processors.

            Selects
    4       signal to be        DCD           DSR
            monitored for
            both
            processors.

            Enable/Disable
    5       reset on           Enable        Disable
            processor B.

            Enable/Disable
    6       reset on           Enable        Disable
            processor A.


*	Position 7 should always be in the ON position.
        It is used by manufacturing test only.
  	                Table 2 - 4
	Switch Block SW1 Switch Configurations

 Description                 Switch Number

                                                 3     4
                                                 5     6
Reset Disabled Processor A                       --   --
OFF   OFF
Reset Disabled Processor B

Reset on COM1 Loss of DCD Processor A            ON   ON
ON    OFF
Reset Disabled Processor B

Reset on COM2 Loss of DCD Processor A            OFF  ON
ON    OFF
Reset Disabled Processor B

Reset on COM1 Loss of DSR Processor A            ON   OFF
ON    OFF
Reset Disabled Processor B

Reset on COM2 Loss of DSR Processor A            OFF  OFF
ON    OFF
Reset Disabled Processor B

Reset Disabled Processor A                       ON    ON
OFF   ON
Reset on COM1 Loss of DCD Processor B

Reset Disabled Processor A                       OFF   ON
OFF   ON
Reset on COM2 Loss of DCD Processor B

Reset Disabled Processor A                       ON    OFF
OFF   ON
Reset on COM1 Loss of DSR Processor B

Reset Disabled Processor A                       OFF   OFF
OFF   ON
Reset on COM2 Loss of DSR Processor B

Reset on COM1 Loss of DCD Processor A            ON    ON
ON    ON
Reset on COM1 Loss of DCD Processor B

Reset on COM2 Loss of DCD Processor A            OFF   ON
ON    ON
Reset on COM2 Loss of DCD Processor B

Reset on COM1 Loss of DSR Processor A            ON    OFF
ON    ON
Reset on COM1 Loss of DSR Processor B

Reset on COM2 Loss of DSR Processor A            OFF   OFF
ON    ON
Reset on COM2 Loss of DSR Processor B
The QL 3002 boards must be installed in the file server or an external bridge or router. If the file server or bridge/router already contains QL 3000 Series boards, and the QL software does not need to be updated, simply follow the instructions below to install the new boards. For all other cases, a complete software installation should be performed. Refer to the QL 3000 Series Guide to Operations.
* Before installing the QL 3002 boards, configure the memory, node numbers, I/O address, and reset on loss of DCD or DSR options as previously described in this chapter.
To install the boards:
	*	Ensure all boards in the server or bridge are idle.
	*	Perform an orderly shutdown of the server or bridge.
	*	Power down the server or bridge.
	*	Remove the access cover to the bus slots.
	*	Seat the QL 3002 board into a 16bit slot in the
	computer and secure with a screw.
                        Repeat for each QL 3002 board to be
                        installed.
	*	Replace the computer's cover.
	*	Apply power to the server or bridge.
	*	Boot the file server or external bridge.  Be sure
	that the system loads all of the selected
                        LAN drivers, and connects properly
                        to the server.
This document, and all Web contents, Copyright © 1997
by Cubix Corp., Carson City, NV, USA.