 |
|
|
|
MP 2008/2208
Appendix C - Line Busy Module Installation
Overview
When a server fails (for example, due to a power failure), the DTR signal from the server to the modem will be off (indicating that the DTE is not ready). In such cases, the modem will not answer incoming calls. If the dial in call is received via the telephone network, a modem on the failed server may ring indefinitely, thus blocking other modems from taking the call.
To resolve this problem, it is necessary to present a busy signal on the telephone connection for modems connected to servers that are not ready to accept incoming calls. When the telephone system senses that the line is in use, it automatically routes the call to the next non-busy line in the group. Hence, calls can be automatically rerouted to a functional server.
To provide this capability without sacrificing the ability to use off-the-shelf modems, Cubix offers an external eight-port line busy module.
The line busy module connects to the serial connector between the server* and the attached modems. It also connects to the telephone cables between the telephone network and the modems. When a non-ready server is detected, the line busy module causes the telephone line to be busy, thus blocking incoming calls and rerouting them to a functional server.
Each line busy module supports up to eight serial COM port connections and can be either rack mounted or installed as a table top unit. When rack mounting, make sure the cabinet supports 19-inch RETMA standards. Instructions for both installations are included in the following sections.
*For the sake of demonstration,"server" used within this document is a BC Series Processor with up to 15 MP adapters housed in a Cubix subsystem.
The WorldDesk System Administrator’s Guide discusses the line busy feature in relation to WorldDesk products.
Cables
The following procedure assumes you have at least one MP Series board installed in an Cubix enclosure. Before continuing, make sure the following cables are available:
Standard
The following cables are required and supplied by Cubix:
Line Busy and Telco
"Line busy" and "telco" cables are required to connect the line busy module to the modem’s RJ-11 phone and telco connections. One line busy and one telco cable is required for each external modem connection (up to eight are supported.) These cables are not shipped as part of the standard line busy package; however, you may order them from Cubix. Contact our sales department for assistance.
Figure C-1 shows the 78-pin and RJ-11 (line busy) connector locations on the Eight-port Line Busy Module. Figure C-2 shows how the line busy module connects to the MP adapter and external modems via the cables described in the previous sections.
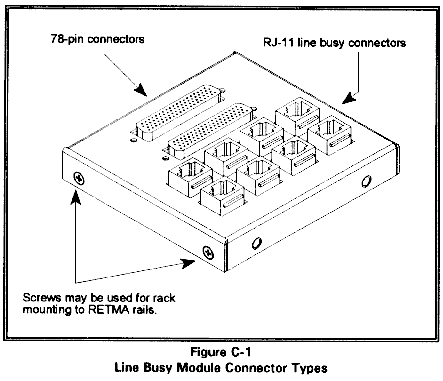
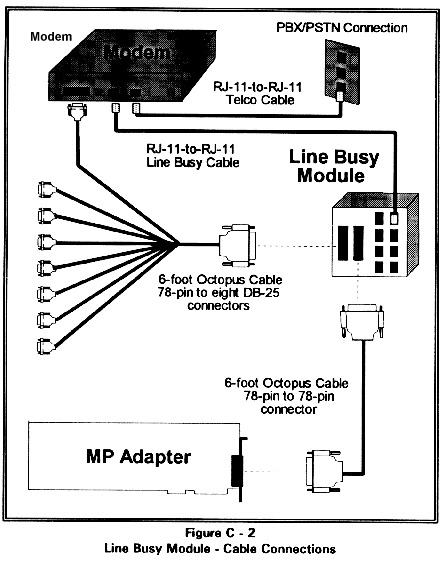
Table Top Installation
Before beginning, make sure that besides the eight-port line busy module and standard cables, the following items are available:
Procedure
Before you continue, make sure the MP adapters are installed and the subsystem in which they reside is powered off. Also make sure the modems to which the line busy module is to be connected are powered off.
Cabinet Installation
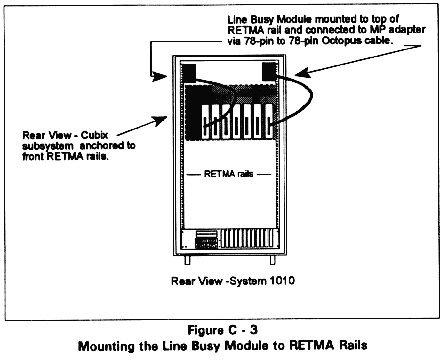
The following instructions assume the line busy module is being rack mounted in a System 1010 rack mount cabinet (along with the Cubix subsystem containing the MP adapters). If not, make sure the rack mount cabinet used complies with 19-inch RETMA standards. A maximum of two line busy modules may be mounted to a Cubix subsystem. (See Figure C-3 for placement.)
Before beginning, make sure that the Cubix subsystem and MP adapters are installed. In addition to the eight-port line busy module and standard cables, make sure the following items are available:
Procedure
This document, and all Web contents, Copyright © 1997 by Cubix Corp., Carson City, NV, USA.